Reviving a G1900

Hugo Habicht

Active member
Lifetime Member

Equipment
G1900
Jun 24, 2024
195
227
43
Ireland
On mine for tacho I opened the alternator and traced the AC signal with my little pocket O/Scope. Once I had the proper square wave I soldered everything up. I'd LOVE to have an actual instrument panel like that though
Typically that is the way to get a tacho signal from a Diesel engine. But I thought the v-belt has slippage and wear, so it may not be precise. Well, to be honest, it is precise enough, did I mention "over the top" already? :)

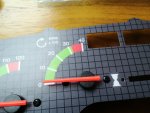
Modifying the instrument panel is actually not that difficult. I scanned in the original front panel and made a design placing the new instruments, which are 12V instruments for cars bought on Aliexpress, I only used the inside.
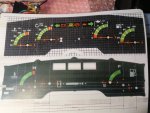
IMG_20241113_181318.jpg

Then I got the design printed professionally as an overlay, made a new front panel using the old as a template and glued the overlay on. The needles are from Aliexpress for "scooters" and they are very close to the Kubota originals.
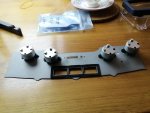
IMG_20250121_194611.jpg

IMG_20250121_194640.jpg

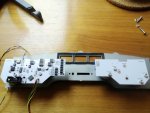
I have PCBs at the back (for some extra functions) but you can run wires as easily.
IMG_20250121_195405.jpg

I did not modify any of the plastics enclosure, so everything can be brought back to original. The extra cables required can go out through the hole under the hour counter.

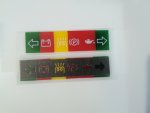
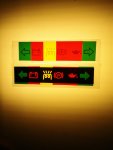
I have not decided about the lamps (that I doubled up) if I leave the Kubota G1900 style with white print and coloured background or the symbol lighting up coloured, I think the latter is almost better when lighting.
IMG_20241218_125506.jpg

IMG_20241218_125812.jpg
 
Last edited:
  • Wow
Reactions: 1 user

lmichael

Well-known member

Equipment
Kubota G2160
Apr 23, 2021
643
283
63
Rockford IL area
That is some absolutely amazing work. Maybe I can get my son in law to do me up some 3D printing. I'd love to not have my gauges just "attached" all over. And have them actually built in like that.
 
  • Like
Reactions: 1 user

Hugo Habicht

Active member
Lifetime Member

Equipment
G1900
Jun 24, 2024
195
227
43
Ireland
Radiator Plug

when draining the coolant the radiator plug broke off without applying any force.

IMG_20250121_180709.jpg

A new plug is $7.35 so not a major investment but what is the point spending money on something that will fail again?

So I decided to make my own. When drilling a hole for a screw extractor the broken off part fell into the radiator and was easy to shake out.

IMG_20250122_115808.jpg

The thread is M10x1.25mm which seems to be the G1900 standard thread found pretty much everywhere :) I made a plug from brass and modified it for an O-ring 10x2.5mm instead of the original flat gasket.

IMG_20250122_115817.jpg

I believe I will not see problems with this plug.
 
Last edited:
  • Like
Reactions: 1 users

Hugo Habicht

Active member
Lifetime Member

Equipment
G1900
Jun 24, 2024
195
227
43
Ireland
Radiator repairs

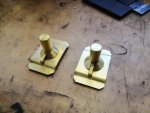
The bonnet / hood is sitting on top of the radiator on two rubbers. One of them was missing, including the holder. So I made a new one plus a spare in case the other side goes missing.

IMG_20250123_110304.jpg

IMG_20250123_110224.jpg

Soldered it onto the radiator and also soldered the left side bracket that had come loose.

IMG_20250123_140607.jpg

A pair of new rubbers made from 30mm round EPDM material, shore 60.

IMG_20250123_140545.jpg

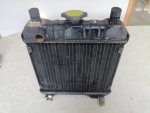
And, together with the new drain plug, the radiator is good to go into the tractor again.

IMG_20250123_140653.jpg
 
  • Like
Reactions: 2 users

Hugo Habicht

Active member
Lifetime Member

Equipment
G1900
Jun 24, 2024
195
227
43
Ireland
Oil dipstick

The rubber seal of the dipstick had shrank and it was a bit loose in the engine. Made a new rubber seal from NBR material, shore A 70. Diameter at seal is 7.4mm. Glued onto dip stick with super glue. Sits nice and tight now.

IMG_20250124_134534.jpg

IMG_20250124_141334.jpg
 
  • Like
Reactions: 1 user

Hugo Habicht

Active member
Lifetime Member

Equipment
G1900
Jun 24, 2024
195
227
43
Ireland
Corrosion

Some parts that I got electroplated received a few layers of paint; weather was favourable.

IMG_20250203_153946.jpg

And since the silencer was off already I thought it is a good time to address the exhaust system corrosion. Manifold came off including the small heat shield.

IMG_20250202_165842.jpg

Sandblasted everything

IMG_20250202_180712.jpg

Chemical rust removal / phosphate layer

IMG_20250203_105109.jpg

Nice grey phosphate layer, picture does not show that properly but nicely visible at the welds of the silencer.

IMG_20250203_125533.jpg

And heat resistant coating

IMG_20250203_154056.jpg
 
Last edited:
  • Like
Reactions: 1 user

Hugo Habicht

Active member
Lifetime Member

Equipment
G1900
Jun 24, 2024
195
227
43
Ireland
Rubber parts

Most rubber parts are still very good, so I just cleaned them and softened them a bit.

IMG_20250202_084249.jpg
 
  • Like
Reactions: 1 user

Hugo Habicht

Active member
Lifetime Member

Equipment
G1900
Jun 24, 2024
195
227
43
Ireland
Electrical

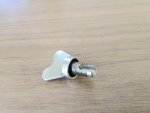
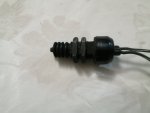
my brake switch is faulty, so I bought a second hand one

IMG_20250131_193454.jpg

Cleaned it up a bit, cleaned and softened the rubber gaiter. In the mean time the switches I had bought in China arrived, they look very similar to me and for 14 quid a piece an alternative worth testing. Only connector has to be changed. Strangely enough they are advertised as "ignition switch", found them through a picture search. Amazing that the search found those. Top: chinese switch, bottom: used switch (cleaned).

IMG_20250203_153210.jpg

I took the generator apart. Slip rings and brushes are within specification but ordered new ones as spares for future use. I also ordered new bearings, they are toast, they have to be replaced.

IMG_20250202_163507.jpg

Cleaned the aluminium enclosure.

IMG_20250203_114532.jpg

Have to wait for the bearings now before I can assemble it again.
 
Last edited:
  • Like
Reactions: 1 user

Hugo Habicht

Active member
Lifetime Member

Equipment
G1900
Jun 24, 2024
195
227
43
Ireland
Accelerator and PTO clutch bowden wires

The accelerator wire outer part had been replaced already but I got all parts cleaned and electroplated. The PTO clutch wire plastic sleeve was frayed badly and crumbling away:

IMG_20250131_192756.jpg

So I removed the sleeve, removed a few rusty spots with a wire brush and chemically removed rust and created a phosphate layer.

IMG_20250204_121110.jpg

A bit of corrosion protection wax and new sleeving added. Made a new nippel, inserted the greased wire and assembled everything with the electroplated original parts.

IMG_20250204_183534.jpg

Same with the accelerator wire. I made two stepped washers to center the spring.

IMG_20250204_193324.jpg

In the mean time the spray painted parts are drying in the living room in the sun. The parts are heating up to about 30°C (86°F) and hence the curing / drying process should be 4 times faster than in the workshop. Want to assemble everything again by Friday.

IMG_20250204_094300.jpg
 
Last edited:
  • Like
Reactions: 1 user

Hugo Habicht

Active member
Lifetime Member

Equipment
G1900
Jun 24, 2024
195
227
43
Ireland
Amazing work! I'm impressed on the work done to make a vastly improved instrument cluster!
Thank you very much !
Lets see if the instruments work now once I have the new boards built. The parts arrived a bit late due to the storm...

Nice work there!
Thank you very much, still a lot of work left. But the tractor is working and cutting the grass and I repair it bit by bit.
 
Last edited:
  • Like
Reactions: 1 user

lmichael

Well-known member

Equipment
Kubota G2160
Apr 23, 2021
643
283
63
Rockford IL area
Truly a wonderful labor on a fine machine. I know it makes me feel good to hear my G2160 fire up. Love the sound of that little 3 banger
 
  • Like
Reactions: 1 users

Hugo Habicht

Active member
Lifetime Member

Equipment
G1900
Jun 24, 2024
195
227
43
Ireland
Truly a wonderful labor on a fine machine. I know it makes me feel good to hear my G2160 fire up. Love the sound of that little 3 banger
The G2160 is very similar to the G1900, basically the newer model with more horsepower, isn't it?

I hope to get mine back together again tomorrow and, weather permitting, cutting the grass on Saturday.
 

lmichael

Well-known member

Equipment
Kubota G2160
Apr 23, 2021
643
283
63
Rockford IL area
The G2160 is very similar to the G1900, basically the newer model with more horsepower, isn't it?

I hope to get mine back together again tomorrow and, weather permitting, cutting the grass on Saturday.
I honestly am little clueless on that. The story of my G2160 is a little comical. My first foray into garden tractors was with an old Allis Chalmers B10. All beat to hell, blown head gasket, bad rod knock, burning enough oil to not see the tractor when it was running. I did a full teardown of it to the frame. Ended up replacing the engine with a brand new cast iron B&S Commercial 16 hp single cyl. Rebuilt the PTOs, steering, electrical system, mower deck. Sanded and repainted it from the frame out. Back when I had the S/N the local dealer told me they believed it was between a 61-64. I ended up selling it and all the accessories I'd accumulated (snow blower, plow blade, belly grader, rototiller, various hitches and such.
But at that time I was exposed to a Kubota and just loved that little diesel and it's "sound". Swore someday I had to get one. Well, time goes on, I'd had the AC for about 30 years and found parts to rebuild the mower deck were nearly non-existent. So, I sold it and ended up with a smaller but pretty cool Honda 4514. Little 2 banger water cooled and it ran like well "a Honda" smooth, quiet, fuel sipper. Honestly all the machine I really needed.
But, a few years ago, perusing FB Marketplace, I see an ad for this G2160 with the magic words "diesel engine". After some cajoling wife said go look at it. It was a little beat up but low hours, good engine, and bones. So, wife allowed me to buy it. Seller even knocked off $200 and delivered it to my front door from close to 90 miles away.
Wasn't without need of plenty of work. Faded paint, headlights, non working power steering, messed up electrical system, filthy cooling system, mouse nests.
I got some things repaired right away. Power steering right off. Which wife appreciated, because when my allergies act up and kick in my COPD, she gets pressed into service.
In the end I did a partial restoration on it, (repaint, used brush on bed liner in place of rubber mat, lots of other things. Mods to electrical system as well, retrofitted very bright LED headlights inside the original housings which I polished.
Bottom line I have my Kubota and a nice machine. A bit too much with the 60" deck (would love to trade someone for the 54"). But, it is a nice machine. And my oldest granddaughter LOVES it. Taken this past October. She's 3 1/2 and wears her papa out. Her little sis hasn't warmed up to it yet :D
20241012_150622.jpg 20241012_150629.jpg 20241012_150633.jpg
 
  • Like
Reactions: 2 users

Hugo Habicht

Active member
Lifetime Member

Equipment
G1900
Jun 24, 2024
195
227
43
Ireland
Yes, I agree, nothing like a Diesel engine.
Power steering is seriously cool although I have to say I find the steering easy enough. So far :giggle:
 
  • Like
Reactions: 1 user

Hugo Habicht

Active member
Lifetime Member

Equipment
G1900
Jun 24, 2024
195
227
43
Ireland
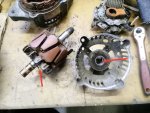
D722 Generator Disassembly

Since the generator was off already now is the time to check and repair it. This is how it is done:

Loosen the nut at the pulley with a 22mm ringspanner, holding the pulley or the shaft with a 10mm nut. Take pulley and ring off.

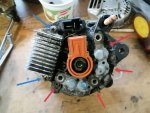
Now take the three bolts out holding the cover (orange arrow) and take off the battery terminal nuts (green arrow) and the insulating black spacer. Take off the cover.

IMG_20250209_123722.jpg

Take off the four bolts for the winding connections (red) and the two bolts for the regulator (blue).

IMG_20250209_123857.jpg

Bend up all four stator wires and straighten them.

IMG_20250209_123932.jpg

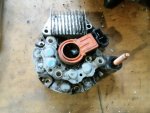
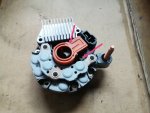
Take off the regulator / brush / rectifier assembly.

IMG_20250201_142013.jpg

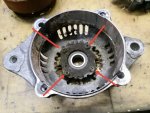
Take off the two nuts and two bolts (red) and pull apart the two halves. The shaft should slide out the front bearing.

IMG_20250209_124029.jpg

Take out the bolts (red) of the front bearing holding plate, take off the plate and push out the bearing.

IMG_20250209_124153.jpg

Press out the rotor from the rear bearing holding the housing. Take care not to drop the rotor and to retain the cover washers at the back and before the bearing (red).

IMG_20250209_124305.jpg

Now we have a lot of parts lying on the workbench :)

I cleaned eveything up before checking and reassembly.
 
Last edited:

Hugo Habicht

Active member
Lifetime Member

Equipment
G1900
Jun 24, 2024
195
227
43
Ireland
D722 Generator Checking

The first thing is to ceck the bearings for play or wear or uneven running. Replace if necessary. The front bearing is a 6202-2RS type 15x35x11mm and the rear bearing is 15x32x11mm. Workshop manual says to replace only with original Kubota "high speed" bearings. Mine were toast so I bought bearings from SKF / FAG.

Next we check the stator resistance and insulation. With an Ohmmeter measure the resistance between each winding (yellow) and the centre point (blue). The resistance should be under 1 Ohm each. Then measure the resistance between the windings (any yellow or blue) against the frame (green). This should be infinite resistance.

IMG_20250209_133526.jpg

The rotor resistance is measured between the two slip rings (yellow) and should be around 2.9 Ohm. Also measure the insulation between the winding (yellow) and the rotor frame (green) which should be infinite.

IMG_20250209_133632.jpg

The slip ring diameter is 14.4mm (0.567") when new and the wear limit is 14.0mm (0.551"). Mine was within specification so I left it alone.

Brushes wear over time and the length new (measured as per picture) is 10.5mm (0.413") when new and the wear limit is 4.5mm (0.177"). Mine were fine but I ordered slip rings and brushes as spares.

IMG_20250209_134557.jpg

The rectifier consists of 8 diodes. To measure them use a multimeter that has a diode forward voltage function or otherwise use a kOhm range. Each diode should be measured in forward and reverse direction, so evey diode to stator connection point (green) should be measured against ground (blue) and battery (red) in both directions. Forward voltage should be around 0.5V and all diode voltages should be similar. When using the kOhm range forward resistances should be similar.

Screenshot_20250209_130058.jpg IMG_20250209_130201.jpg

The voltage regulator can be tested properly using a fairly complex setup, I refer to the workshop manual for that. A simple test is to measure resistance in each direction between terminals F and B (red). In one direction it should conduct, in the opposite the resistance should be infinite.

Screenshot_20250209_135827.jpg IMG_20250209_130252.jpg
 
Last edited:
  • Like
Reactions: 1 user