L4150 Repair Restore

RCW

Well-known member
Lifetime Member

Equipment
BX2360, FEL, MMM, BX2750D snowblower. 1953 Minneapolis Moline ZAU
Apr 28, 2013
9,135
5,194
113
Chenango County, NY
Cisco - no advice, but wanted to say I really enjoy following your progress.

Best wishes getting it straight and right….:cool:

Thanks.
 
  • Like
Reactions: 1 users

CiscoRanger

Active member
Lifetime Member

Equipment
L4150DT / BF900
Oct 3, 2022
254
130
43
Texas
Cisco - no advice, but wanted to say I really enjoy following your progress.

Best wishes getting it straight and right….:cool:

Thanks.
Thank you RCW. I appreciate it!!
 
  • Like
Reactions: 1 user

CiscoRanger

Active member
Lifetime Member

Equipment
L4150DT / BF900
Oct 3, 2022
254
130
43
Texas
Update: The used hard oil lines came in today. @Nicksacco thank you again for locating those. They’ve seen some use for sure and someone was a little rough when they pulled them off the donor but I got them installed. I like how they fit tucked in between the bell housing and subframe mount. No rubbing on the throttle or brakes like the hoses did:

1665862834000.jpeg


1665862872853.jpeg


They shift MUCH smoother too. Diameter of the hard line is a fair amount bigger then the 1/4” hoses. No leaks after a test run. The fittings are compression that Had mated to another machine. Normally I wouldn’t reuse those. But some teflon tape on the leading edge of the compression part did the trick. Some folks don’t recommend that. Not sure why it wouldn’t work. Time will tell.

Spent a little more time on the electrical testing today. The fuel cutoff solenoid is good, but the timer is bad. The relay is stuck it seems.

1665863187772.jpeg


I removed it and gently beat on it to see if it would free up. And it did for a few times, but then quit again. The part is $200 to replace so I may have to live with the manual cutoff for now.

Alternator checks good, and I’m halfway through the voltage regulator test. Pretty sure the hazard flasher is toast.

Since we aren’t leaking oil or anything anymore I moved it into the new shop. We are supposed to get some rain tonight and tomorrow. Y’all say a prayer for it, or do a rain dance, or pray while Rain dancing. 🤣

1665863636942.jpeg


May get back out there later. Will see what the “boss” has planned for me. 🤠
 
  • Like
Reactions: 2 users

TheOldHokie

Well-known member
Lifetime Member

Equipment
L3901/LA525, B7200DT/B1630, G2160/RCK60, G2460/RCK60
Apr 6, 2021
8,735
4,477
113
Myersville, MD
windyridgefarm.us
Update: The used hard oil lines came in today. @Nicksacco thank you again for locating those. They’ve seen some use for sure and someone was a little rough when they pulled them off the donor but I got them installed. I like how they fit tucked in between the bell housing and subframe mount. No rubbing on the throttle or brakes like the hoses did:

View attachment 88856

View attachment 88857

They shift MUCH smoother too. Diameter of the hard line is a fair amount bigger then the 1/4” hoses. No leaks after a test run. The fittings are compression that Had mated to another machine. Normally I wouldn’t reuse those. But some teflon tape on the leading edge of the compression part did the trick. Some folks don’t recommend that. Not sure why it wouldn’t work. Time will tell.

Spent a little more time on the electrical testing today. The fuel cutoff solenoid is good, but the timer is bad. The relay is stuck it seems.

View attachment 88858

I removed it and gently beat on it to see if it would free up. And it did for a few times, but then quit again. The part is $200 to replace so I may have to live with the manual cutoff for now.

Alternator checks good, and I’m halfway through the voltage regulator test. Pretty sure the hazard flasher is toast.

Since we aren’t leaking oil or anything anymore I moved it into the new shop. We are supposed to get some rain tonight and tomorrow. Y’all say a prayer for it, or do a rain dance, or pray while Rain dancing. 🤣

View attachment 88859

May get back out there later. Will see what the “boss” has planned for me. 🤠
I had a shop just like that once right down to the insulation. Now its so full you can hardly move around and the floor is oil stained.....

Dan
 
  • Like
Reactions: 3 users

PoTreeBoy

Well-known member
Lifetime Member

Equipment
L35 Ford 3930
Mar 24, 2020
2,805
1,522
113
WestTn/NoMs
Spent a little more time on the electrical testing today. The fuel cutoff solenoid is good, but the timer is bad. The relay is stuck it seems.

View attachment 88858

I removed it and gently beat on it to see if it would free up. And it did for a few times, but then quit again. The part is $200 to replace so I may have to live with the manual cutoff for now.
That part number may have been superceded. Denso 061700-3771 may be a replacement. You can find it for $60 or so.

Can you get into the old one and replace the relay?
 

CiscoRanger

Active member
Lifetime Member

Equipment
L4150DT / BF900
Oct 3, 2022
254
130
43
Texas
That part number may have been superceded. Denso 061700-3771 may be a replacement. You can find it for $60 or so.

Can you get into the old one and replace the relay?
Oh cool thanks. I’ll check that out. No, unfortunately they’ve got that Epoxy stuff pretty much all over it all.
 

CiscoRanger

Active member
Lifetime Member

Equipment
L4150DT / BF900
Oct 3, 2022
254
130
43
Texas
Update: Still going through the electrical procedures in the WSM. Found more modifications made due to the switch issue. a couple of ground circuits also cut off at the harness. The hazard unit is indeed toast but just about any flasher should work as a replacement. The stop relay is toast. Looks like Po’s find mIght work tho (thanks!). And thankfully the voltage regulator, fuel sender and alternator check out fine.

I also made my way through all the sensors And they all check out too. got the new Vacuum sensor installed on the suction line. It’s not pulling the vacuum I’d expect from the ohm readings. We’ll see how it does when I get the suction line o-rings and rubber sleeve changed out.

The biggest challenge for the electrical (besides the previous mechanic) is the dash. Outside of the starter and lights, everything electrical has to do with the dash and it’s just not in great shape. The gauge needles are missing and the lights are old style twist on the circuit board.

1665893436756.jpeg


1665893519445.jpeg


chased my tail on this for an hour or two. Just not good solid connections anymore. I considered drilling holes in the plastic light caps and putting led’s in there, using the wires instead of the board. Given the state of the gauges I’m also considering getting rid of this and doing a flat dash with a gauge kit.

Be interested in what people think.

And here’s the small victory for today (hazard lights). Goodnight y’all!


1665894042052.jpeg
 

Nicksacco

Well-known member

Equipment
Kubota L35 TLB, 2014 RTV-1140CPX
Sep 15, 2021
679
386
63
Bahama, NC
Wow! Good stuff!
I'm so glad you got the pipes and sorted out the electric! Excellent!
Funny, my tractor's key switch didn't work either and once I got to the electrical portion of the work I found out a standard relay was used - no timer at all! Ya gotta love used and abused equipment. :LOL:

@PoTreeBoy 's tip is a good one. I hope it works out for you.

When I look at the components of your machine, there are many similarities/parts to my L35 - oh yea, it's a Kubota but still...

On the dash, I guess I got lucky; Though nothing was working, nothing was missing either. Just years of crud and ugliness and such. And how about that circuit board used eh? Believe it or not, my 2003 Trailblazer's dash is made in a very similar way.

You say needles are missing from the dash's gauges. There are places that rebuild gauges and/or you could perhaps find some pointers that will work (if the gauge still works). I guess it all depends if you care about OEM look or not - either way it's your machine and choice (y)

On my motorcycle restorations, I found places where you can buy parts or they do the work for you. Just an idea.

Once you get into these decisions, you can try using tape or paper or even hands from an old clock as a pointer to let you know if the existing gauge actually works.

On the L35 the gauges are built with an internal voltage regulator (on motorcycles I've done, the VR is a separate unit). I'm guessing guages are matched to the sensor resistances. So if you replace everything in dash, you might have to replace sensors to be compatible with new gauges. Maybe someone who's done this has some ideas.

I found these looking for "Tractor Gauge Repair": Don't know if they can help but might be worth a call.


1665910260420.png


1665910887053.png


1665911010847.png
 
  • Like
Reactions: 1 user

MountainMeadows

Well-known member

Equipment
L2501, JD 655, Ford 841, JD 6x4 Gator, Gravely 432.
Jun 6, 2022
222
302
63
Poconos, PA
Great work on your L4150 Cisco!

Following along on your tractor resurrection and Cisco being such a small town, I have to wonder, might you have known Jack Kisner? He was the kind of character that would be hard to miss in a small town.
 
  • Like
Reactions: 1 user

CiscoRanger

Active member
Lifetime Member

Equipment
L4150DT / BF900
Oct 3, 2022
254
130
43
Texas
Great work on your L4150 Cisco!

Following along on your tractor resurrection and Cisco being such a small town, I have to wonder, might you have known Jack Kisner? He was the kind of character that would be hard to miss in a small town.
Hey MM. I don’t think so. We’ve only been in the area for about 5 years. 2.5 full time. I don’t get out that much either so we don’t know a lot of folks outside our neighbors. Probably should get out and meet more people.
 

TheOldHokie

Well-known member
Lifetime Member

Equipment
L3901/LA525, B7200DT/B1630, G2160/RCK60, G2460/RCK60
Apr 6, 2021
8,735
4,477
113
Myersville, MD
windyridgefarm.us
Great work on your L4150 Cisco!

Following along on your tractor resurrection and Cisco being such a small town, I have to wonder, might you have known Jack Kisner? He was the kind of character that would be hard to miss in a small town.
Maybe he needs a new handle

1665937401194.png
 
  • Like
Reactions: 1 users

MountainMeadows

Well-known member

Equipment
L2501, JD 655, Ford 841, JD 6x4 Gator, Gravely 432.
Jun 6, 2022
222
302
63
Poconos, PA
Hey MM. I don’t think so. We’ve only been in the area for about 5 years. 2.5 full time. I don’t get out that much either so we don’t know a lot of folks outside our neighbors. Probably should get out and meet more people.
Jack passed on about 5 years ago but I'm sure if he was still around you would have noticed him or heard mention of him. He was a friend of mine, when I lived in Sundown. He was originally from Cisco and had moved back about 15 years ago. Quite the character well known by all in a small town environment.
 
  • Like
Reactions: 1 user

CiscoRanger

Active member
Lifetime Member

Equipment
L4150DT / BF900
Oct 3, 2022
254
130
43
Texas
Jack passed on about 5 years ago but I'm sure if he was still around you would have noticed him or heard mention of him. He was a friend of mine, when I lived in Sundown. He was originally from Cisco and had moved back about 15 years ago. Quite the character well known by all in a small town environment.
Im sorry I never got the chance to meet him. And I’m sorry about the loss of your friend. I’ll ask my neighbor about him.
 
  • Like
Reactions: 1 user

CiscoRanger

Active member
Lifetime Member

Equipment
L4150DT / BF900
Oct 3, 2022
254
130
43
Texas
Update: ok, so where to start. I guess with the gauges. Since the bulbs werent making good connections I had an idea, at least for a test. I took a couple of pieces of wire just to use as "Brushes" for the bulbs contacts...

1665968192952.jpeg


It worked pretty well and we actually ended up with some dash lights...

1665968244582.jpeg


It was great to see those finally, however, it was still intermittent. As soon as I started to pick up the dash the lights went out. Went round and round with them and at the end of the day, the plug is not making good contact with the pins either.

1665968559425.png


I can test the wires all day long and they are good and the circuit performs as expected. But not the connection to the board, or the board to the lights. Not sure how easy or hard it will be to get into those plugs. After that discovery I set it aside. Still seriously considering using LED indicator lights on the original dash, and connecting directly to the wires. Will do some more thinking on it.

So, more dash related stuff. I reinstalled the thermostat, and tested the coolant gauge on the dash. It actually functioned well, getting up to halfway and holding there. And going back down as the engine cooled. There's a little nub of needle left, not sure if you can see it very well in this pic.

1665968996471.png


Fuel gauge...I originally thought the fuel low sensor worked because the light came on and the fuel was low, but after I filled the tank halfway with diesel, it still didn't go out. The fuel gauge is also not working (or the sender isnt) because the gauge never moved from half. I think the sender unit as a whole is bad...when i went through the gauge test procedure, the result was as expected...but the sender unit test failed.

From there I pretty much tested every circuit front to back. The oil pressure sensor, I checked while not running, then while running, etc. Through all the circuits. Everything is wired up in the harnesses to the dash/key/lights switch/Fuse panel as it should be now. So on to the headlights...

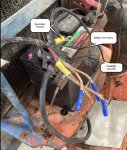
This is what we were starting with. (as a side note I dislike battery retaining bars that are on the same side as the terminals. so I flipped the battery, cleaned off the frame and main ground lead, and moved the lead to the left side. ...back to the headlights...) The wiring diagram shows 5 wires up front. Secondary circuit ground (not frame ground), ground for headlights, battery low wire, low beam, and high beam.

1665969788415.jpeg


I was figuring out my approach because I wanted to leave the original wire colors showing if at all possible. So I started de-looming the wires...and this...the headlight grounds were just a "V'd" wire taped into the harness going nowhere. bizarre.

1665970429054.png


Anyway, glad I de-loomed it. Got the lows and highs wired up and....

1665970194291.jpeg


With that done, everything Electrical from the firewall forward has been tested (except the glow plugs) so I put harness 1 and 2 back together. I still need to make them pretty, I'm just not sure how they are routed from the factory. Especially the harness going around the radiator. I'll finish the loom at the firewall when those two harnesses are ready to go together. And the blue and white plug in the middle of the right harness is the coolant reservoir sensor...but since there is no reservoir...

1665970865918.jpeg


And the left side... That blue and white plug is the "Fusible link". Glad this half is done...

1665970961620.jpeg


That's it for the evening...Have a great week ahead everyone... 🤠
 

Attachments

Last edited:

Nicksacco

Well-known member

Equipment
Kubota L35 TLB, 2014 RTV-1140CPX
Sep 15, 2021
679
386
63
Bahama, NC
Cisco, you have inadvertently fallen into "the creative wiring zone"!
But it appears you've gotten most of it figured out in spite of "the zone".

Maybe I've missed it, but wanted to mention the front axle. Definitely give it a check for oil/condition of oil there.
I drained about a cup from each side during my restoration and it was thick and black. Lucky I was that this lack of care didn't ruin the guts of the axle. As I recall, every seal on the thing was useless.

As for the dash, whatever you do, don't try solder on the circuit board. Those copper tabs on the light sockets don't look too bad from here - are they corroded and broken off? Is the plastic toast?

I was wondering if you could add a drop of solder with a needle tip iron to the socket's circuit board contacts? Then you could file the drop down to adjust tightness. Also, add a bit of dielectric grease.

As for the multi-pin socket - what is the condition of the contacts? can you bend them back to be tighter around the pins? Is there some kind of bracket that holds the socket to the board? It appears that there is the ole' typical "bend a piece of metal around the wire" thing. Well better than nothing - add some heat shrink to it

Curious to know what you find on the tank gauge. Hopefully the sensor is fine and just gunked up. Sometimes the float sinks! I'm always surprised during this discovery phase!


1665990393821.png


1665990806822.png
 
  • Like
Reactions: 1 user

MountainMeadows

Well-known member

Equipment
L2501, JD 655, Ford 841, JD 6x4 Gator, Gravely 432.
Jun 6, 2022
222
302
63
Poconos, PA

Nicksacco

Well-known member

Equipment
Kubota L35 TLB, 2014 RTV-1140CPX
Sep 15, 2021
679
386
63
Bahama, NC