Fixing hole in side of block

joesmith123

Active member

Equipment
L295DT, BX1500
Mar 18, 2023
487
100
43
earth
Found new machine shop and dropped off the block that needs milling,

told the guy doing it:
he get big tip if done within a month

Got a good feeling about this shop


20240904_115908.jpg


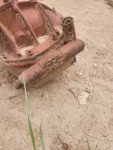
Heavy duty post hole digger, goal: hit the broken weld with grinding wheel, weld on a new hinge

20240904_121302.jpg


I point to stuck hinge, tried soaking in diesel, hit it with torch, won't budge

This hinge being stuck broke the weld

20240904_120222.jpg


2nd big task: now that engine is in motion to be milled, this is the head from that engine, there is warping that you will see clearly once cleaned, also it did have bent valves etc, it will need some parts to make perfect

Goal: plane it well using some diy, level out burned area, go through clean it with abrasives of all kind, rebuild for later on

20240904_120237.jpg


Another task: try to use that tool that pulled out pilot bearing, to

Finangle that tool on these connecting rods and try to remove damaged wrist pin bushing with new wrist pin bushing

now i go try remove those wrist pin bushings

20240904_123831.jpg


Setup trying to pull bushing

Spray with diesel, hit with torch aiming at the connecting rod

20240904_124702.jpg


Underneath, teeth gripping

20240904_125111.jpg


2nd attempt

20240904_125713.jpg


Did not work, caused damage to bushing

Not the right tool for the job


Video showing you why this tool not correct

Leave that task alone, wait til I get better setup, go rebuild that old head with 2500 hours
 

Attachments

Last edited:

joesmith123

Active member

Equipment
L295DT, BX1500
Mar 18, 2023
487
100
43
earth
Rebuilding head with 2500 hours


20240904_134908.jpg
20240904_134916.jpg
20240904_134942.jpg
20240904_135002.jpg
20240904_142013.jpg


Leveled ground with rake, cleaned up table get ready to rebuild head

Pictures of it

Last picture: exact setup for pushing down springs, left hand pushing down tie rod separator, right hand with pik removing the holder, wear glasses

Finally got the valves out, they were stubborn, very stuck

20240904_150401.jpg

20240904_150414.jpg
20240904_150432.jpg
20240904_150439.jpg

20240904_150456.jpg


The smaller holes are fully clogged on all 3

The valves with the pitting metal were most seized, most stubborn

Now: hit all sides of block with abrasives soaked in diesel, experiment with the flap disc sanding
 
Last edited:
  • Like
Reactions: 1 user

fried1765

Well-known member

Equipment
Kubota L48 TLB, Ford 1920 FEL, Ford 8N, SCAG Liberty Z, Gravely Pro.
Nov 14, 2019
7,778
4,975
113
Eastham, Ma
  • Haha
Reactions: 1 user

ejb11235

Well-known member

Equipment
BX23S, Braber BBR4G 4' Box Blade & LRM5G 5' landscape rake
Jan 20, 2022
450
324
63
Seattle, WA, USA
@joesmith123 Glad you wore glasses during the valve removal. That's quite an ingenious setup you used to compress the valve springs. I don't know if it's frowned upon, but there's also a technique there you put a socket down on the valve and give it a hit with a mallet. Sometimes that will cause the keepers to fall out. But probably better to do what you did and keep it controlled.
 
  • Like
Reactions: 1 user

MountainMeadows

Well-known member

Equipment
L2501, JD 655, Ford 841, JD 6x4 Gator, Gravely 432.
Jun 6, 2022
220
300
63
Poconos, PA
I'll say one thing Joe: You've got more Ambition then All the Naysayers on this forum combined!
 
  • Like
  • Love
Reactions: 5 users

MountainMeadows

Well-known member

Equipment
L2501, JD 655, Ford 841, JD 6x4 Gator, Gravely 432.
Jun 6, 2022
220
300
63
Poconos, PA
When it comes to those wrist pin bushings you're going to need at least a 20 ton hydraulic press and the correct bushing driver. Your best bet may be to take them to the machine shop and let them change them.
 
  • Like
Reactions: 1 user

joesmith123

Active member

Equipment
L295DT, BX1500
Mar 18, 2023
487
100
43
earth
Hit the head hard with abrasives

20240904_154056.jpg
20240904_155129.jpg
20240904_170034.jpg
20240904_171241.jpg
20240904_171306.jpg
20240904_171313.jpg
20240904_171341.jpg
20240904_171403.jpg
20240904_171453.jpg
20240904_171502.jpg


Files and chisels breaking away at the buildup on the block around essential passageways

Best way to break down crud: chisel and a small hammer chipping away at the crud lightly, not digging into block

Hit with diesel, then compressed air, then flap disc 80 grip on all flat surfaces

Using smaller front facing wire wheels getting all holes, spin both direction

Using round file going through all ports filing away the crud, dip file in diesel

Hit with parts cleaner

 
Last edited:

Jim L.

Active member
Jun 18, 2014
851
150
43
Texas
By your picture I see that you also noticed the pitting on the cylinder head. Wonder if that could be caused by coolant getting in.

Otherwise, nice job on cleaning up!
 
  • Like
Reactions: 1 user

Vlach7

Active member

Equipment
L47 305DT JD500C
Dec 16, 2021
326
237
43
Frazier Park Ca
By your picture I see that you also noticed the pitting on the cylinder head. Wonder if that could be caused by coolant getting in.

Otherwise, nice job on cleaning up!
2 of the valves looked different than the others.:unsure:
 
  • Like
Reactions: 1 user

joesmith123

Active member

Equipment
L295DT, BX1500
Mar 18, 2023
487
100
43
earth
By your picture I see that you also noticed the pitting on the cylinder head. Wonder if that could be caused by coolant getting in.

Otherwise, nice job on cleaning up!
My theory as to why it pitted: the ports on that rear cylinder were so clogged, it put pressure on the head and separated it from the block

Causing explosion to escape from where they belong, causing the permanent damage to the head

(My theory just on instinct)

2 of the valves looked different than the others.:unsure:
Yes, I think explosions were escaping their designated area, and caused permanent damage to those two valves

I still have yet to hit everything with wire wheel, this was just first cleaning to get the big crud

Plan with the pitted head: plane it as good as possible, then get a good gasket, and then see what the pressure test says

I think a good gasket will do the job and I will be hitting the seat of the valves HARD with everything so that valves sit flat

@joesmith123 Glad you wore glasses during the valve removal.
The other day I was taking out a snap ring on one of the gears, it shot out whizzing past my eye

Never again do I do anything without eye protection if there's a chance of something flying

Remind me to show yall my favorite tool, most used tool

When it comes to those wrist pin bushings you're going to need at least a 20 ton hydraulic press and the correct bushing driver.
Yes, ktrim said I need press ten pages ago, I need to see how others do it and and emulate them

Tasks moving forward: keep filing away the crud in the ports, hit head hard with fast wire wheel, hit valves hard, put it back together

Next goal: weld the hinge on auger, rebuild the auger and try to get it to work on bx1500

20240904_230341.jpg


Head gasket lined up, pitted area is in explosion zone of 3rd cylinder
 
Last edited:
  • Like
Reactions: 1 user

joesmith123

Active member

Equipment
L295DT, BX1500
Mar 18, 2023
487
100
43
earth
hit pitted area with files and sanding disc, hit head and valves hard with everything

20240905_140120.jpg
20240905_140939.jpg
20240905_141904.jpg
20240905_143716.jpg
20240905_153059.jpg
20240905_153108.jpg
20240905_153130.jpg
20240905_153145.jpg
20240905_153156.jpg
20240905_153226.jpg


Spent 15 minutes filing the pitted head, especially the port

Used Dremel, files to smooth out valve seat

Hit each valve on vice hard with fast wire wheel, and top of head with sanding disc on angle grinder, it should burn hand when taken off vice

Hit whole head with fast wire wheel

Now: put head back together
 

GreensvilleJay

Well-known member

Equipment
BX23-S,57 A-C D-14,58 A-C D-14, 57 A-C D-14,tiller,cults,Millcreek 25G spreader,
Apr 2, 2019
11,125
4,747
113
Greensville,Ontario,Canada
re: stuck hinge pin

try putting it in a bucket of 'oil' for a week, in the hot sun if possible.
let TIME move the oil into all the nooks and crannies.
then try tapping the pin back and forth
when it moves keep going back and forth, maybe add oil
You want to go back and forth NOT bang from ONE side only.

patience and a plan......

Joe certainly has a LOT of patience !!!
 
  • Like
Reactions: 1 user

fried1765

Well-known member

Equipment
Kubota L48 TLB, Ford 1920 FEL, Ford 8N, SCAG Liberty Z, Gravely Pro.
Nov 14, 2019
7,778
4,975
113
Eastham, Ma
hit pitted area with files and sanding disc, hit head and valves hard with everything

View attachment 136870 View attachment 136871 View attachment 136872 View attachment 136873 View attachment 136874 View attachment 136875 View attachment 136876 View attachment 136877 View attachment 136878 View attachment 136879

Spent 15 minutes filing the pitted head, especially the port

Used Dremel, files to smooth out valve seat

Hit each valve on vice hard with fast wire wheel, and top of head with sanding disc on angle grinder, it should burn hand when taken off vice

Hit whole head with fast wire wheel

Now: put head back together
All is looking SO good!
You will......figure it out! ;)
 
  • Like
Reactions: 1 user

joesmith123

Active member

Equipment
L295DT, BX1500
Mar 18, 2023
487
100
43
earth
Put head back together using tie rod tool and needle nose

20240905_160835.jpg
20240905_162426.jpg
20240905_162519.jpg


Exact way to put in holders on spring: left hand pushing spring down with tie rod tool, right hand using needlenose to get it in place then push down

Fastest I've ever put them back on

Other pictures: finished product, notice the pitting a bit better

20240905_163235.jpg


Up close of pitted area after hit with everything imaginable

re: stuck hinge pin

try putting it in a bucket of 'oil' for a week, in the hot sun if possible.
let TIME move the oil into all the nooks and crannies.
then try tapping the pin back and forth
when it moves keep going back and forth, maybe add oil
You want to go back and forth NOT bang from ONE side only.
Yes, soon I go pick up auger using chain and 3 point hitch on bx1500 and bring to work area

Problem: hinge attached to massive auger, I cannot just take the hinge and put in oil
 
Last edited:
  • Like
Reactions: 1 user

jaxs

Well-known member

Equipment
B1750HST
Jun 22, 2023
676
437
63
Texas
Hit that hinge hard with everything you have and if that doesn't loosen it,hit it again and again until it's loose.
 
  • Haha
Reactions: 1 users

MountainMeadows

Well-known member

Equipment
L2501, JD 655, Ford 841, JD 6x4 Gator, Gravely 432.
Jun 6, 2022
220
300
63
Poconos, PA
Joe, you need to get some valve lapping compound and a valve lapping stick to lap in the valves. This is the way you can check the sealing area on the valves and the valve seats to see if there are any issues. You put the grinding compound on the valve sealing area and rotate the valve back + forth on the seat with the tool. If there are any issues with the sealing area you will be able to see them.


  • Like
Reactions: 1 users

fried1765

Well-known member

Equipment
Kubota L48 TLB, Ford 1920 FEL, Ford 8N, SCAG Liberty Z, Gravely Pro.
Nov 14, 2019
7,778
4,975
113
Eastham, Ma
Joe, you need to get some valve lapping compound and a valve lapping stick to lap in the valves. This is the way you can check the sealing area on the valves and the valve seats to see if there are any issues. You put the grinding compound on the valve sealing area and rotate the valve back + forth on the seat with the tool. If there are any issues with the sealing area you will be able to see them.


Joe ....will figure it out.
 
  • Like
Reactions: 1 users

joesmith123

Active member

Equipment
L295DT, BX1500
Mar 18, 2023
487
100
43
earth
Fixed bent bracket on bx1500, then brought auger to get it working

20240905_211035.jpg


Steering bracket keeps bending on bx1500

20240905_211909.jpg


Raise machined, hit it with sledgehammer, watch your fingers


Now that bx fixed, went and picked up auger with 3 point hitch, dragged it to the shop area

20240905_213136.jpg


Up close of stuck hinge on auger

Plan: spray with diesel, hit with torch hard, hammer each side trying to unseize it, get grease into the grease pins

20240905_215534.jpg


I point: shaft that slides as auger go up and down, spins from tractor to auger

Problem: shaft seized

Plan: hit with diesel, clamp stuff on them then hit them with hammers, and torch of course


Imagine if I had a press: lay auger on side, press into the pin with real force

20240905_224605.jpg

20240905_224616.jpg


Soaked with diesel, hit with compressed air, grease pins not taking grease, hit with torch

20240905_230351.jpg

20240905_230400.jpg


Both pins accepted grease: sprayed them with diesel, went with pik and opened the port, hit with torch, then sledgehammer, solved

20240905_231016.jpg


Hit seized sliding rod with diesel then torch, entire area

20240905_232941.jpg


Using tie rod tool to strike up using sledgehammer, tried both ways, won't budge

Now: leave it alone, try to unseize main big hinge
 
Last edited:

Ktrim

Well-known member

Equipment
B2400, lA352 loader,3pth quick hitch/z122r zero turn/restored 52 farmall super a
Dec 23, 2020
405
293
63
Nazareth Pa
Propane not gonna get hot enough. Use your oxy
 
  • Like
Reactions: 1 user