Got the auger up in the air, connect shaft to spindle


 youtube.com
Change tire on bx, tire bulges from running over cinderblock, auger lifted, now connect the shaft

Trying to understand how far in the shaft goes, hit both connections with round files, spray with diesel

Problem: chain does not stop the auger from twisting, whereas the heavy duty hinge stops twisting
Twisting puts stress on the drive shaft as well
Meaning, it needs the hinge welded on...
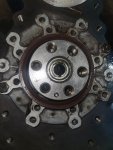
Now: clean out and understand the drive connection, see how it locks into the spindle

Tried to get spindle in for 10 minutes, won't go in, hit both areas with files and diesel, saw the lock it has, a sliding lock, genius, smack with hammer where I point to unlock it

Spindle in it's place, put lumber on end, smack lumber with sledgehammer until it goes all the way in

Smack where I point to lock the spindle, absolutely genius
Now: try spin auger slowly

Tried to spin auger, seized, tried turning with big crescent, won't budge
Plan: spray with diesel, hit entire area with torch, mix another jar of acetone and trans fluid, try to get around the spinning parts, inject more grease into the main grease hole
youtube.com
Video: spinning it with crescent, what I did: soak all area with diesel, hit entire thing with torch, go back and forth with crescent
Turned on pto using lever, spun the auger, chain not gonna work, driveline getting too much stress
Plan: slice off the area using cut off disc, grind it smooth, look into another hinge, weld on using flux coated bronze, take measurements of current hinge, find a chinese hinge with similar dimensions, try to stick chinese hinge the same way the bad hinge is fabricated
Parts update: messick ships fast, should have parts to get block with hole back onto tractor tomorrow (monday)
Install the new pilot bearing, take main bearings from other crankshaft, install them on crankshaft, get crankshaft into block installed using the torque wrench, put the 3 gaskets to seal the crankcase, install the bell housing parts, clutch, flywheel, etc, put block back onto tractor, might use the bx1500 to raise the block to get it back onto tractor (if it is too heavy).
Gaskets coming from messick: 3 gaskets to seal the crankcase, oil pan gasket, head gasket
Tomorrow: try to gather funds to get the chinese gasket kit to fill in the gaps
At this point, I should be able to continue reassembly (put all the gears back in, maybe even put on the gear case, without having any holdups. It just depends on if I forgot or did not get the gasket yet. There are some seals that I did not get, we will see how far I can get.
- YouTube
Enjoy the videos and music you love, upload original content, and share it all with friends, family, and the world on YouTube.
youtube.com
Change tire on bx, tire bulges from running over cinderblock, auger lifted, now connect the shaft
Trying to understand how far in the shaft goes, hit both connections with round files, spray with diesel
Problem: chain does not stop the auger from twisting, whereas the heavy duty hinge stops twisting
Twisting puts stress on the drive shaft as well
Meaning, it needs the hinge welded on...
Now: clean out and understand the drive connection, see how it locks into the spindle
Tried to get spindle in for 10 minutes, won't go in, hit both areas with files and diesel, saw the lock it has, a sliding lock, genius, smack with hammer where I point to unlock it
Spindle in it's place, put lumber on end, smack lumber with sledgehammer until it goes all the way in
Smack where I point to lock the spindle, absolutely genius
Now: try spin auger slowly
Tried to spin auger, seized, tried turning with big crescent, won't budge
Plan: spray with diesel, hit entire area with torch, mix another jar of acetone and trans fluid, try to get around the spinning parts, inject more grease into the main grease hole
- YouTube
Enjoy the videos and music you love, upload original content, and share it all with friends, family, and the world on YouTube.
youtube.com
Video: spinning it with crescent, what I did: soak all area with diesel, hit entire thing with torch, go back and forth with crescent
Turned on pto using lever, spun the auger, chain not gonna work, driveline getting too much stress
Plan: slice off the area using cut off disc, grind it smooth, look into another hinge, weld on using flux coated bronze, take measurements of current hinge, find a chinese hinge with similar dimensions, try to stick chinese hinge the same way the bad hinge is fabricated
Parts update: messick ships fast, should have parts to get block with hole back onto tractor tomorrow (monday)
Install the new pilot bearing, take main bearings from other crankshaft, install them on crankshaft, get crankshaft into block installed using the torque wrench, put the 3 gaskets to seal the crankcase, install the bell housing parts, clutch, flywheel, etc, put block back onto tractor, might use the bx1500 to raise the block to get it back onto tractor (if it is too heavy).
Gaskets coming from messick: 3 gaskets to seal the crankcase, oil pan gasket, head gasket
Tomorrow: try to gather funds to get the chinese gasket kit to fill in the gaps
At this point, I should be able to continue reassembly (put all the gears back in, maybe even put on the gear case, without having any holdups. It just depends on if I forgot or did not get the gasket yet. There are some seals that I did not get, we will see how far I can get.
Last edited: