

“Practice" does not make perfect you Jackass…..Only “perfect practice” makes perfect!!!!

Runs With Scissors

Well-known member

Equipment
L2501 TLB , Grappel, Brush Hog, Box Blade, Ballast box, Forks, Tiller, PH digger
Jan 25, 2023
3,997
5,407
113
Michigan
Thats what my Senior Drill Instructor kept telling us about “drilling” (the marching kind, not the “drill a hole” kind;))

So I have been trying to make a “plug” for the end of my SSQA contraption.

But I keep getting “steps” in my thread(s) when I am single point threading, and the threads to appear “tapered”.

EDIT: when I say “tapered", I am referring to the “V” in the threads, it appears that one side of the “V” is longer than the other…..I am not referring to the taper of a NPT style fitting from end to end. (hope this clarification helps)


I really “screwed the pooch” on my first attempt (who the hell came up with that saying? 🤔 )

Here is the first attempt.

IMG_6641.JPG

Threading seems to be my “White Whale” when it comes to machining things, so I have ordered a ‘Big Ass Tap and Die” in order to complete the project.

Basically, I can’t/won’t let my pride get in the way of finishing this project, and I need to make some progress.

HOWEVER, I still want to try and learn what I am doing wrong.

Here are some of my other attempts, but I must be doing something “systematically wrong” cause they keep having the same “steps” and “sloping” problem. IMG_6644.JPG

IMG_6647.JPG


Lastly, in general, the finish of my threads absolutely sucks….

I decided to try threading in “reverse” because it really made a huge difference in my “parting off” abilities. (I used to dread parting off, now it’s kinda fun)

So I bought one of these a few months back, and it looks cool, but I clearly have not “grasped the concept” of it, cause my threads still suck.

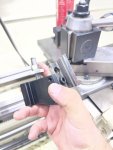
IMG_6659.JPG


IMG_6660.JPG


I am thinking that those “little steps” in my threads are some sort of indicator, but i can’t quite figure it out.

Any suggestions?
 

PHPaul

Well-known member

Equipment
B2650, Pronovost snow blower, Landpride rotary mower, Howard tiller, box blade
Apr 2, 2015
1,289
1,613
113
Downeast Maine
www.eastovershoe.com
Disclaimer: I am NOT a machinist.

Now that we have that out of the way, my first thought is that your tool is not set up right. I believe standard threads are 60° and the tool (cutter) has to be at 90° to the work. They make a little gauge for checking that:
 
  • Like
Reactions: 1 users

Paul Allwood

Well-known member
Lifetime Member

Equipment
Kubota B7200HSTD, RC60-72H MMM, homemade FEL, forks & ballast box, rotary hoe
Jul 8, 2025
703
1,275
93
Baranduda, Victoria, Australia
Can you post a pic from above showing the angle of your top slide and the angle of the tool ?

What is the thread angle that you're trying to cut ?
 

ken erickson

Well-known member

Equipment
B7100 hst, 2650 front mount snowblower, L2501 hst qa loader
Nov 21, 2010
1,426
2,649
113
Waupaca Wisconsin
Basic question. Are you using the half nut and tread dial to engage the half nut , not the feed clutch , to cut the threads, in a race track pattern? Engaging the half nut on the proper even or odd line depending on threads per inch ?

From your pictures I assume your cutting a 60 degree thread, if so , are you setting the compound to 29.5 degrees?

How many threads per inch are you cutting?

I single pointed my share of rifle barrel blanks to receivers and the threads had to be cut accurate and to the correct depth for the receiver I was working on. I got in the habit of only engaging my threading dial on the same line no matter what book said, and I also did not like turning the lathe off until I finished the job. I used the racetrack pattern method. Engage half nut, turn out the cross slide quickly as the cutter finished the run, left the lathe run, moved the carriage back to the starting position, run the cross slide back to zero, move my compound in however many thousands per cut, engage the half nut on the same line. Rinse and repeat till I was full depth . OF course then I would have to turn the lathe off to trial fit the receiver.
 
Last edited:
  • Like
Reactions: 1 user

Workerbee

Well-known member
Lifetime Member

Equipment
Zd21
Mar 1, 2020
380
258
63
MN
My first thought on the finish issue would be that youre not using a correct lubricant, but I rather doubt that you wouldnt know whats correct.
 

ken erickson

Well-known member

Equipment
B7100 hst, 2650 front mount snowblower, L2501 hst qa loader
Nov 21, 2010
1,426
2,649
113
Waupaca Wisconsin
I decided to try threading in “reverse” because it really made a huge difference in my “parting off” abilities. (I used to dread parting off, now it’s kinda fun)
I do not see the benefit of threading in "reverse" . I assume that is what your showing in the pictures is the holder for that operation? Can you show your set-up for standard rotation, single point thread cutting? I would want to see the top of the cutter as the thread is cut. Important for the cutter to be ground properly and set accurately on center of the work piece.

I normally used a surfer based dark thread cutting fluid for single point work, back gear or slowest spindle speed, paying attention to a rigid set-up.
 

Lil Foot

Well-known member
Lifetime Member

Equipment
1979 B7100DT Gear, Nissan Hanix N150-2 Excavator
May 19, 2011
8,182
3,559
113
Peoria, AZ
Wow.
As stated above, I'd like to see pics showing everything in place ready to cut threads- tool, tool holder, compound setting, machine settings....
I'm not sure how I would produce "threads" that look like that....
 
  • Like
Reactions: 1 user

lynnmor

Well-known member

Equipment
B2601-1
May 3, 2021
1,803
1,607
113
Red Lion
Mount the cutting tool on the bottom angle of the holder. Set the compound to 29 or 29.5 degrees. Always return to the zero on the cross slide and advance the cuts on the compound. Until we know the TPI, engage the half nuts at the same number. Take light cuts, especially near the finish size.
 

#40Fan

Well-known member
Jul 21, 2022
633
463
63
USA
The angle of the compound looks wrong to me. It appears yours is closer to being perpendicular to the cross slide when it should be closer to parallel when set to the 29.5 degrees everyone uses.
 
  • Like
Reactions: 1 user

Runs With Scissors

Well-known member

Equipment
L2501 TLB , Grappel, Brush Hog, Box Blade, Ballast box, Forks, Tiller, PH digger
Jan 25, 2023
3,997
5,407
113
Michigan
I was trying to cut 12 tpi, and my “scratch pass” checked out good. It’s a 1 inch bar.


Here are some pics of my setup.


IMG_6677.JPG


Its kinda hard to get a good angle, but I think this looks ‘on center’.

IMG_6678.JPG

Heres a different pic of the above shot.

But as I post this pic, maybe I am a little high of center?


IMG_6679.JPG

IMG_6680.JPG


IMG_6681.JPG


Here is what I am using as cutting fluid.


IMG_6683.JPG


As I post this, and now that I think about it, could this “mystery bar” could be some sort of “un-obtainium” metal?????????

I can never keep straight in my head, which numbers I can use for odd-even threads..blah..blah…So I always engage the half nut on “2”……I’m in no hurry, and 2 works for everything..(I think ;) )


But after seeing @PHPaul post that pic of that tool, I did forget to use that. However I did square up the toolpost to the lathe chuck using parallels.


Aside from pride, any reason to not just BUY a plug from the hardware store?
curious as to the 'SSQA contraption'.
Nope…It’s all about pride and the satisfaction of being able to do it at this point….IT’S WAR!!!!!!!:ROFLMAO:
 

ken erickson

Well-known member

Equipment
B7100 hst, 2650 front mount snowblower, L2501 hst qa loader
Nov 21, 2010
1,426
2,649
113
Waupaca Wisconsin
I believe you have the compound set 29 degrees from parallel to work piece, you need to set 29.5 degrees perpendicular to work piece.


A few ways to set to correct threading angle. The scale on the cross slide goes to 60 degrees. If you start with 90 degrees meaning the compound is parallel with work piece that means 90 minus 29.5 degrees = 59.5 degrees. If you set it at the 60 degree mark on the cross slide, then bump it by eyeball another 1/2 degree you will be there. The yellow arrow is where you would move your compound witness mark to to achieve the proper 29.5 degrees angle.


Image 1.jpg


The second way, and I do not know if your compound has another witness mark in line with the compound handwheel underneath. If it does, then you would swing that witness mark till it hits the 29.5 degrees to the right side by my red arrow. The green arrow would point to the location around the perimeter 90 degrees from the witness mark that your using. Hopefully that makes sense.

The third way is to use a combination square with a protractor head, and set to 29.5 degrees and rest the legs on the protractor on the work piece, and the rule along the ground side of the compound rest.


The angle you have the compound set is what is causing that "step" action in your trial piece.


Oh, and I would ditch the reverse cutter set up , and use a conventional 60 degree single point cutter , on center, looking down from the top seeing the point of the cutter doing the chip removal. JMHO.


Image.jpg
 
Last edited:
  • Like
Reactions: 1 users

PoTreeBoy

Well-known member
Lifetime Member

Equipment
L35 Ford 3930
Mar 24, 2020
3,913
2,420
113
WestTn/NoMs
I believe you have the compound set 29 degrees from parallel to work piece, you need to set 29.5 degrees perpendicular to work piece.
I think you're right. But as an example of my machining skill, the only time I cut a thread on a lathe, 50 years ago, I used a tool ground to 60° and fed it perpendicular to the shaft 🔩🥽🤷‍♂️🧙‍♂️
I've been looking, casually, for a lathe and mill. Maybe I should rethink things.
 

Lil Foot

Well-known member
Lifetime Member

Equipment
1979 B7100DT Gear, Nissan Hanix N150-2 Excavator
May 19, 2011
8,182
3,559
113
Peoria, AZ
I have never seen a threading tool like that.
But unless you are running the spindle in reverse.... it should be in this orientation.....

tool.jpg
 
  • Like
Reactions: 1 users

ken erickson

Well-known member

Equipment
B7100 hst, 2650 front mount snowblower, L2501 hst qa loader
Nov 21, 2010
1,426
2,649
113
Waupaca Wisconsin
I have never seen a threading tool like that.
But unless you are running the spindle in reverse.... it should be in this orientation.....

View attachment 178530
Bill,
I think he was running the spindle in reverse with the set-up that he photographed. He mentioned he tried cutting in reverse.

Bottom line is he has the angle of his compound set incorrectly and believe that will cause that step cut effect in the trial pieces.
 
  • Like
Reactions: 1 user

Lil Foot

Well-known member
Lifetime Member

Equipment
1979 B7100DT Gear, Nissan Hanix N150-2 Excavator
May 19, 2011
8,182
3,559
113
Peoria, AZ
Just for reference, more conventional threading tools:

IMG_0014.JPG IMG_0019 copy.jpg IMG_0016 copy.JPG
 
  • Like
Reactions: 1 users

#40Fan

Well-known member
Jul 21, 2022
633
463
63
USA
I believe you have the compound set 29 degrees from parallel to work piece, you need to set 29.5 degrees perpendicular to work piece.


A few ways to set to correct threading angle. The scale on the cross slide goes to 60 degrees. If you start with 90 degrees meaning the compound is parallel with work piece that means 90 minus 29.5 degrees = 60.5 degrees. If you set it at the 60 degree mark on the cross slide, then bump it by eyeball another 1/2 degree you will be there. The yellow arrow is where you would move your compound witness mark to to achieve the proper 29.5 degrees angle.


View attachment 178528


The second way, and I do not know if your compound has another witness mark in line with the compound handwheel underneath. If it does, then you would swing that witness mark till it hits the 29.5 degrees to the right side by my red arrow. The green arrow would point to the location around the perimeter 90 degrees from the witness mark that your using. Hopefully that makes sense.

The third way is to use a combination square with a protractor head, and set to 29.5 degrees and rest the legs on the protractor on the work piece, and the rule along the ground side of the compound rest.


The angle you have the compound set is what is causing that "step" action in your trial piece.


Oh, and I would ditch the reverse cutter set up , and use a conventional 60 degree single point cutter , on center, looking down from the top seeing the point of the cutter doing the chip removal. JMHO.


View attachment 178527
Yep, like this.

 
  • Like
Reactions: 1 users

Runs With Scissors

Well-known member

Equipment
L2501 TLB , Grappel, Brush Hog, Box Blade, Ballast box, Forks, Tiller, PH digger
Jan 25, 2023
3,997
5,407
113
Michigan
Well I’ll be damned gentlemen!!!!

This is me in my first “Machinist class”…Hhahahahahh :ROFLMAO: :ROFLMAO: 🤷‍♂️

1787647458439.png


As I sit here, sipping covvffee, not being able to sleep once again, I am laughing at myself.

I have probably read, read, and re-read that you have to set the compound to 29.5 degrees, maybe 10,000 times and watched videos too!!!!

But it never occured to me to ask “29.5 degrees FROM WHERE?

I had just assumed that it was 29.5 degrees on my scale. (and yes I get the whole “ass-u-me” joke;))

I find it fascinating how much there is to learn.
1787648138656.png


I am going to make some changes and give it a try.

Stay tuned for updates…...
 
Last edited:
  • Like
Reactions: 1 users

Yooper

Well-known member
Lifetime Member

Equipment
3901 LA525
May 31, 2015
1,746
925
113
NE Wisconsin
Or you could get an indexable carbide setup like Lil’ Foot and just run it straight in with the cross feed. I only use the compound when I thread with hss on my little lathe.
 
  • Like
Reactions: 1 user