Fascia repair project: how should it have been done and where do I go from here?

sheepfarmer

Well-known member
Lifetime Member

Equipment
L3560, B2650, Gator, Ingersoll mower
Nov 14, 2014
4,445
663
113
MidMichigan
I know among the forum members are many professional and amateur house fixers, so I am asking for help.

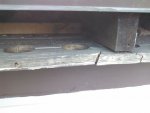
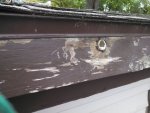
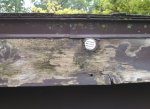
I was just going to get up on the roof and slop some paint over this one strip of fascia board that is peeling and call it good, but it is so far rotted that my OCD has set in, and I would like to do it better. The root causes can't be fixed, flattish roof and maybe the drip edges on the most recent re-roofing job not installed correctly. The result is the fascia is nearly always wet. Some previous roofer thought vent holes should be drilled in this board, and they have collected the water and so the wood around them is rotted. I pulled one out, actually it fell out into my hand, and the result was quite the gaping hole. There are two "regular" full size vents in the soffit along this run, so I am not sure what these added ones are supposed to do. See photo. What I am thinking to do now, since glueing a patch into that hole is looking like an epic fail (I tried it), is pull that board off, or boards plural, and replace them, and then have my favorite eavestrough company cover this strip of fascia with aluminum, and then the water can drip over it all it wants. I have never done this before, and given that this house is really old and repaired, remodeled, and constructed by numerous relatively incompetent people, I am not sure what I will find if I go ripping these boards off. They look like they are held on by small nails into something. It looks like if I am careful I could slide the board out from under the drip edge and tuck another one back under. If I do this before the eavestroughs guys come I could prime and paint it first. They would do it, but probably using 1 x 6s, but this board is really 1 X 5, i.e 3/4 " by 4 1/2". I have found a source of 1 x 5s, Home Depot, which is good because I don't have a table saw to rip a 1 x 6.

My question is, there are 2 boards that are 10ft 1inch long, and 1 3ft 1 inch long to cover the span. I have no clue as to the spacing of any rafters or whatever that the fascia might be nailed to. I can only get 8 foot long boards so the spacing will be different. My intuition is that the ends of the fascia boards should be nailed to something and not hanging out in space, so I should cut them so the nails or screws go into half a rafter at the joins?

So basically my question is how should it have been done, and how can I best cope with the mess I have? And any guesses as to how it might have been done at least 50 years ago? Part of this house was the granary, hand hewn beams etc, then it was the hired man's house for lord knows how long, and then somewhere around 50 years ago it was remodeled extensively.

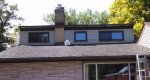
I get these why don't you have someone do this for you, why don't you just call a painter questions. One look at how the new siding, the way the roof is sagging should tell you. That corner of the house was taken down to the rafters for the last reroofing job, new windows, new flashing, new insulation, new house wrap, plenty of opportunity to square things up, and this was what I got. So I am going to try to fix this little thing myself. And no I shouldn't be up on the roof but it is really pretty safe. End of rant.

Thanks for any thoughts! Any knowledge I can gain before I start pulling boards off would be all to the good.
 

Attachments

geoff

New member

Equipment
b2410 tractor, FM90 topper,RS1200 cultivator,bearcat 4 inch chipper,b1610.
Jul 7, 2017
102
1
0
essex uk.
I would want to get those facias off and renew, if your joins don't meet on a rafter end, and you can't cut them to do that, then a simple noggin between the rafters and fixed between them will give you a fixing for the facia boards.
Some form of vent in or under the facia would be desirable to air the rafter voids, maybe treat the rafter ends with preservative while you have it stripped back.
You might be able to use a plastic or metal facia to good effect, and maybe get a light gutter under the roof drip by saving on facia thickness.
Nice looking property you have there.:)
 

William1

Well-known member
Lifetime Member

Equipment
BX25D
Jul 28, 2015
1,092
278
83
Richmond, Virginia
The drip edge and roofing shingles need to be extended, typically out 1 to 1.5" from the fascia edge. If wind or other conditions cause rain to 'splash back' against the fascia, consider using Vinyl or cover the board in aluminum.
Most roofs I've seen like your are the result of a roofer who has no idea what he is doing. I'm no roofer but I've seen similar to yours a few times.
 

Lil Foot

Well-known member
Lifetime Member

Equipment
1979 B7100DT Gear, Nissan Hanix N150-2 Excavator
May 19, 2011
7,320
2,283
113
Peoria, AZ
and then have my favorite eavestrough company cover this strip of fascia with aluminum, and then the water can drip over it all it wants.
I can't be of much help, other than to recommend
Do Not Do The Aluminum!
My FIL (a notorious cheapskate; "Why spend $4000 on a quality re-roof when some guy off the street will do it for $600?") had his roof re-done (poorly) and then decided to wrap his facia boards with aluminum. He was an AC sheet metal guy, so he bent up some aluminum in a "J" shape and covered the boards. Fast forward many years, with the roof leaking behind the facia, into the "J" shape where it was trapped, rotting the facia boards, two feet of the rafter ends, the soffits, and much of the roof sheeting. It will require MAJOR work & MAJOR dollars to repair.
And this is in Arizona, where it is DRY. I'm sure it has been done sucessfully, but my personal experience says avoid it like the plague.
 

William1

Well-known member
Lifetime Member

Equipment
BX25D
Jul 28, 2015
1,092
278
83
Richmond, Virginia
I can't be of much help, other than to recommend
Do Not Do The Aluminum!
My FIL (a notorious cheapskate; "Why spend $4000 on a quality re-roof when some guy off the street will do it for $600?") had his roof re-done (poorly) and then decided to wrap his facia boards with aluminum. He was an AC sheet metal guy, so he bent up some aluminum in a "J" shape and covered the boards. Fast forward many years, with the roof leaking behind the facia, into the "J" shape where it was trapped, rotting the facia boards, two feet of the rafter ends, the soffits, and much of the roof sheeting. It will require MAJOR work & MAJOR dollars to repair.
And this is in Arizona, where it is DRY. I'm sure it has been done sucessfully, but my personal experience says avoid it like the plague.
My fascias are all covered in aluminum. My home is 30+ years old. I did some remodeling two years ago, the wrapped fascia boards were fine. The wood windows below however had rot! It is all about the methods (techniques) used. The path the water follows has to lead it away from the wood. IIRC, on the back of the aluminum up against the roof was bent to have an upward lip so any water that weeped back, could not make it over the lip.

Another solution is to use PVC planking. I redid the boards and trim around my garage doors with PVC due to moisture that wicked up from the bottom.
 

Lil Foot

Well-known member
Lifetime Member

Equipment
1979 B7100DT Gear, Nissan Hanix N150-2 Excavator
May 19, 2011
7,320
2,283
113
Peoria, AZ
Like I said, I'm sure it's been done successfully, but the combo of aluminum wrap & a bad or marginal roof can be disastrous. My FIL saved a few hundred in trim painting costs over the years, but it is going to cost $40K+ to repair this mess.
I like the idea of the new plastics for such things, but the jury is still out (out here anyway) as to how it will hold up long term in our heat & UV.
 

geoff

New member

Equipment
b2410 tractor, FM90 topper,RS1200 cultivator,bearcat 4 inch chipper,b1610.
Jul 7, 2017
102
1
0
essex uk.
Here in the uk pvc cladding, windows and doors are used extensively, and seem to be a durable option, though we don't have the same climate as you all.
 

CaveCreekRay

Well-known member
Lifetime Member

Equipment
L3800 HST, KingKutter box scraper, KingKutter 66" rake, County Pride Subsoiler
Jul 11, 2014
2,631
96
48
Cave Creek, AZ
The small brown piece of flashing off the roof was not long enough to cover the upper portion of the plate (end beam). The water flowed down it and it appears some got behind the flashing and helped the end beam start rotting. Also looks like the paint has been gone in sections for awhile. I just went through rot issues on this place and I have similar damage in a much smaller area on a patio cover that I will fix this fall.

To replace the rotted end boards, you will need to work fast. Dimensional lumber comes wet from the mill (high water content). You will have barely a week to get the new ones primed, cut and installed before they start to twist or warp. Buy as straight a board as you can find but, expect movement after drying sets in. The sooner you pin them back up, the less of a hassle that presents. You may want to buy the new lumber after pulling off the old stuff.

Essentially, get some 10' or 12' 2x6 and see if you can find somebody nearby to trim them for you. You should have a lumber yard nearby that carries those. Home Depot stocks them so you may have to drive the nearest HD. Get one extra while you are at it, just in case. These will be wet lumber so they will be very heavy. Get help unloading them.

While at HD or wherever you find the lumber, get some exterior primer and your matching house paint. Prime these the day you get home or the day after. The faster you seal them, the slower the water will evaporate out of the wood, keeping them straighter longer. Priming and painting the straight lumber before its cut and installed gets a much better coat and makes touch-up painting when done a lot easier. Use a roller and get two good coats of each, with at least 8 hours between coats. If its sunny and dry, you can shorten that a little with a coat in the morning and one in the afternoon.

You are going to have to find some galvanized flashing that will slide under the brown metal flashing that is there and drip away from the wood as much as possible. Home improvement stores have some flashing material available. A piece that slides under an inch and then bends 45 degrees out about an inch (a shallow "V" viewed on end) will get the water away from that joint on the end plate. Or, some pieces look like a squared "S" viewed on end. The flashing nails up with galvanized 1" flashing nails, nailing right through the old brown flashing. Galvanized won't take paint for a couple of years unless you degrease it well.

As for getting those end plates off, I would suggest trying a 4lb sledge first. If you start at one end you might be able to pull them away. You should find the trusses in good shape. Rot does not always jump joints. Hopefully, the damage is contained at the end plate. I can't tell enough from the pictures to tell if the end plate is pinned by nails through your roof plywood. If it is, this project will be a lot harder as you will have to peel back your roofing to get the new plate nailed to the roof plywood. That may be a showstopper for you, just so you know. Those end plates are not only pinned into your trusses, they are likely pinned from above as well. Even if you have to have the job done by a carpenter, if you do the removal, you'll save a bunch of money by doing the demo and priming and painting the new wood. If you are out there with a paint brush, any scarf joints can be painted during assembly which will greatly minimize further rot.

Good luck and keep us posted.
 

North Idaho Wolfman

Moderator
Staff member
Lifetime Member

Equipment
L3450DT-GST, Woods FEL, B7100 HSD, FEL, 60" SB, 743 Bobcat with V2203, and more
Jun 9, 2013
29,123
5,417
113
Sandpoint, ID
I'm a fan of Hardi board.
It's composite (cement board) and it holds up very well in a wet situation like that.
I'm wondering if fascia board that you have now covers a non vented attic space hence the vents, if that is the case, you can get Hardi board with a vent holes along the entire surface, it vents out moisture very well. ;)
 

sheepfarmer

Well-known member
Lifetime Member

Equipment
L3560, B2650, Gator, Ingersoll mower
Nov 14, 2014
4,445
663
113
MidMichigan
Thanks everyone, those are helpful thoughts. It sounds like I need to take it a little further apart to see what I am really dealing with. No way am I touching the roof and the shingles, so I have to hope that the fascia is only nailed to the rafters or some other board, and there are no nails running obliquely from the plywood forward into the fascia.

I wondered about plastic boards, but didn't run across any of the correct size. William I kind of wondered how come they were so chintzy when they put the shingles on, they could have made them stick out just a little past the fascia and drip edge. Maybe because that piece of roof is so flat.

So step 1 bite the bullet and take off the fascia, hoping the little nails I can see are all that is holding it. Hope rafters are in good shape....
 

sheepfarmer

Well-known member
Lifetime Member

Equipment
L3560, B2650, Gator, Ingersoll mower
Nov 14, 2014
4,445
663
113
MidMichigan
I'm a fan of Hardi board.
It's composite (cement board) and it holds up very well in a wet situation like that.
I'm wondering if fascia board that you have now covers a non vented attic space hence the vents, if that is the case, you can get Hardi board with a vent holes along the entire surface, it vents out moisture very well. ;)
There isn't much of an attic space; the ceiling of the little bedroom up there parallels the roof. I remember when the roofer, no. 2, asked about putting in those little vents, and said that would help with the icicles, but I don't see that they did much good. I had asked about adding insulation since they had removed the deck if I recall correctly. I didn't get to see, I had to go to work. There is a good sized vent in the soffit under there, but I need to see if the spaces connect, and the only way to do it is take the board off (or maybe a boroscope through one of the holes? :D )

I'll look up Hardi board I think it might come in the right dimensions. What kinds of fasteners are best for both plain wood and Hardi board in this application? Would the venting still work under an aluminum cover?
 

tlefire

Member
Lifetime Member

Equipment
B7100, L2350, L2501
May 18, 2017
94
9
8
talladega alabama
How much snow and ice stays on your roof during winter? Your problem stems from the bad shingle roof job and, untill you address the roof, your facia will never be fixed properly.
 

BravoXray

New member

Equipment
BX-25D, Ford 9N, Bobcat 825. Too many implements to list
Feb 6, 2014
190
4
0
Lake Winola,PA.
Sheep farmer, you are right. Your first step is to remove those fascia boards. They are most likely only face nailed into the tails of the rafters. Slip new ones under the drip edge. Then find someone who has, or rent, an aluminum brake. Home Depot has aluminum trim coil stock in various colors. You will cut some strips of aluminum roughly six inches wide and as long as your brake will take, mine is an eight footer, so I can only do eight feet at a time, but if your renting you can get ten or twelve foot brakes. One side of the aluminum strip will go over your new fascia board, and slip up under the existing drip edge. The other side of the strip will be bent in the break to about a forty five degree bend out away from the fascia board. This will allow any water that comes down the drip edge to run down the aluminum fascia, and get ejected out and onto the roof below. You don't need those drain holes, they are too small to accomplish anything. If you like, I can bend up some small pieces and show you what it should look like. Feel free to PM me and I'll be glad to help.
Jerry
 

sheepfarmer

Well-known member
Lifetime Member

Equipment
L3560, B2650, Gator, Ingersoll mower
Nov 14, 2014
4,445
663
113
MidMichigan
Update on the fascia saga :eek:

Well I have some fascia boards lined up, all primed and painted, just have to pull the old ones off and put them up, got my new drill and driver ready with some screws, easy right?

Getting the old ones off without damaging the soffits is interesting. I am about halfway there. The brute force method does not work. Prying is risky. Either I or a previous person cracked the soffit board near the vent so I have that to fix, not sure exactly how, and the area around the chimney has a litle board whose nails I didn't see, is held only to the fascia by two nails, and the chimney by calk. Getting that back will be fun. Removing the fascia boards has required chiselling enough wood around each nail head so the I can get a grip on it and hoping the head doesn't fall off. They were mostly nailed to the rafters or to the soffitt edges. They did not end on rafters, it will be interesting to cut the new boards so that they do, and so that I don't have an end in the middle of the chimney section.

The structure underneath the roof is interesting. The soffitt vents probably only vent two of the bays, although there is a vent all along the top end, effectiveness unknown. The space for insulation between the rafters is about 4 or 5 inches tall, and the rafters are spaced irregularly 21 to 26 inches apart. There is some pink fiberglass like stuff up in there. So the ceiling in that bedroom is tongue and groove knotty pine, and there is nothing between the back side of those boards and this space that I can see. Would be hard to pull the pink stuff out from the end I am looking at, but I sure wish I could figure out how to get in a better layer of insulation, still leave an airspace, and not mess up the wiring that must be in there somewhere. I think impossible?

Hoping to get this finished off today or tomorrow before it rains....
 

highcountrybarry

New member
Mar 20, 2016
45
2
0
Fleetwood, NC
Oddly enough a sheep's foot nail puller would help you a lot. I have also used a sawzall with a metal blade to cut those nails behind the fascia. Makes a quick job of it. You may bend a blade or two until you get the hang of it.

Sounds like you don't have an attic access or you could blow in additional insulation pretty easy. May be worth adding a hatch. You can get styrofoam or cardboard baffles at Home Depot for the eaves that will block insulation and keep an air space open, but you need to install those while the fascia is off. If weather is a concern maybe use a few screws to temporarily install the new fascia until you can do that. Don't worry about insulation on the wiring if that is your concern. Non issue.

Interest about the spacing of rafters, haven't seen that in my forty years of construction. Got a pic of the soffit near the vent?


Sent from my iPad using Tapatalk
 

sheepfarmer

Well-known member
Lifetime Member

Equipment
L3560, B2650, Gator, Ingersoll mower
Nov 14, 2014
4,445
663
113
MidMichigan
Hmm, I have been thinking a sawzall would be nice to have...yet more tools. :D I did go get a nail puller, a little one, and it helps some. And my pry bar is too big to grab them. But there are a lot of nails that are so rusty the puller bends to a scary degree. If I can get them started and then grab them with the hammer claw all is good. And some just disintegrate.

Here is a picture, I didn't measure it, but I think the rafters are old style lumber. And I am not sure but maybe some of the soffit is oak or some other kind of wood besides pine. Will make drilling and nailing fun. I have tried to drill holes in other stuff around here and it sometimes isn't easy.

I looked in the bedroom, and the light is up at the top at the peak of the roof, so probably the only wiring up there. I have deck screws so if I put some in carefully maybe it will be possible to remove fascia later easily if I can figure out the insulation question. I could drill more holes in the soffit and cover with screen to improve ventilation.

If you have any hints about fixing the cracks in the soffit you can see I'm all ears. I was thinking a lot of plastic wood, and maybe gluing a little piece of wood over the one between the round vent holes (which have a metal grate on the lower surface.)
 

Attachments

Last edited:

highcountrybarry

New member
Mar 20, 2016
45
2
0
Fleetwood, NC
I wouldn't worry too much about the cracked soffit. Caulk it good when you paint it and that should be fine. Caulk moves with the wood as temp and moisture change. Plastic wood in that environment will come out. Be sure screening is good on all the vents or varmints may get in. If you want to add additional ventilation Home Depot or Lowes will have these and all you need is a drill and a hole saw. Easy.


Sent from my iPad using Tapatalk
 

RCW

Well-known member
Lifetime Member

Equipment
BX2360, FEL, MMM, BX2750D snowblower. 1953 Minneapolis Moline ZAU
Apr 28, 2013
8,498
4,217
113
Chenango County, NY
Sheepfarmer -

My experience is limited, but usually with a cathedral ceiling you want to draw air into a lower soffit, and exhaust it out the top via another soffit vent.

If air movement is limited or stopped along the length of the rafters, because it's plugged with fiberglass, it can cause several problems.

There are "channels", for lack of a better term, that fasten to the roof sheating and allow a free flow of air from the lower to upper soffits of a cathedral ceiling rafter.

I searched "Cathedral Vent" and found several examples. This is just one:

http://www.bestmaterials.com/detail...MI4IPfiaiH1gIVAxxpCh20VgbcEAQYASABEgKeVvD_BwE

I used a simple Styrofoam one before, all the way from top plate to peak in between all the rafters.

I'm not sure your fascia issue is directly related to venting or not, but either way, if soffit isn't vented well at each rafter, your fascia could be trapping moisture from the inside.

If the sheathing were ever pulled off on a roof job, I would definitely add some vents between the rafters.


Good luck!
 
Last edited:

Daren Todd

Well-known member
Lifetime Member

Equipment
Massey Ferguson 1825E, Kubota Z121S, Box blade, Rotary Cutter
May 18, 2014
9,263
4,874
113
Vilonia, Arkansas
RCW, on most newer construction, the attics vent that way. When I bought my house, there was a fan in the peak of the attic that vented the hot air out. It was run by a thermostat. Fan locked up. When I had a new roof put on, instead of an attic fan, or whirly birds. I had them install a ridge vent.

Coupled with the soffit vents, once the attic heats up, it creates a draft and vents the excess heat.

When I blew in extra insulation into the attic, some of the soffit vents got clogged. To unclog them, I just went around the house with a back pack blower and put the nozzle to each one of the soffit vents. :D


Sent from my iPhone using Tapatalk
 
Last edited:

sheepfarmer

Well-known member
Lifetime Member

Equipment
L3560, B2650, Gator, Ingersoll mower
Nov 14, 2014
4,445
663
113
MidMichigan
RCW while i smiled at the thought of anyone mistaking any part of this old house for a cathedral ceiling, that in fact is the problem that I need to solve. One of the roofers installed a ridge vent which makes the roof look like it is sagging, and probably lets the mice in, and so better ventilation from the soffit as shown by Barry instead of the fascia as before would get the airflow needed. The pink stuff doesn't block airflow now except where the mice have fluffed it up, but adding anything would. Thanks guys!