Made a plow for my BX23S

RWey56

Member

Equipment
BX23S
Feb 8, 2018
111
3
18
Stanchfield, MN
Though I'd share this with you folks. Plowing snow with the 4' bucket works, but gets a bit tedious, so I thought I'd build a somewhat wider blade that would quick-attach to the bucket. Now, I certainly won't win any welding competitions, but it turned out solid and works well. Stores in a small space too. The dealer attachments are nice, but I just couldn't justify $1800 for a plow I'd use 5 times a year, so I designed and built this for about $200.
 

Attachments

RWey56

Member

Equipment
BX23S
Feb 8, 2018
111
3
18
Stanchfield, MN
Just curious. How did you get the curve in the blade?
Four 2x4s cut to the curvature, then cinched them in with threaded rods to a 2x4 spanner on the back side. There's four 1/4" holes in the sheet the rods passed through. Just kept tightening the nuts until it warped it into shape, then tack welded.

If I had to do it again, I'd probably have someone cnc cut the ribs out of 3/8" steel, and I'd probably us 16 ga sheet rather than 14.
 

North Idaho Wolfman

Moderator
Staff member
Lifetime Member

Equipment
L3450DT-GST, Woods FEL, B7100 HSD, FEL, 60" SB, 743 Bobcat with V2203, and more
Jun 9, 2013
30,552
6,600
113
Sandpoint, ID
You better put some kind of cutting edge on it, it takes no time at all to wear soft metal down!
 
Last edited:

coachgeo

Well-known member

Equipment
L225 w/woods Few Mowers & Back Blade, D722 in Motorcycle (Triumph Tiger), LMTV
Nov 16, 2012
2,460
35
48
Southern OH
The straps that you use to hold it on.... will the webbing rub the ground on occasion or alot on the underside of the bucket? If so might wear that out fast and they break.
 

ryansmoneypit2

New member

Equipment
B7100, 48" snow blower, woods rear blade, crappy front blade, 64" mower deck
Mar 2, 2018
29
0
0
virginia
This thing looks great! Fair amount of work to build that thing too.
 

RWey56

Member

Equipment
BX23S
Feb 8, 2018
111
3
18
Stanchfield, MN
The straps that you use to hold it on.... will the webbing rub the ground on occasion or alot on the underside of the bucket? If so might wear that out fast and they break.
They shouldn't rub as long as the bucket is level or pitched down slightly. The aforementioned bolt on edge would help too
 

chim

Well-known member

Equipment
L4240HSTC with FEL, Ford 1210
Jan 19, 2013
2,147
1,266
113
Near Lancaster, PA, USA
Belt rubber works really well too. ;)
At work we have a Montana with a rear scraper blade. Our "squeegee" is made from an old tire tread that is sandwiched between the cutting edge and the blade. It's been used for several Winters and still has lots of life left in it. If you can stay out of traffic to harvest them, big trucks shed really heavy duty treads on the highways.
 

skeets

Well-known member

Equipment
BX 2360 /B2601
Oct 2, 2009
14,618
3,447
113
SW Pa
If you can stay out of traffic to harvest them, big trucks shed really heavy duty treads on the highways.

Leave the alleygators on the highway. There was a young off duty trooper down this way a few years ago that stopped to remove one from the interstate. There is now an inter change named after him, thanks to a coal bucket driver,,all pilled up and no place to go.

Check around to see if there are any mining operations around or companies that use heavy conveyor belting. Most times they will give you a hunk that has been damaged
 

RWey56

Member

Equipment
BX23S
Feb 8, 2018
111
3
18
Stanchfield, MN
OK Gents,

Gave the plow its first workout this morning on 8" snow and a 120' driveway and it worked really well, but there's a couple things I learned and also confirmed things others have recommended here in this thread. Bear in mind I have never operated/maintained a plow in my life so this was just as much an experiment as a necessity.

First, as harsh as the scraping sounded, there was no wear on the cinch straps when I took it off after I was done. I also bumped it pretty hard on the sides and there was no bending, so I believe it's built strong enough.

What it needs:
  1. D2Cat mentioned side plates. Definitely needs those and I'll probably retrofit.
  2. NIW mentioned a cutting blade. Needs that too. I'm leaning toward a really thick piece ( 1/2" + ) of belt rubber ... the type with cords embedded. Let it hang down 1/2" or so and sandwich it between a front plate and secure with several bolts. Rubber would also let me plow our sealed patio without scraping the hell out of it.
  3. While the curl furrowed the snow forward really well, some fell back and the bucket was full of snow by the time I finished. Needs a lightweight deflector at the top. A 1/8 piece of polyprope would work well for this.


I noticed that floating the bucket didn't work so well because extra width really cuts in and causes the tractor to do the typical buckle, jacking the front wheels up. I ended up floating into position, then adjusting the boom slightly as I drove. Very easy.

It remained very secure on the bucket and the straps didn't loosen a bit, so I'm satisfied with the attachment scheme, and lifting it another 1/2" with a sacrificial scraper blade would further protect the straps. Hell, even if the straps do wear out, they're only a few $$$ to replace.

I can post more construction pics and a bill-of-materials if anyone would like, but I don't have an account here and I'm not sure if there's enough storage room for all the pics. Frankly, I'm very inclined to redesign it knowing what I now know from the first attempt and make improvements.
 

RWey56

Member

Equipment
BX23S
Feb 8, 2018
111
3
18
Stanchfield, MN
Members get 5 MB for photos and I'm not sure if that is set in stone since I'm above 6 MB... guess I'm ratting myself out?!?!?!

Yes, more photos would be appreciated, just resize them so they don't take up too much space.
I did resize them, and will try to get more uploaded. Understand that I didn't take pictures of every step, so I'm sure there'll be questions. I'm currently at work, but will try to get to this later tonight.
 

RWey56

Member

Equipment
BX23S
Feb 8, 2018
111
3
18
Stanchfield, MN
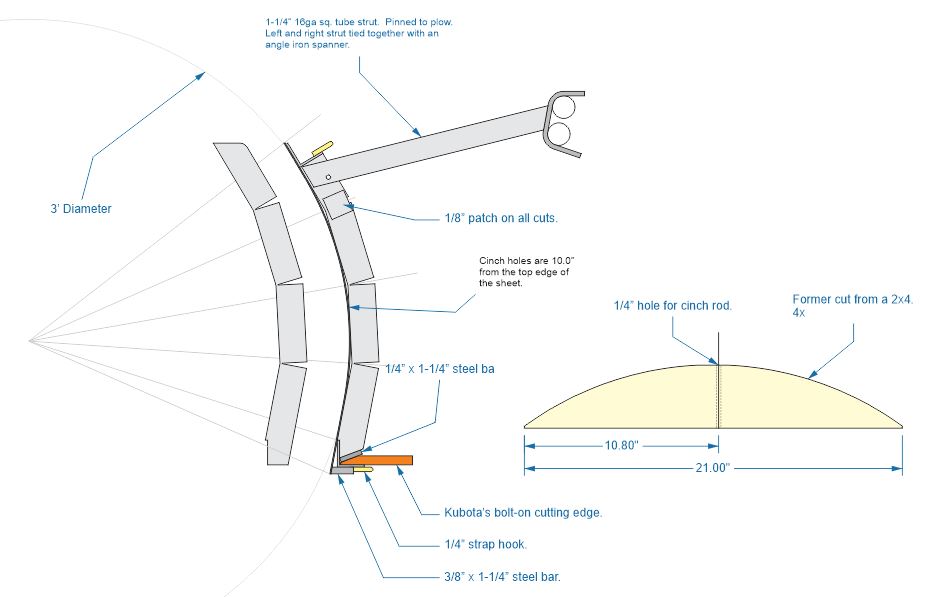
OK, as requested, here's some pics. The design was done using Corel Draw.


This one says the most. Shows the general plan and curve dimension. The rib to the left is the end rib, and is move out of the way to show the inner construction.


This is a detail of the end ribs. You need two, mirror image of each other.


Detail of the center ribs. Need four, two left and two right ... mirror images of each other.

 
Last edited:

RWey56

Member

Equipment
BX23S
Feb 8, 2018
111
3
18
Stanchfield, MN
The first step is to cut out all the ribs, then bend them all to the same radius using one of the 2x4 formers. Stacking them helps to make sure they're all the same, and this is pretty important.

Next, you'll want to weld the 1/8" x 1"sq patches on all the (now spread open) cuts. Now you see why I want to use CNC ribs cut from 3/8" :)

The plow is 66" wide.

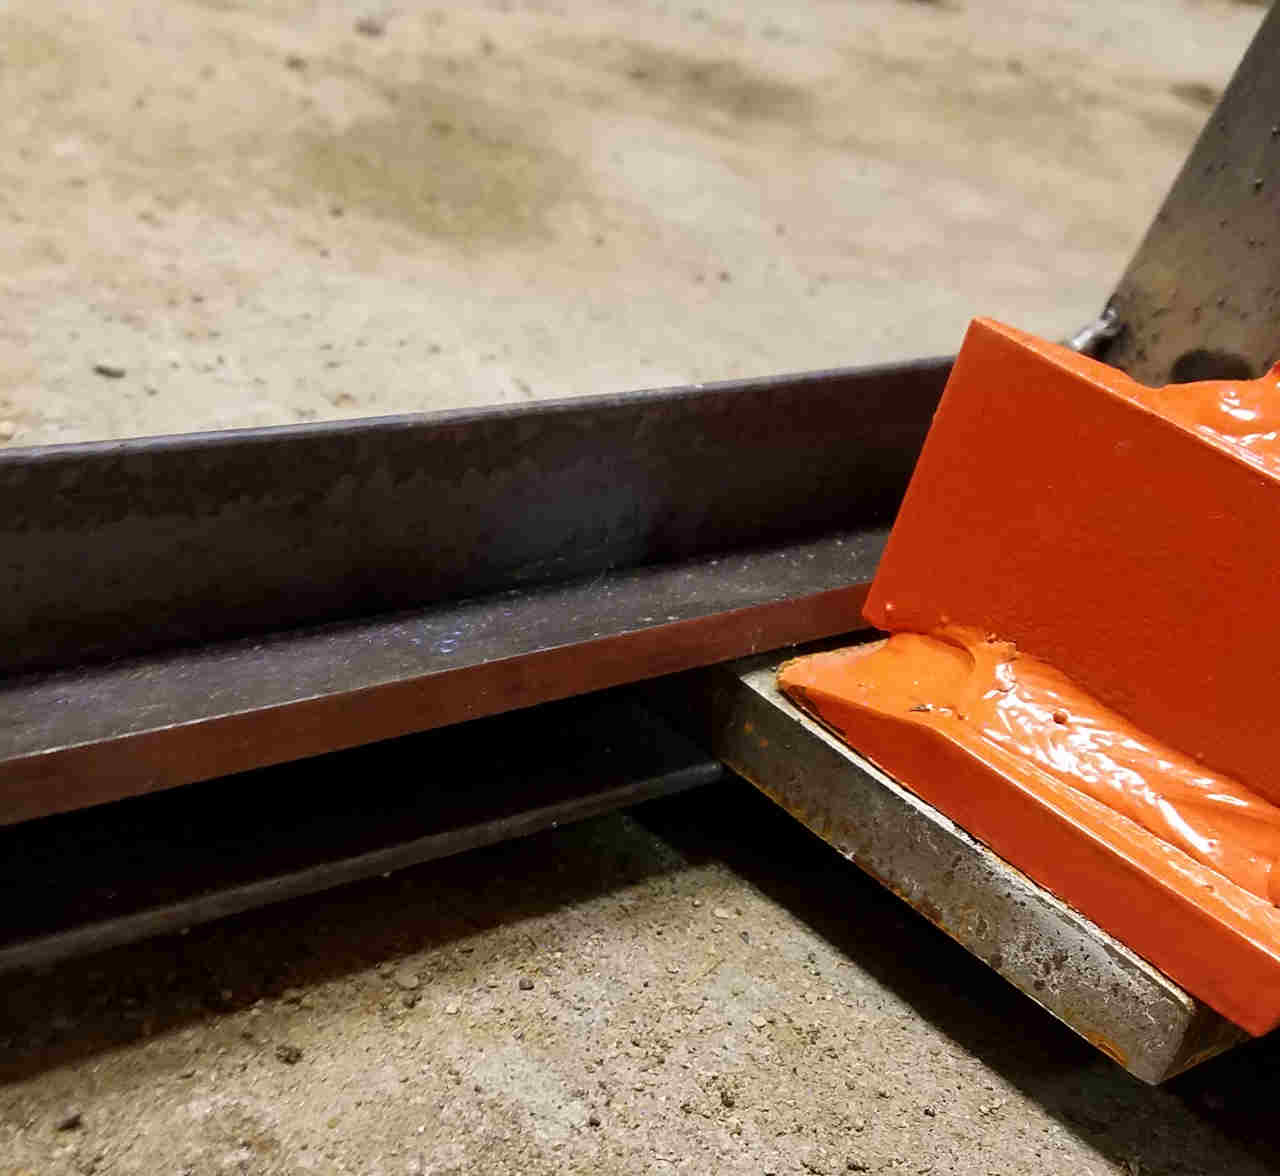
Once all the ribs are done, the next step is to weld the 3/8" x 1-1/4" bar to the lower angle iron. NOTE, weld little 4" runs here and there, switching sides, or you'll warp the whole damned thing. Then, as the next picture shows, you slide it under the bucket's cutting edge, lay the 1/4"x1-1/4" bar on top and tack weld it into place in a few spots. DON'T put weld tacks where the ribs will be placed. NOTE that this 1/4" bar is cut to 65-3/4" to accommodate the end ribs.


RWey56

Member

Equipment
BX23S
Feb 8, 2018
111
3
18
Stanchfield, MN
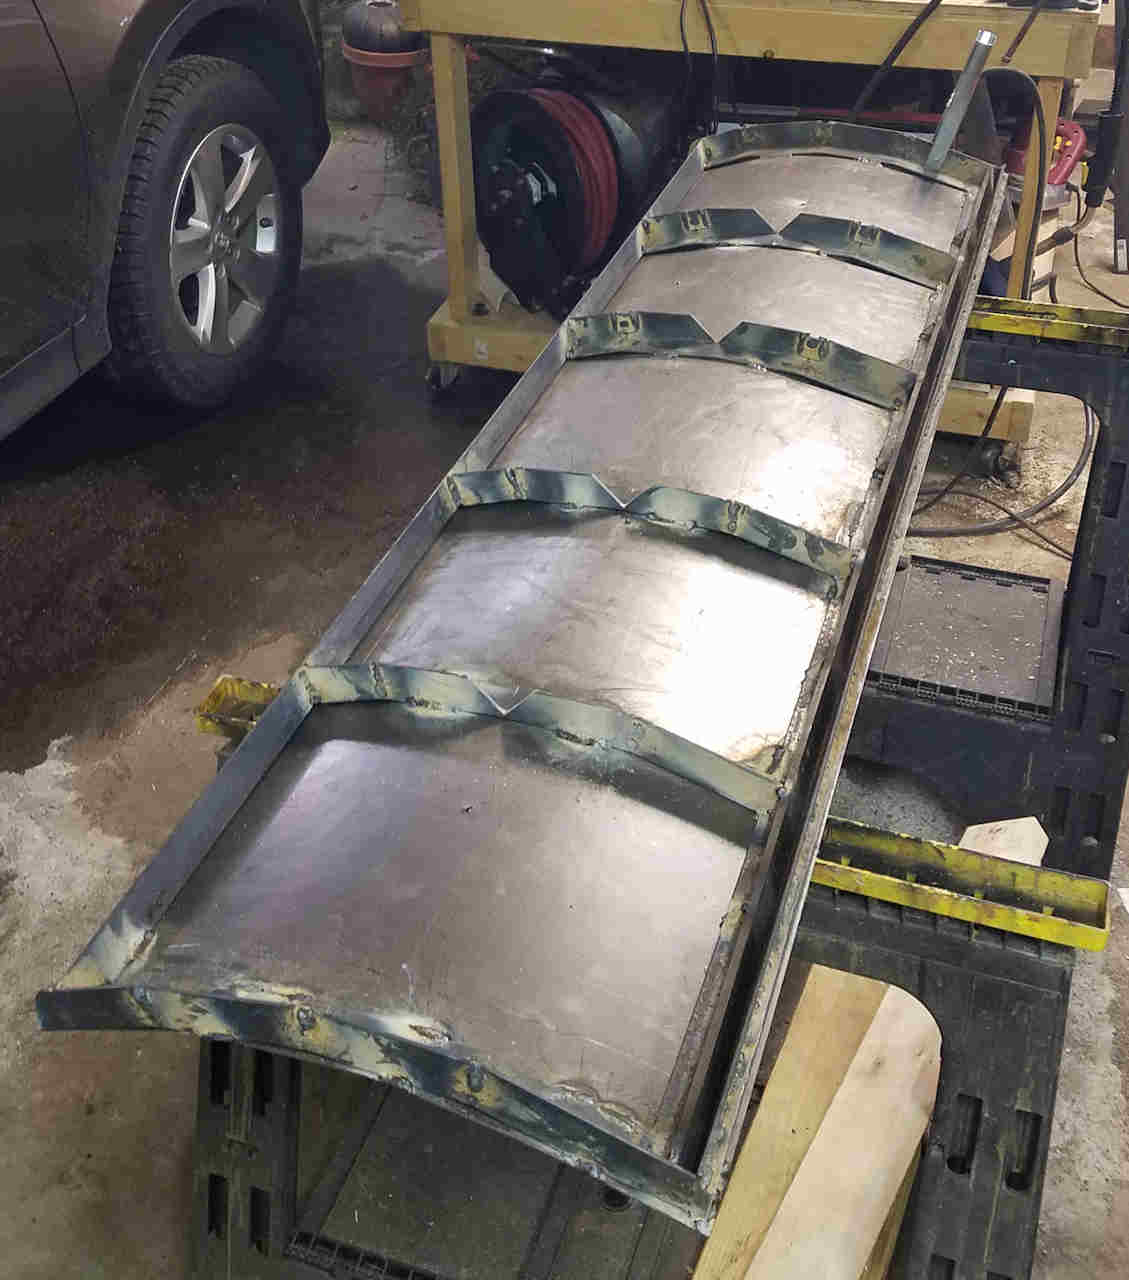
This is the frame welded up, and the plate is cinched on. Sorry, didn't take any pics of the cinching process, but you can figure it out.

Now, you'll notice that my center ribs have a wider notch cut for what looks like another piece of angle iron. They are, and I found it to be completely unnecessary. Strong enough without it. Thus, the center rib diagrams above don't show this cut-out.

If you picture the steel sheet laying flat under the frame, and the 2x4 formers under the sheet with 4 threaded rods poking through, then a 6' 2x4 cleat running the length on the top with 4 holes and the rods coming through, you get the idea of cinching the curl into the sheet. You just keep tightening the nuts on the rods and it will pull it into shape. Before you tack weld it, you can bump it around with a hammer to get it aligned ... in particular you want to flush it up on the bottom scraping edge.

 
Last edited:

RWey56

Member

Equipment
BX23S
Feb 8, 2018
111
3
18
Stanchfield, MN
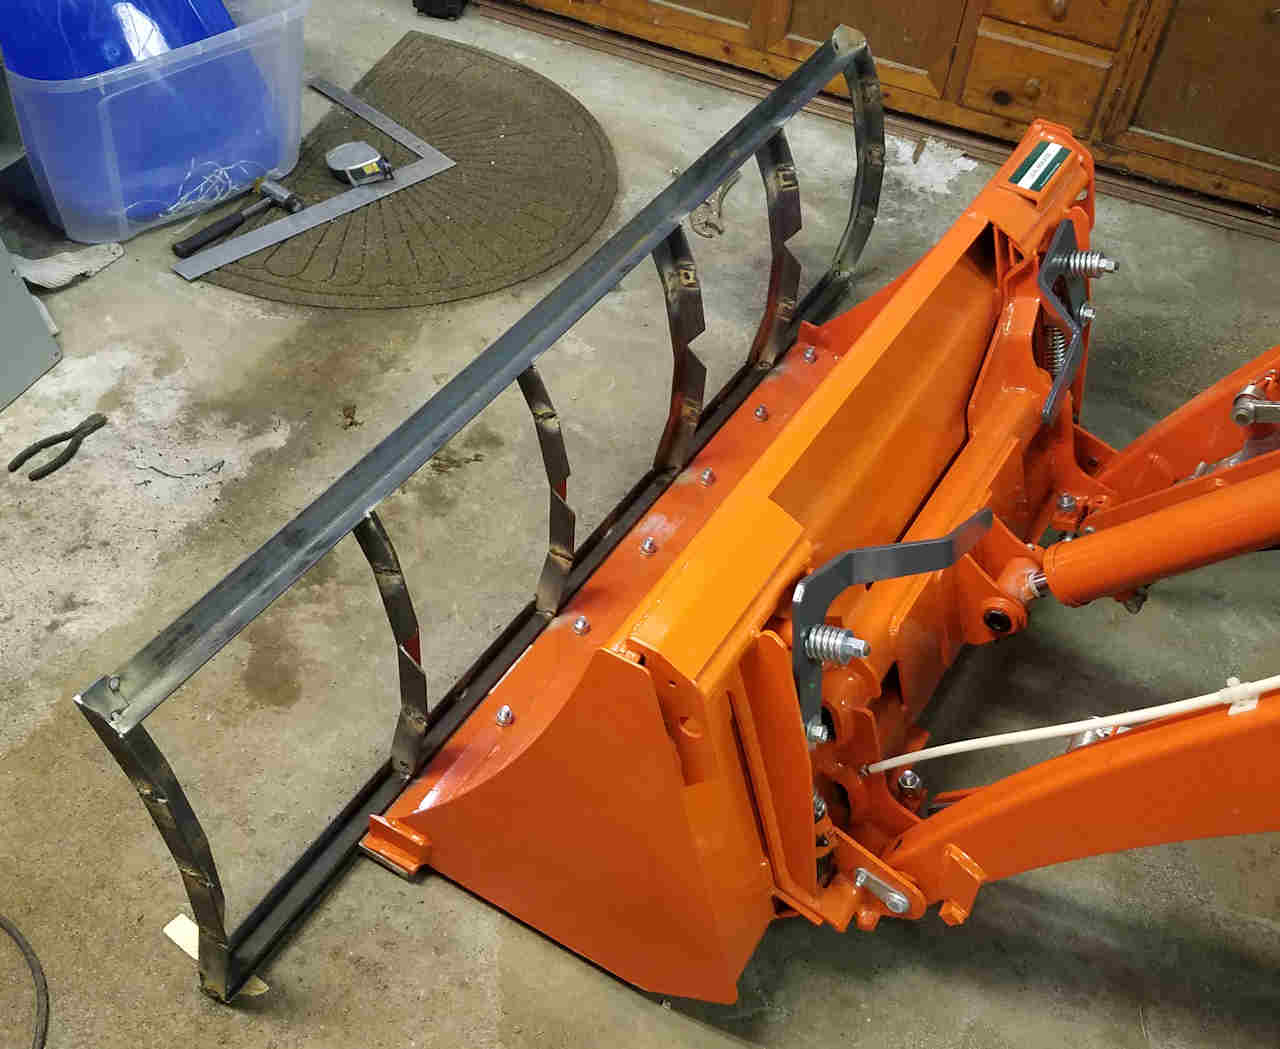
This next one shows the first trial fit. Pay close attention to the upper angle iron lateral. It's cut to 65-3/4" and with one flat cut away on each end to accept a flush weld to the side ribs. You not looking at a lap joint, which would make a step that would be difficult to fit the sheet across. Precise cuts on this and on the ribs is critical, or nothing will line up.

You can see the V notches in the center ribs for additional angle iron. Again, not necessary.

 
Last edited: