L4150 Repair Restore

PoTreeBoy

Well-known member
Lifetime Member

Equipment
L35 Ford 3930
Mar 24, 2020
2,805
1,522
113
WestTn/NoMs
Howdy boys, been a little while. Mrs Ranger and I took an anniversary trip to Cancun last week. Our trip had been postponed from march due to Covid, so we finally got to go, and we got Covid, šŸ¤¦šŸ»ā€ā™‚ļø Been laid up for almost a week, but feeling better by the day. Got up and around and a little bit done on the tractor. Thought Iā€™d update.

So one of the easy checker (warning) lights on the dash was the battery. There was a 2v sensor that would plug into one of the cells on an older style battery. That sensor and battery is gone now, so I decided to upgrade that slot to a volt meter. I always find it helpful to have one. This should work just fine and keeps a factory dash look.

(I know @Nicksacco is gonna tell me Iā€™m creative wiring again šŸ¤£)

View attachment 89560


View attachment 89561

Iā€™ve also been trying to figure out what to do with the pc board pins. I didnā€™t want to get rid of the plugs, but I want solid connections. I finally decided to use m2.5 pan head screws mounted upside down to act as pins.

View attachment 89562


They are a few thousandths (inch) thicker than the pins but seem to work well and make good contact. I added the new led lights and cups and gave it a test runā€¦it holds and works well!

View attachment 89563


View attachment 89564


Iā€™m waiting on some dash pointers to come in tomorrow, and with that sorted I should be able to wrap up the dash this weekend hopefully.

Last thing for today was the stop solenoid relay timer. @PoTreeBoy it was a direct fit, and works like a champ! Thank you sir!

View attachment 89565

Thats it for today. Yā€™all have a great night!

šŸ¤ 
Glad to see you back and doing well. That's a neat voltmeter - where'd you get it? I have a combo USB charger/voltmeter that plugs into the cigarette lighterpower outlet I installed on the dash. I've contemplated a 4wd indicator, maybe in an unused spot in the easy checker. But the voltmeter would be a good alternative. How about a picture when you get it back together?

I would have soldered those nuts or used the compound for dissimilar metals since zinc and copper could cause galvanic corrosion, but you can do that next time šŸ˜ˆ
 
  • Like
Reactions: 1 user

Nicksacco

Well-known member

Equipment
Kubota L35 TLB, 2014 RTV-1140CPX
Sep 15, 2021
679
386
63
Bahama, NC
Ha! Cisco, I'm glad you're back and in good health.
I like the voltmeter thingy and I would say that is NICE creative wiring as opposed to the photo below for example. :LOL:
Perhaps add a disconnect if you have to remove the panel in the future. Unless you're getting the juice from one of the ALT circuits internally.
Maybe some dielectric or compound as @PoTreeBoy suggested. Cool idea for adding a 4WD indicator too. Easy enough and hmmm, gives me ideas...
Looking forward to some final pics and such!


1666944391627.png
 
Last edited:
  • Like
Reactions: 1 user

CiscoRanger

Active member
Lifetime Member

Equipment
L4150DT / BF900
Oct 3, 2022
254
130
43
Texas
Glad to see you back and doing well. That's a neat voltmeter - where'd you get it? I have a combo USB charger/voltmeter that plugs into the cigarette lighterpower outlet I installed on the dash. I've contemplated a 4wd indicator, maybe in an unused spot in the easy checker. But the voltmeter would be a good alternative. How about a picture when you get it back together?

I would have soldered those nuts or used the compound for dissimilar metals since zinc and copper could cause galvanic corrosion, but you can do that next time šŸ˜ˆ
Thanks Po. ā€œNext timeā€¦ā€ Lol. I havenā€™t finished assembly yet, just a test fit, and I am considering oxguard under them and on the threads acting as pins. The plan is for there not to have to be a next time. šŸ˜‰ Oh and the screws and nuts are stainless. Still dissimilar, tho.

I got the voltmeter off of Amazon. Was the right size for the easy checker light cavities. Had to cut the screw hole wings off but no big deal.

bayite Pack of 5 Three-Wire Calibratable DC 0~30V Red Digital Mini Voltmeter Gauge Tester Mount Car Motorcycle Battery Monitor Volt Voltage Meter 0.36" Red LED Display Panel https://a.co/d/2O9fY9Z

No work done today. The fatigue comes and goes. Hopefully back at it tomorrow.

šŸ¤ 
 
Last edited:
  • Like
Reactions: 1 user

CiscoRanger

Active member
Lifetime Member

Equipment
L4150DT / BF900
Oct 3, 2022
254
130
43
Texas
UPDATE: Howdy Gents. Been awhile since I worked on the Cheeto restore. brought it back into the shop to close on some remaining items and hopefully return it to service.

I finally finished the dash and all is working very well. Lights, hazards, all ez checkers, etc. I ended up gluing some coffee stir sticks to the pivots for needles. The coolant needle is to tall to hit the stop but it works as intended when running.

4236E591-9845-41BA-8750-334235D98DAE.jpeg


after mostly buttoning up the dash (still waiting on the shuttle shift lock parts to put the covers on the steering column) I started in on the rad fan. It was super brittle, and wouldnā€™t have lasted long.

777BFD81-0FA7-425A-9FA9-EB0B73370643.jpeg


i pulled the rad too and changed the hoses. Itā€™s pretty rusty inside so a flush will follow.

55D0ACE8-1B74-4DE4-98B7-4FC5544A1DD3.jpeg


The only thing left before putting the panels on was figuring out where the coolant overflow bottle went. It was missing when I received the tractor, but I bought a replacement. Iā€™d wracked my brain and parts diagrams and the WSM looking for the bracket that it mounts onā€¦then it finally hit meā€¦maybe it mounts to the side panels. Sure enough.

71A34DEC-D8A9-4D66-B897-22C9B8C7EF13.jpeg


Relief. Got the side panels on then got the loader remountedā€¦looking good!

B95BD183-62C2-4607-ADED-A1019B4A6938.jpeg


08C58155-2AA6-444C-93A4-3A3551AA4B16.jpeg


Need to put the panels back on around the seats, and get some decals on order.

Have some additional updates Iā€™ll get typed up.

šŸ¤ 
 
  • Like
  • Love
Reactions: 3 users

fried1765

Well-known member

Equipment
Kubota L48 TLB, Ford 1920 FEL, Ford 8N, SCAG Liberty Z, Gravely Pro.
Nov 14, 2019
7,843
5,066
113
Eastham, Ma
UPDATE: Howdy Gents. Been awhile since I worked on the Cheeto restore. brought it back into the shop to close on some remaining items and hopefully return it to service.

I finally finished the dash and all is working very well. Lights, hazards, all ez checkers, etc. I ended up gluing some coffee stir sticks to the pivots for needles. The coolant needle is to tall to hit the stop but it works as intended when running.

View attachment 100307

after mostly buttoning up the dash (still waiting on the shuttle shift lock parts to put the covers on the steering column) I started in on the rad fan. It was super brittle, and wouldnā€™t have lasted long.

View attachment 100309

i pulled the rad too and changed the hoses. Itā€™s pretty rusty inside so a flush will follow.

View attachment 100310

The only thing left before putting the panels on was figuring out where the coolant overflow bottle went. It was missing when I received the tractor, but I bought a replacement. Iā€™d wracked my brain and parts diagrams and the WSM looking for the bracket that it mounts onā€¦then it finally hit meā€¦maybe it mounts to the side panels. Sure enough.

View attachment 100311

Relief. Got the side panels on then got the loader remountedā€¦looking good!

View attachment 100314

View attachment 100316

Need to put the panels back on around the seats, and get some decals on order.

Have some additional updates Iā€™ll get typed up.

šŸ¤ 
Is it going to get fresh new clothes?
 
  • Like
Reactions: 1 user

CiscoRanger

Active member
Lifetime Member

Equipment
L4150DT / BF900
Oct 3, 2022
254
130
43
Texas
Is it going to get fresh new clothes?
I donā€™t think so. At least not yet. After everything is done Iā€™m going to cut the loader brackets off the bucket and weld on some SSQAs. Loader will see some paint at that point for sure. Might paint ROPS. But I doubt Iā€™ll do the whole thing.
 

Nicksacco

Well-known member

Equipment
Kubota L35 TLB, 2014 RTV-1140CPX
Sep 15, 2021
679
386
63
Bahama, NC
Nice work, Cisco.

The panel is awesome and I love the coffee stirrer idea!
 
  • Like
Reactions: 1 user

CiscoRanger

Active member
Lifetime Member

Equipment
L4150DT / BF900
Oct 3, 2022
254
130
43
Texas
Nice work, Cisco.

The panel is awesome and I love the coffee stirrer idea!
Thanks Nick. I appreciate it. I looked for actual needles for a long while, but no luck. The coolant needle rubs on my OCD a little bit, but This will do fine. šŸ˜‚
 

CiscoRanger

Active member
Lifetime Member

Equipment
L4150DT / BF900
Oct 3, 2022
254
130
43
Texas
UPDATE: Iā€™ve seen a drip or two of oil prior to this but after driving it to put on the loader and pulling back into the shop, thereā€™s a significant drip coming from the front end under the diff.

392190D3-1079-4C98-B3C2-B460375124B1.jpeg


at first I thought this was maybe a front Axle leak, but it isnā€™t 80w90, and the motor oil is darker. This has to be hydraulic oil. The only hydraulics (under the hood) that I know of that comes forward of the bellhousing is the pump. Itā€™s not leaking from there and all around the motor is dry.

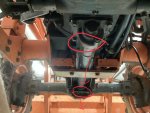
I think it is dripping from under the transmission where the front drive shaft exits the trans, and is running down the shaft cover and exiting at the pinion housing. Red arrows

5F4E46C4-903F-47E6-9A88-6FD7617B4B71.jpeg


Only way I can confirm where it is leaking is to remove the front drive shaft cover. To remove that I have to remove the loader cross member. Green arrows.

To remove the crossmember I have to remove 3 of the loader frame bolts on each side. Looks like there are plenty of other bolts and would not cause a safety issue, but you guys sanity check me.

02E6E9A6-3D8D-4DA1-9930-C7050F8ECBA6.jpeg


Maybe throw some jack stands under the loader mast base?
 

Attachments

North Idaho Wolfman

Moderator
Staff member
Lifetime Member

Equipment
L3450DT-GST, Woods FEL, B7100 HSD, FEL, 60" SB, 743 Bobcat with V2203, and more
Jun 9, 2013
30,193
6,366
113
Sandpoint, ID
UPDATE: Iā€™ve seen a drip or two of oil prior to this but after driving it to put on the loader and pulling back into the shop, thereā€™s a significant drip coming from the front end under the diff.

View attachment 100322

at first I thought this was maybe a front Axle leak, but it isnā€™t 80w90, and the motor oil is darker. This has to be hydraulic oil. The only hydraulics (under the hood) that I know of that comes forward of the bellhousing is the pump. Itā€™s not leaking from there and all around the motor is dry.

I think it is dripping from under the transmission where the front drive shaft exits the trans, and is running down the shaft cover and exiting at the pinion housing. Red arrows

View attachment 100325

Only way I can confirm where it is leaking is to remove the front drive shaft cover. To remove that I have to remove the loader cross member. Green arrows.

To remove the crossmember I have to remove 3 of the loader frame bolts on each side. Looks like there are plenty of other bolts and would not cause a safety issue, but you guys sanity check me.

View attachment 100327


Maybe throw some jack stands under the loader mast base?
You really don't need to pull that bracket, can pull the cover and expose the shaft and see if it's leaking from the rear housing.

But if you want to, you can safely pull that center bracket without having to support the side arms, it's there for side force mitigation when the loader is in use.
 
  • Like
Reactions: 1 user

CiscoRanger

Active member
Lifetime Member

Equipment
L4150DT / BF900
Oct 3, 2022
254
130
43
Texas
T
You really don't need to pull that bracket, can pull the cover and expose the shaft and see if it's leaking from the rear housing.

But if you want to, you can safely pull that center bracket without having to support the side arms, it's there for side force mitigation when the loader is in use.
Thanks wolfman. Ok bolts came out relatively easy (Thank you Texas for everything not being rusted.). It is doing exactly that. Running the length of the FDS cover.

1C81C5FE-F5DF-4597-BACB-277372ACC0ED.jpeg

Looks like the FDS housing where it mates to the trans is dry, but the bearing seal is wet so likely leaking there.

6C6283D3-DC55-47DC-81BC-BB9C9B72B7BD.jpeg


The front Axle Pinion seal and bearing looks off center. Maybe that is causing the back seal to leak. See the gap underneath the Pinion? shaft

45DCDF99-8978-419A-B380-0487AA69E3E6.jpeg


Might be a good idea to have both seals/bearings replaced? Not sure what all that entails from the front, but looks like splitting the front axle from the motor.
 
  • Like
Reactions: 1 user

MountainMeadows

Well-known member

Equipment
L2501, JD 655, Ford 841, JD 6x4 Gator, Gravely 432.
Jun 6, 2022
222
303
63
Poconos, PA
With the shaft being that far off center I'd have to wonder if the bearing failed.
 
  • Like
Reactions: 1 users

TheOldHokie

Well-known member
Lifetime Member

Equipment
L3901/LA525, B7200DT/B1630, G2160/RCK60, G2460/RCK60
Apr 6, 2021
8,735
4,477
113
Myersville, MD
windyridgefarm.us
T

Thanks wolfman. Ok bolts came out relatively easy (Thank you Texas for everything not being rusted.). It is doing exactly that. Running the length of the FDS cover.

View attachment 100333
Looks like the FDS housing where it mates to the trans is dry, but the bearing seal is wet so likely leaking there.

View attachment 100334

The front Axle Pinion seal and bearing looks off center. Maybe that is causing the back seal to leak. See the gap underneath the Pinion? shaft

View attachment 100335

Might be a good idea to have both seals/bearings replaced? Not sure what all that entails from the front, but looks like splitting the front axle from the motor.
I have ZERO direct knowledge but looks to me like it just unbolts from the underside of the transmission.

Dan
 

North Idaho Wolfman

Moderator
Staff member
Lifetime Member

Equipment
L3450DT-GST, Woods FEL, B7100 HSD, FEL, 60" SB, 743 Bobcat with V2203, and more
Jun 9, 2013
30,193
6,366
113
Sandpoint, ID
Dropping the front axle is fairly easy to drop 6 bolts:

1681600204638.png


You'll unbolt the differential cover:

1681600396065.png


Then you can get to the seal and bearings:

1681600428010.png
 
  • Like
Reactions: 1 user

CiscoRanger

Active member
Lifetime Member

Equipment
L4150DT / BF900
Oct 3, 2022
254
130
43
Texas
I have ZERO direct knowledge but looks to me like it just unbolts from the underside of the transmission.

Dan
I think youre right. The one with 4 bolts is under the transmission, and the two bolts, is the front axle support at the front diff. Both look to drop by just unbolting them.
 

CiscoRanger

Active member
Lifetime Member

Equipment
L4150DT / BF900
Oct 3, 2022
254
130
43
Texas
Dropping the front axle is fairly easy to drop 6 bolts:

View attachment 100369

You'll unbolt the differential cover:

View attachment 100370

Then you can get to the seal and bearings:

View attachment 100371
@North Idaho Wolfman The more I look at this, the more I think that front axle support is a dry area, and the seal is just a dust seal. On your Diff diagram, the pinion exits out the back thru 2 bearings and an oil seal (which seals the Front axle oil from the front axle support) and a nut on the end...leaving the splines still exposed.

1681606488924.png


Then the coupling (100 in my diagram below) fits over the splines of the pinion gear in the front, and couples it through the axle support housingto the drive shaft.


1681605787319.png


1681606337192.png


I'm guessing you can pull the drive shaft, remove these two bolts, and separate it from the closed/sealed Front differential body.
 

North Idaho Wolfman

Moderator
Staff member
Lifetime Member

Equipment
L3450DT-GST, Woods FEL, B7100 HSD, FEL, 60" SB, 743 Bobcat with V2203, and more
Jun 9, 2013
30,193
6,366
113
Sandpoint, ID
@North Idaho Wolfman The more I look at this, the more I think that front axle support is a dry area, and the seal is just a dust seal. On your Diff diagram, the pinion exits out the back thru 2 bearings and an oil seal (which seals the Front axle oil from the front axle support) and a nut on the end...leaving the splines still exposed.

View attachment 100397


Then the coupling (100 in my diagram below) fits over the splines of the pinion gear in the front, and couples it through the axle support housingto the drive shaft.


View attachment 100394

View attachment 100396

I'm guessing you can pull the drive shaft, remove these two bolts, and separate it from the closed/sealed Front differential body.
Grab a hold of the shaft like a gorilla and shake, does the shaft move in the case?
If it doesn't you might be right.
I don't know if you can remove just the rear support, but worth a try.
 
  • Like
Reactions: 1 user