Fish Lifes B6100 Restoration

motorhead

Active member

Equipment
2009 B3200, 2007 Dodge/Cummins powered Ram 2500 395hp
May 17, 2012
441
34
28
Atascadero
Is the pilot bushing suppose to be a snug fit in the end of the crack? I had to use a pulled to get the old one out but the new one has a bit of clearance and wobbles around in the hole. It does fit perfect on the shaft though.
The pilot bearing has to have a "Press fit" into the crank. Is it a needle bearing or just a bronze bushing? In any event, especially with a roller bearing for the pilot bearing, be careful driving it in so you don't damage it. The bronze solid bushing is more forgiving but also take care driving it into the crank. Make sure there is no burrs after the install as it will hang up on the main shaft.
 
Last edited:

FishLife

New member
Nov 28, 2018
177
0
0
Destin, Fl
The pilot bearing has to have a "Press fit" into the crank.
That’s what I was thinking. I had to use a puller to get the old one out. I have replaced all parts with OEM but the one part I get off eBay aftermarket doesnt fit. At least it was only six dollars but now has created a delay as I will have to wait on an OEM one.
 

FishLife

New member
Nov 28, 2018
177
0
0
Destin, Fl
The pilot bearing has to have a "Press fit" into the crank. Is it a needle bearing or just a bronze bushing? In any event, especially with a roller bearing for the pilot bearing, be careful driving it in so you don't damage it. The bronze solid bushing is more forgiving but also take care driving it into the crank. Make sure there is no burrs after the install as it will hang up on the main shaft.
It is a bronze bushing with some type of yellow friction material on the inside that contacts the propeller shaft.
 

JohnDB

Active member
Lifetime Member

Equipment
M4500DT
Jun 9, 2018
396
71
28
NZ
Should definitely be a press fit (as in it should be a tight enough fit inside the crank that it won't turn in the crank). Usually you can install these with light tapping with a hammer. You probably know this anyway: make sure it's aligned dead centre and straight, and you have something to spread the load of the hammer evenly around the end of the bushing that you are striking, to minimise or prevent the burring that motorhead warns about.
 

FishLife

New member
Nov 28, 2018
177
0
0
Destin, Fl
I got the engine on my bench to test that everything is running before I bolt the haves back together. Started up fine after bleeding the fuel lines. I only ran it 10-15 sec with about a 30-45 min cool down since I dont have the cooling system hooked up. I mainly wanted to check the oil pressure since I had installed a new plug in the end of the cam. I was hoping to see the pressure jump up but unfortunately not as much as I was hoping. It went from 5-7 psi at idle to about 22psi idle and about 28 psi full throttle. Is there a plug in the rear of the cam? It looks like there is a freeze plug in the block that is where the came end is. Any thoughts? Also running Roltella 15-40. I would think the pressure will drop some after the oil gets hot also.
 

torch

Well-known member

Equipment
B7100HSD, B2789, B2550, B4672, 48" cultivator, homemade FEL and Cab
Jun 10, 2016
2,621
871
113
Muskoka, Ont.
I just changed the pilot bushing in my B7100, and it was a light press fit into the crankshaft. The old one was similar, requiring a gentle pull with a blind bearing puller.

Do you have a micrometer? I still have my old one and can measure the OD for comparison if you like.

I would consider using a wrap of shim stock around the bearing. Of course, that will require some precision measurements to determine the required thickness. They can be hard to find, but 1/4" wide feeler gauges would be an appropriate measurement tool for this. Determine the gap, round up to the nearest thousandth and divide by 2 to determine the required shim thickness.
 

FishLife

New member
Nov 28, 2018
177
0
0
Destin, Fl
I just changed the pilot bushing in my B7100, and it was a light press fit into the crankshaft. The old one was similar, requiring a gentle pull with a blind bearing puller.

Do you have a micrometer? I still have my old one and can measure the OD for comparison if you like.

I would consider using a wrap of shim stock around the bearing. Of course, that will require some precision measurements to determine the required thickness. They can be hard to find, but 1/4" wide feeler gauges would be an appropriate measurement tool for this. Determine the gap, round up to the nearest thousandth and divide by 2 to determine the required shim thickness.
I you dont mind. This aftermarket replacement one measures 16.05mm. The hole in the end of the crank shaft measures 17mm.I looked for my old one but I must of thrown it out already. I was going to order an OEM one on Monday.
 

motorhead

Active member

Equipment
2009 B3200, 2007 Dodge/Cummins powered Ram 2500 395hp
May 17, 2012
441
34
28
Atascadero
Fish, Get the right one. If you shimmed one to fit and it is NOT dead center, you could have vibrations through the trans, cause the trans input bearing to not run even and possibly wear it out.
 

FishLife

New member
Nov 28, 2018
177
0
0
Destin, Fl
I just changed the pilot bushing in my B7100, and it was a light press fit into the crankshaft. The old one was similar, requiring a gentle pull with a blind bearing puller.

Do you have a micrometer? I still have my old one and can measure the OD for comparison if you like.

I would consider using a wrap of shim stock around the bearing. Of course, that will require some precision measurements to determine the required thickness. They can be hard to find, but 1/4" wide feeler gauges would be an appropriate measurement tool for this. Determine the gap, round up to the nearest thousandth and divide by 2 to determine the required shim thickness.
Did you Buy The Kubota OEM bushing? just curious.
 

torch

Well-known member

Equipment
B7100HSD, B2789, B2550, B4672, 48" cultivator, homemade FEL and Cab
Jun 10, 2016
2,621
871
113
Muskoka, Ont.
Did you Buy The Kubota OEM bushing? just curious.
Yes I did.

BTW: I ran out to the garage to measure the old one, but it's not where I thought I left it. I have a house full of grandkids so I couldn't stay out there and look for it. I'll look again tomorrow when there's another adult around to watch the kids.
 

FishLife

New member
Nov 28, 2018
177
0
0
Destin, Fl
Yes I did.

BTW: I ran out to the garage to measure the old one, but it's not where I thought I left it. I have a house full of grandkids so I couldn't stay out there and look for it. I'll look again tomorrow when there's another adult around to watch the kids.
No problem,
Thanks
 

torch

Well-known member

Equipment
B7100HSD, B2789, B2550, B4672, 48" cultivator, homemade FEL and Cab
Jun 10, 2016
2,621
871
113
Muskoka, Ont.
Found it. It must have fallen off the workbench and rolled across the floor. Unfortunately I ran it over when I pulled a snowmobile in for a windshield change and it's more of a c-shape now so any measurement would be pointless.

Sorry.
 

North Idaho Wolfman

Moderator
Staff member
Lifetime Member

Equipment
L3450DT-GST, Woods FEL, B7100 HSD, FEL, 60" SB, 743 Bobcat with V2203, and more
Jun 9, 2013
30,557
6,602
113
Sandpoint, ID
The hole in the crank is 17MM so yes the bushing that you got is wrong?
An OEM bushing should fit perfectly. ;)
 

FishLife

New member
Nov 28, 2018
177
0
0
Destin, Fl
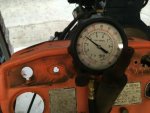
I have oil pressure back again! I was only getting 20 psi after the cam plug repair and decided to change the high pressure oil bypass thinking the spring or seat could be worn out after 40 years. After changing it the pressure jumped to 54 psi. Super excited about that. Also got the OEM pilot bushing and it fits correctly.
 

Attachments

Last edited:

JohnDB

Active member
Lifetime Member

Equipment
M4500DT
Jun 9, 2018
396
71
28
NZ
Congratulations! Been a lot of fun to follow your journey and learn stuff myself in the process.
 

FishLife

New member
Nov 28, 2018
177
0
0
Destin, Fl
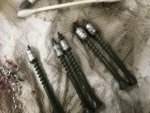
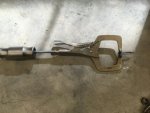
I had forgotten that some of the small aluminum oil galley plugs were leaking and needed to be fixed. After my bench test they reminded me. I got them out pretty easily. Using some grease to collect the chips I drilled a small hole in the center and screwed a deck screw into them. I the used a slide hammer with vise grips to pull them out. I originally planned on tapping the holes and using a threaded pipe plug in place of the hammer in aluminum plugs. Now Im wondering if I should just get new aluminum plugs from Kubota and put a little sealant on them instead of threading them. Im thinking if something goes wrong threading the holes it could really cause some problems getting the holes plugged.
 

Attachments

Last edited: