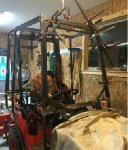
BX Snow Cab

Ping

Active member

Equipment
BX2370-1
Dec 25, 2018
311
226
43
Troy, Ohio
Not really sure where to start...so, here goes.
Bought my BX2370 about 3 years ago and have enjoyed everything about it except one thing: you freeze your backside off while plowing snow. I don't recall it being this cold when we plowed snow as kids 40 some years ago.
So, silly me, I think I'll just buy an aftermarket cab, how much could that cost? Well, after the wife finished with the CPR and defibrillator, I decides I'm not going to take out a second mortgage on the house and I'm going to build my own cab. After all, how hard could it be?
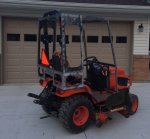
So, I surf the internet looking for ideas on DIY or home made tractor cabs. Some looked to be really well thought out and some, well, lets just say while they may have been functional their looks left a lot to be desired. Right then is when I thought that if I was going to fabri-cobble a cab for this tractor, I was going to make something that looked like it belonged there. I wanted to maintain my ROPS, have good visibility, aesthetically pleasing, easily removable, access to hood latch, not create any new holes in the tractor and be built with tools I had on hand.
Using my newly found intranet ideas (tinkerwitheverything, tcrote and Chim from here really stood out, thanks for posting gentlemen) along with my own spin on things, the little wheels upstairs were turning and I set out to mock this build up with materials I had on hand to see if things would work out in real life like they did in my head. You also need to know that I have access to AutoCAD Inventor at work and would model things up during lunch when I could. I'm on about the 4th or 5th iteration for the as built. Some things were easily modeled and worked out first on the computer. And, some were easier for me to cobble together in the garage then create the model afterwards.
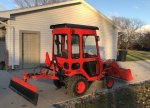
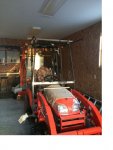
I've learned you really do like your tractor porn around here and hope you're not disappointed. I'll try to attach a couple pictures of the completed cab for your enjoyment. For those of you interested, I worked on this off and on for the last 3 years. I have lost track of how many hours I have invested in this but, it has been a labor of love. I've learned a lot from this build and will post updates from time to time so you can experience the journey as well.
Hope you enjoy!
 

Attachments

  • Like
Reactions: 1 user

sagor

Active member

Equipment
BX25, BX2750D, BX2760A, 5' back blade
Jan 9, 2017
285
58
28
Sudbury, ON, Canada
Nice Cab. Wish I had a hard cab. But, I'll put still up with my soft cab in the winter. At least it keeps the wind and blowing snow out.
 

Ping

Active member

Equipment
BX2370-1
Dec 25, 2018
311
226
43
Troy, Ohio
Thanks and stay warm up there. Used to drive a soft top Jeep many years ago. I remembered how bad the plastic windows would look after a couple years is the reason I went hard cab & glass.
Regards
 

RCW

Well-known member
Lifetime Member

Equipment
BX2360, FEL, MMM, BX2750D snowblower. 1953 Minneapolis Moline ZAU
Apr 28, 2013
9,142
5,215
113
Chenango County, NY
Used to drive a soft top Jeep many years ago.

Ping - excellent work.
I also drove a ragtop CJ-7 to/from Syracuse, New York as a college kid. I could tell some stories....Syracuse gets snow sometimes...oh, sometimes about -20F...BRRR.....[emoji15]

Some days I’d like a soft top for my BX/snowblower...better than I have now!
Looks great! The integrated work lights and flashers at top are wonderful adaptations!


Sent from my iPhone using Tapatalk
 
Last edited:

NoJacketRequired

Active member

Equipment
B7510 & LA302 FEL & B2782 blower, B7510 & B2781 blower, B2410 & B2550 blower
May 25, 2016
432
68
28
Ottawa, Ontario
Looks great, Ping!

I'm curious about the mirrors you used and how you mounted them. Do they not shake loose / change aim as the cab door gets opened and closed, vibrating them?

I'm looking for a way to mount mirrors on the Curtis cab (with soft doors) on my "home" tractor, a B7510...
 

Ping

Active member

Equipment
BX2370-1
Dec 25, 2018
311
226
43
Troy, Ohio
RCW, we could swap stories sometime. Mine was a CJ5 during my stay at Ohio State.

Nojacket, those are cheapo Amazon golf cart mirrors. They're bolted into the square tubing door frame. I have less than 2 hours run time since I installed the cab last month. So far, no trouble with them vibrating out of position.

Pauly, yes. Complete build pictures. I'm not really good at this posting stuff. Be patient, they'll come
 
Last edited:

RCW

Well-known member
Lifetime Member

Equipment
BX2360, FEL, MMM, BX2750D snowblower. 1953 Minneapolis Moline ZAU
Apr 28, 2013
9,142
5,215
113
Chenango County, NY
RCW, we could swap stories sometime. Mine was a CJ5 during my stay at Ohio State.

While my CJ wasn’t suited to I-81 much...and drove it daily, this was part of my commute many days for SUNY ESF.... I lived in a rural area and this was a town road through our farm ...could make some maple syrup there ....[emoji41] I took the picture 35 years ago...

The right wiper is a wool sock...[emoji15]


Sent from my iPhone using Tapatalk
 
Last edited:

js5020

Member

Equipment
BX23S
Jun 27, 2018
75
2
8
PA
Nice work on the cab! It's on the to do list here but first I have to raise a few door ways or the machine would need to sit outside,,, cab can wait. Cj,s,,,,I have 2 a 79 and an 80 both cj5's.
 

Ping

Active member

Equipment
BX2370-1
Dec 25, 2018
311
226
43
Troy, Ohio
The Beginning:
I hadn't originally planned to install a front wiper. My plan was to angle the windshield forward like some of the older IH cabs. Since I wanted to have good visibility and knew Lexan or Plexiglass would eventually become frosted and scratched over time, I bit the bullet and went glass all around. I thought I wanted laminated for the front windshield and tempered in the rest. After several discussions with a local glass company, I come to find out that 1/4" laminated would actually be the most inexpensive option for me. He stocked that, said my pieces weren't that big and worked them in over a couple months saving me a few $. I'll get to the rest of that later.
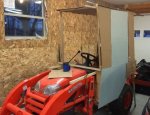
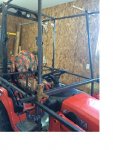
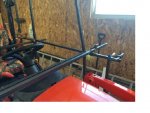
Now for the mockup. Knowing I wanted to go metal instead of wood, and having built cabinets with inset doors, there was no way I was going to attempt to build flush doors for this. All my panels are full overlay so you don't notice any variation in the opening reveal. Mockup with cardboard and Z-fold attached. I wanted my switch panel overhead so as to not block visibility and didn't really have a better idea of where to place it. It was at this point I realized my arms were entirely too short to reach that far forward from the seat. This led to revision #1 where I reversed the angle of the windshield (now layed back in a more conventional arrangement) and needed to incorporate a wiper. Stay tuned, more build progress & pics to come.
 

Attachments

Last edited:

Ping

Active member

Equipment
BX2370-1
Dec 25, 2018
311
226
43
Troy, Ohio
Mounts and Rear Assembly:
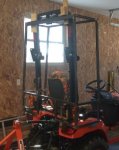
Knowing that curved sections was out (I don't have a tubing roller nor wanted to fork out $ for curved glass) I built everything using simple planes. The original plan for the lower rear portion was to leave the factory hazard lights in place and utilize the 4 small porthole windows to allow them to be seen from outside. This lower portion hangs plumb with 90 degree corners at the rear. The upper portion angles inward about 3" or 5.5degrees. If I had it to do over, I would pinch the top in a little more but that would require I rethink how the front wiper is set up. Since I wanted to retain the ROPS with this cab, I came up with the clipped corner roof design to keep the overall height as low as possible. Also, to clear the ROPS, I left 3/4" between the ROPS and cab frame at the top rear which provides about 5/16" clearance for the rear glass at the pivot brackets. I really liked tinkerwitheverythings idea for pivoting the whole cab off in the spring but wanted a little more substantial rear mount. The rear mounts are 1.5x1.5x3/16 angle iron. I utilize the ROPS fasteners at this point and am working on a modified nut design to increase thread engagement. The weight of the cab is supported by the bracket itself. I'm not relying on any weld or fastener to carry the cab weight. The dowel pins hold the cab from sliding to the rear off the mounts and provide the hinge pin for install and removal. The picture below shows the frame in the 'rotated back' position.
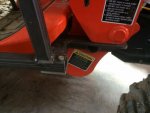
For the front mounts, I utilized the factory holes in the loader mount. If I remember, the OD of 1" pipe needed to be ground down slightly to fit this opening. The rest was just a matter of cobbling angle iron together to get out to the front corners of the operators platform.
Stay tuned, I'll try to upload some more tomorrow. This picture resizing is a challenge for me.
 

Attachments

Last edited:

Ping

Active member

Equipment
BX2370-1
Dec 25, 2018
311
226
43
Troy, Ohio
Cab Frame
The remainder of the frame was fit and tack welded together on the tractor. First thing was to establish the location for the apex of the front (intersection of the windshield and lower portions by the loader arms). I didn't want to have to remove the cab to raise the hood. This was one potential issue I discovered during my web search. Once this position was established in the front to back and vertically in line with the square portion of the rear frame, I had to determine how much I could 'pinch' both side in. It may not be evident from any of the pictures I've posted so far but the front is narrower than the back as well as the top being narrower than the bottom. The jpg of CAD model better illustrates this.
So, everything below this vertical elevation is plumb. The portion above (upper door, front windows, etc) slope inward. The rear window hangs plumb. This was one portion that clamping things together, measuring, etc was more productive than trying to model it first. Once the front was complete, it was just a matter of tying it to the back. Again everything is built as a plane so it was just a matter of measuring the angles and filling in the gaps.
I chose to skin the frame with 18ga sheet metal instead of welding in pieces to create the window openings. I thought this would result in a cleaner more finished look when completed. The fixed window openings were cut in the sheet metal before being plug welded to the frame. This made it easier to manipulate the panel to cut. In an attempt to make this appear like I knew what I was doing, I did my best to keep the tops and bottoms of all glass level as well as in line vertically. Before I could start poking holes in the skins, I had to decide how I was going to mount my glass. I wanted something I could source, wouldn't cost a fortune and be able to install myself if needed. I ended up using Trim-Lok LK1522 single piece locking gasket. Working with my local glass guy, we came up with a reasonable gasket reveal on the inside. I didn't want the gasket to bump up against the frames and give myself enough room to work. So, with my 5/8" reveal plus the width of the gasket, I marked window locations on the panels off the inside of the frame. I found Folgers can lids are a near perfect 3" radius and this was used in all corners. Straight sides were cut with an electric hand shear and the radiused corners a jigsaw. Everything was cleaned up with a file. If I had this to do over or wanted to go into business building these (I'm a gluten for punishment) I would have made plywood templates for each opening and knocked these out with a nibbler. It would have been way faster than the way I did it. Panels were drilled for plug welding about every 3" or so and finish ground. Stay tuned further updates to come.
Hope you enjoy
 

Attachments

Last edited:

Ping

Active member

Equipment
BX2370-1
Dec 25, 2018
311
226
43
Troy, Ohio
Window Time:
Both front and rear windows are operational. I couldn't come up with a slick and inexpensive way to provide a sliding window in the doors like a Curtis Cab so to provide a little ventilation during late fall or early spring use while this is still installed, I went ahead and opted for operable windows. Since the 1x1x14ga tubing frame provides only marginal thread engagement, at each hinge point I installed a 1/4" thick Dutchman in both the cab frame and opening frame. I fit the mitered frames to the openings allowing for 1/4" gap on the 3 non-hinged sides if that makes sense. Everything was tacked in place and then welded up later. Also, so I would have some room for weatherstripping later, the window frames stand proud of the cab frame about 1/8". Nothing earth shattering about this portion of the build. Just a lot of measuring and cutting. Also, it was handy to have an ample supply of clamps in place to hold spacers, etc in place while fitting all this together.
My hinges are left overs from a remodel job we did years ago. Guess in this case it pays to be a pack rat. Just in case anyone is worried about these wearing out prematurely, I probably have enough spares to build another cab.
Up next, Those Darn Doors!
Hope you enjoy.
 

Attachments

Mainah

New member
Lifetime Member

Equipment
L2501HST, BLMX3164 blower, BB1266 box blade, BX42S chipper, Titan forks
Feb 26, 2018
100
0
0
Standish, Maine
Great job on the cab! It looks very professional.
 

pauly

Member

Equipment
2014 B2650, LA534A FEL,B2781B Snow Blower, Land Pride RCR 1260 Land Pride RB157
Sep 23, 2014
150
4
18
East Troy Wisconsin USA
That is some really nice work, impressive. Look forward to the rest of the story.
 

tcrote5516

New member

Equipment
BX1860, FEL, 50" Front Blower, Heated Cab, 6' blade, 3pt carry all, 3pt hitch
Sep 2, 2014
482
3
0
Southern New Hampshire
Phenomenal job! I'm proud to have helped inspire your build but I have to say your's put's mine to shame. Great job man, enjoy it!