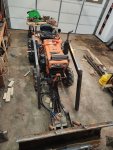
Kubota b7100 FEL build on a budget

Vigo

Well-known member

Equipment
B6100, B8200
Jan 9, 2022
595
340
63
San Antonio Texas
The one weird thing about npt which has bit me i think twice over the years is since its a tapered thread, when you first start threading 2 things together you’re threading the smallest part of the male thread to the biggest part of the female thread and that makes it possible to start it crooked and start crossthreading it without it ‘feeling’ like you’re crossthreading it until you’re already a couple turns in. I just try to make sure its visually correct when im starting things together and dont ‘just’ go by feel on the first couple of threads.

Sounds like you got it figured out.. and yeah Surplus Center is great and their paper catalog is legitimately the most interested ive been in a paper catalog in many years.. maybe ever. 🤣🤣
 
  • Haha
  • Like
Reactions: 1 users

trial and error

Well-known member

Equipment
B7100dt manual trans. homemade FEL, 4 way hydraulic dozer blade
Feb 16, 2023
396
388
63
NY
The one weird thing about npt which has bit me i think twice over the years is since its a tapered thread, when you first start threading 2 things together you’re threading the smallest part of the male thread to the biggest part of the female thread and that makes it possible to start it crooked and start crossthreading it without it ‘feeling’ like you’re crossthreading it until you’re already a couple turns in. I just try to make sure its visually correct when im starting things together and dont ‘just’ go by feel on the first couple of threads.

Sounds like you got it figured out.. and yeah Surplus Center is great and their paper catalog is legitimately the most interested ive been in a paper catalog in many years.. maybe ever. 🤣🤣
Thankfully I have a fair amount of experience with threading fittings working in water treatment
 
  • Like
Reactions: 1 user

trial and error

Well-known member

Equipment
B7100dt manual trans. homemade FEL, 4 way hydraulic dozer blade
Feb 16, 2023
396
388
63
NY
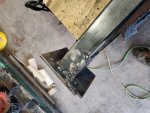
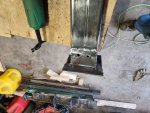
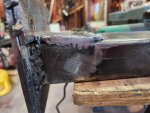
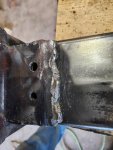
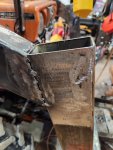
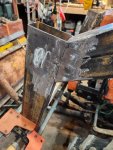
Took Wolfmans advice and got the thinner wire (.030) and what a difference that makes with consistent arc and concentrated heat. I'm still no expert but it definately made a difference in "weld quality" if you can even use the word quality with my work.

Becuase I still don't fully trust my welds at the base of the towers I've decided to add 2×3" 3/16" angle welded and bolted to both the tower posts and the plate that will bolt to the tractor crossmember. I experimented with one of the four sides of the two towers this evening and with the new wire and extra angle tying the plate and 2"×4" together got what I think I could call acceptable results.
The plate on the crossmemeber that the towers get bolted to will also get through bolted samwiching the plate to the 2'x4" cross member to reinforce those welds that will be cleaned up and ran over again after that I think it'll hold.
 

Attachments

North Idaho Wolfman

Moderator
Staff member
Lifetime Member

Equipment
L3450DT-GST, Woods FEL, B7100 HSD, FEL, 60" SB, 743 Bobcat with V2203, and more
Jun 9, 2013
30,206
6,378
113
Sandpoint, ID
Take a piece of steel and run a bead down it and I might be able to tune you into even better welds
 
  • Like
Reactions: 1 user

trial and error

Well-known member

Equipment
B7100dt manual trans. homemade FEL, 4 way hydraulic dozer blade
Feb 16, 2023
396
388
63
NY
Take a piece of steel and run a bead down it and I might be able to tune you into even better welds
I'll have to give that a whirl Saturday, schedule is jammed until then and I may even lose part iof Saturday depending on how much slushy snow we get
 
  • Like
Reactions: 1 user

D2Cat

Well-known member
Lifetime Member

Equipment
L305DT, B7100HST, TG1860, TG1860D, L4240
Mar 27, 2014
13,827
5,568
113
40 miles south of Kansas City
T & E, if you practice on some scrap steel you'll quickly get the hang of the wire, amperage and movement required. From a couple of pictures you have I'd suggest turning up the amperage a bit and practice a back and forth short weave from the two pieces of steel. When you get it dialed in it should sound like you're frying eggs. Try to keep your hand steady.

Do you use an auto darkening welding hood? If not that will make your welding much easier which in turn makes for stronger and better appearing welds.

A bit of practice and confidence building will keep you from drilling and bolting angles at those towers.
 
  • Like
Reactions: 1 user

trial and error

Well-known member

Equipment
B7100dt manual trans. homemade FEL, 4 way hydraulic dozer blade
Feb 16, 2023
396
388
63
NY
T & E, if you practice on some scrap steel you'll quickly get the hang of the wire, amperage and movement required. From a couple of pictures you have I'd suggest turning up the amperage a bit and practice a back and forth short weave from the two pieces of steel. When you get it dialed in it should sound like you're frying eggs. Try to keep your hand steady.

To this end my machine is at max amps already I'm definately working on technique and getting more of the correct sound of bacon or eggs if you will especially now with the better quality and smaller wire diameter keeping my hand steady although im learning to brace it etc s perhaps my third biggest challenge behind the two others I'll get to.

Do you use an auto darkening welding hood? If not that will make your welding much easier which in turn makes for stronger and better appearing welds.

I do use an elautodarkening hood and it is a great improvement over the old style non auto for sure. However my natural eyesight is far from great and that presents its own challenge

A bit of practice and confidence building will keep you from drilling and bolting angles at those towers.
When I ground down the plates attached to the towers I could see decent bond and penetration wherever the weld was at least halfway consistent so I supposse if I kept practicing and trying I could probably get away without the uncontemproary added amgle and bolts however since this is probably the spot which will take the most stress and be the most prone to failure as well as being the hardest to fix or reinforce I would rather just take the extra step and eliminate any doubt in my mind, does drilling 2 holes in the bottom of each post "weaken" it's structural integrity? Perhaps? does it display a lack of confidence. In my ability most likely but I'm going for functional and strong over appetizing to the eyes. I'm not brushing any of your suggestions off just trying to work with what I have and learning/ improving as I go. I attempted to adapt a larger plow to the tractor in the fall I built the adapter plates to what I thought was "strong enough" specs and quickly realized the power of hydraulics and this small little 17 hp tractor with a 5 foot lever on the front. I rebuilt those adapter plates and reinforced them significantly wherever I could and now I can ram the tractor into a immovable object stopping it in its tracks with no damage to the plow mounts (that's how tested not what I do on a regular basis lol ) so I'm trying to take that as a learning experience and the lesson is take what I think is strong enough and double it on crucial parts.
 

D2Cat

Well-known member
Lifetime Member

Equipment
L305DT, B7100HST, TG1860, TG1860D, L4240
Mar 27, 2014
13,827
5,568
113
40 miles south of Kansas City
On your loader perhaps the most important piece of steel would be the two bars that go from the base of the towers back to the rear axle. Make sure the steel for them does not flex anywhere. They keep the whole thing stable when pushing into material.
 
  • Like
Reactions: 1 user

trial and error

Well-known member

Equipment
B7100dt manual trans. homemade FEL, 4 way hydraulic dozer blade
Feb 16, 2023
396
388
63
NY
On your loader perhaps the most important piece of steel would be the two bars that go from the base of the towers back to the rear axle. Make sure the steel for them does not flex anywhere. They keep the whole thing stable when pushing into material.
Thankfully for that the kubota kuh110 ? plow subframe frame is nearly identical to the b219 loader subframe and uses the same axle bolting technique. As far as diagonal bracing from the front of the tractor to the top or middle of the towers I have 2x2" x3/16 wall planned which should be sufficient
 

trial and error

Well-known member

Equipment
B7100dt manual trans. homemade FEL, 4 way hydraulic dozer blade
Feb 16, 2023
396
388
63
NY
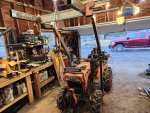
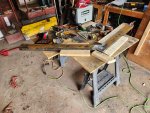
Spent the day getting the loader arms tacked up and the rough measurements as to where to drill the holes for the tower to arm pivot point. In a couple weeks I'll be using a much nicer drill press then mine at my father's shop. Hopefully between they better drill press with a stable table and two sets of hands we can get the holes drilled through the rectangle tube and have it come out at least really close on both sides. I will be sleeving the space between with some sort of bushing for the pins to ride in (sorry guys it's gonna have to be black pipe no DOM and I don't have a mill or lathe to make something superior near me and I know it's gonna wear out sooner then a hardened bushing) but albeit it's better then nothing.

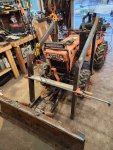
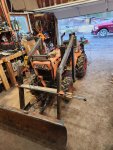
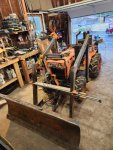
Pics of today's progress below.

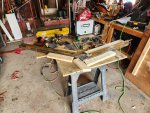
Yes my garage is a giant mess, I have too many projects and not enough space or time and still have to break everything down to get the one car that fits in, with the forecasted snow early next week. Leave it to winter to show up in mid March in New York

Ps if anyone sees and glaring flaws with my geometry or setup please let me know. With the arms raised up to 70+inches I'm still at a eventual bucket pin pivot out near the plow which is over two feet in front of the hood, so while it looks like the arms are close to the wheel in the lowered position that's halfway on purpose. The plan is to leave enough height on the towers to add a side to side brace on the back/top of them and still clear the hood opening and closing
 

Attachments

Last edited:

North Idaho Wolfman

Moderator
Staff member
Lifetime Member

Equipment
L3450DT-GST, Woods FEL, B7100 HSD, FEL, 60" SB, 743 Bobcat with V2203, and more
Jun 9, 2013
30,206
6,378
113
Sandpoint, ID
The blue line will not change if you lower the towers.
it still has the same clearance.
1678649304982.png
 
  • Like
Reactions: 1 users

North Idaho Wolfman

Moderator
Staff member
Lifetime Member

Equipment
L3450DT-GST, Woods FEL, B7100 HSD, FEL, 60" SB, 743 Bobcat with V2203, and more
Jun 9, 2013
30,206
6,378
113
Sandpoint, ID
Your loader arms should be level or slightly down, not a steep angle.
 
  • Like
Reactions: 1 user

trial and error

Well-known member

Equipment
B7100dt manual trans. homemade FEL, 4 way hydraulic dozer blade
Feb 16, 2023
396
388
63
NY
QUOTE="North Idaho Wolfman, post: 619646, member: 13714"]
Your loader arms should be level or slightly down, not a steep angle.
[/QUOTE]

Got it thanks I already disassembled everything this afternoon in preparation for the snow we are suppossed to get tomorrow night so I'll have to revisit this in a couple weeks

I will have to revisit the angle at the joint if I do this correct? make it a shallower angle otherwise when I drop the angle out of the upper section of the arms it's going to push the vertical section way out further from the wheels Also my reasoning for leaving the towers tall is so I could have a second brace running between the arms at the top of the towers and still maintain hood clearances. Am I over thinking this extra bracing? Is not needed I know the factory loader only has one but I was of the thinking more is better. Not trying to argue or be combative, just curious the reasoning?

In the picture below the loader arms are slightly angled down albeit not to the extreme I have them and the towers are as you pointed out roughly level with the hood. If I'm not mistaken the factory lift cylinders are 16"x2" and from the picture it looks like tolerances are tight when the front wheels articulate. My cylinders are longer and in order to gain some triangulation becuase of my cylinders diameter being only 1 inch shaft I was hoping to go at a steeper angle, lower on the tower and possibly not quite out to the joint in the arms as is the factory b219 loader. Again I'm all for suggestions and welcome them with open arms I just am curious the reasoning. Steel is probably the least expensive part of this process but getting more of it is not easy here and this stuff traveled over 600 miles (free shipping) so I could get it at 65cents per pound and I only have one "extra peice of 2x4 rectangle tube. So I'm trying the measure fourteen times cut once method
 

Attachments

Last edited:
  • Like
Reactions: 1 user

trial and error

Well-known member

Equipment
B7100dt manual trans. homemade FEL, 4 way hydraulic dozer blade
Feb 16, 2023
396
388
63
NY
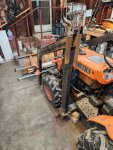
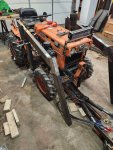
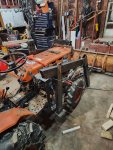
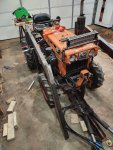
Spent some time last evening making some adjustments to the overall setup with my father, two sets of eyes are better then one and two sets of hands are also better especially when one is older and wiser.
We started with the existing tower height and set one front tire to full stuff articulation and clamped the lift cylinder in place and determined that we had plenty of room to keep clearances on the hydraulic ram and tire comfortable if we dropped the height of the towers roughly 9-1/2" which put the lift arms much closer to level and the tower height close to the height of the hood as suggested. Then unbolted the towers and cut roughly 9.5" inches off with the thought in the back of my head saying " ain't no goin back now." After that we mocked everything back up keeping the existing angle on the lift arms vertical and horizontal peices. Then we clamped the lift cylinder back in place and checked for clearances both at full articulation and with both front wheels flat on the ground and determined we could slide the lift arms back 7/8" re-checked everything again and found roughly a 23 degree angle between the lift cylinder and the tower with acceptable tolerances on the tire/cylinder then checked full height of lift arms with the cylinder clamped in place to determine rough height at the future bucket pin which was a measly 60ish inches (not very impressive) I think I can adjust the cylinder angle and bracket locations to get a little bit more lift and still allow for a cylinder angle of 15 degrees minimum keeping wheel tolerances acceptable. 15 degrees is my minimum goal for cylinder angle while still keeping decent lift capacities for both height and weight 7/8 degrees should be plenty of wiggle room to make adjust/accomplish a little more height while still keeping a 500#lift capacity give or take. 1" cylinder with a 1.5" bore set at 15 degrees and 1500 psi gives me a max vertical lift of 686 # per cylinder so even if I'm getting 2/3 or 1/2 of that capability based on fulcrums and angles I should be fine. Below are a couple pictures of the lower tower height. The horizontal part of the arms still has to be trimmed but that can be done after the tower to arm pin holes are drilled and bushed
 

Attachments

D2Cat

Well-known member
Lifetime Member

Equipment
L305DT, B7100HST, TG1860, TG1860D, L4240
Mar 27, 2014
13,827
5,568
113
40 miles south of Kansas City
Are your tower bases as close to the center of the tractor as possible? Looking at your 4th picture there appears to be room to move the loader arms closer to together.
 

trial and error

Well-known member

Equipment
B7100dt manual trans. homemade FEL, 4 way hydraulic dozer blade
Feb 16, 2023
396
388
63
NY
Are your tower bases as close to the center of the tractor as possible? Looking at your 4th picture there appears to be room to move the loader arms closer to together.
Yes and no, they are 32" apart inside to inside allowing room for the belly braces that I have fabbed up to go from the factory holes in the transmission tunnel to the cross member, and also allow my braces from the towers to the front of the tractor clearances for the exhaust and intake