Woodland Mills Stump Grinder with Backup Camera

bird dogger

Well-known member
Vendor Member

Equipment
Kubota B2650 and lots of other equipment
Feb 24, 2019
1,620
1,501
113
North Dakota
After cutting & clearing a 700 ft. swath of brush, small trees, and a few larger trees along the back side of a row of pine trees, it was time to start grinding all the stumps. I bought a back up camera earlier but never really finished installing it as i only ground a few stumps at a time every now and then. But with 100s of buckthorn, boxelder, small ash and other stumps to grind.....it was time to give the camera a trial run. It was impressive.

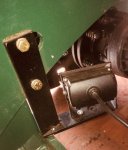
It stood up to the vibration, although the display needs a more solid mounting system. The camera, mounted on a bracket on the grinder, stayed put throughout the task and the view on the display was steady and never failed. Here's a couple of pics:
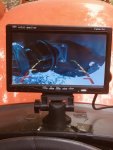
Backup Camera for WG24 Stump Grinder.JPG Camera Mount Bracket.JPG
The system still needs a little tweaking but significantly reduced the need to look back over the shoulder. It really simplifies controlling the depth of cut while moving forward as well as lifting/backing up/ and starting the next cuts.

The tweaking still needed: the camera seems to focus on the cutting wheel, which is fantastic while cutting. But when the grinder is lifted and you're locating the stump to grind....the view below the wheel is kinda washed out so currently I need to look over the shoulder to locate the stump. Once the grinder is lowered within a few inches of the ground or the stump top.....the view becomes much more clear. It may just have been the lighting. It may just need the camera's sun shade to be adjusted. But once the stump is located in front of the grinder you're done looking back for the most part.

This system came with two cameras so I may try mounting the 2nd one topside and looking down and back from the grinder. Then using the split screen function just might fix the need to turn around to initially locate the starting position. The area was somewhat shaded and the display was bright and easy to see. If the grinder started to shake a little too much, so did the display. Hence the need, or want, of a little more solid mount. It was just taped to the deck with duct tape. But if the display was shaking, it was time to lift the grinder a bit anyway.

This was a "wired" system and since it's for autos/rvs the wiring is quite long for the kubota installation. I might just get brave and redo the wiring and connections to make it more tractor friendly with an easy on/off for connections and mounting. All in all, it really was impressive in how much it sped up the process and saved on getting sore neck muscles! At the time purchased, I think the system was well under $100. If I add the 2nd camera or solve the depth of field issue with the first camera I'll update the story for all to see.
 
  • Like
Reactions: 6 users

B737

Well-known member
Lifetime Member

Equipment
LX3310
Jun 9, 2019
2,024
2,200
113
USA
Another first class install Bird! That is a great location for camera
 

bird dogger

Well-known member
Vendor Member

Equipment
Kubota B2650 and lots of other equipment
Feb 24, 2019
1,620
1,501
113
North Dakota
Very nice, I have been thinking about that very setup.
Nice write up! And your neck is saying thank you!
Another first class install Bird! That is a great location for camera
Thank you, gentlemen! I think it's a "keeper". After the very minor issues get resolved it'll really work slick.
After a long afternoon of grinding one day and in the morning the next.....there were no ill effects or stiff neck so it must help?
 

bird dogger

Well-known member
Vendor Member

Equipment
Kubota B2650 and lots of other equipment
Feb 24, 2019
1,620
1,501
113
North Dakota
To put things in perspective with the workout I gave the grinder here’s some more info and pics.

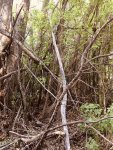
Young pine trees had been planted up against the existing but very old shelter belt close to 30 years ago. The original shelter belt (700+ ft. long) was old then and really failing fast now. It was time to clear a path along the pines to give them some more room, but also to make space to begin cleaning up and removing the deadfall and standing dead trees. It’s fast becoming quite a mess. Here’s what the mess looked like before the chainsaw roared to life:
Pre Path Pic.jpg

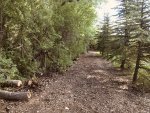
Here’s what it looks like now. And, yes, that little sliver of light is actually the light at the end of the tunnel as it opens up out into the neighboring field! :ROFLMAO:
New Path.jpg

During a week of rainy weather there was one hellacious and ongoing bonfire from sunup to sundown each day. The EA grapple was worth its weight in gold in moving all the cut brush and trees to the burn pile!

Today I cut, cleared, and ground stumps on the last 30 feet with just some scrub buckthorn trees and a couple of very small boxelders. But there was a glitch in the process: There is nothing in the grinder’s manual that warns you that this machine is also a good metal detector! While grinding one of the last few small stumps I heard a strange sound. Without ear protection on I might have heard it earlier? But I suspect the damage was done in the first inch of travel. Buried 3 inches below ground level the grinder exposed a length of 5/8” rebar. Dang!
Buried Rebar.jpg Rebar Extracted.jpg

The grapple dug out all 20 some feet of it. Being this is an old farmstead, I should maybe have swept the area with my metal detector first. But why a length of rebar at the very outside edge of the original shelter belt? It damaged the outer teeth on the circumference of the wheel. I’ll have to clean and inspect the teeth to see how bad and how many need replacing. For the amount of grinding its now done its not a big deal. Lesson learned! Thankfully, I started the grinding on the other end!! I'd have been quite pissed to have come to a screeching halt (literally) had I started clearing/grinding on this end.

Equipment used: chainsaw, grapple, stump grinder, flail mower
 
  • Like
  • Wow
Reactions: 2 users

B737

Well-known member
Lifetime Member

Equipment
LX3310
Jun 9, 2019
2,024
2,200
113
USA
that came out awesome! Reclaiming land from totally overgrown mess of woods is the best feeling. incredible amount of work
 

bird dogger

Well-known member
Vendor Member

Equipment
Kubota B2650 and lots of other equipment
Feb 24, 2019
1,620
1,501
113
North Dakota
that came out awesome! Reclaiming land from totally overgrown mess of woods is the best feeling. incredible amount of work
Thanks, B737! and I agree. Pretty sure I sweat more in the 3 weeks of this project than my 42 years of working for a living! :ROFLMAO:
 

bird dogger

Well-known member
Vendor Member

Equipment
Kubota B2650 and lots of other equipment
Feb 24, 2019
1,620
1,501
113
North Dakota
After cleaning up and inspecting the stump grinder for damaged teeth, I discovered 8 totally damaged teeth and 1 that had a minor chip on the carbide tip. :eek: The replacement set of 6 teeth from Woodland Mills didn’t cover all the damages done by hitting that buried length of rebar.

The 4 outer teeth on the wheel circumference were replaced along with 2 of the 4 lowest forward-facing teeth. Since the B2650 has trouble using the full cutting depth of all the teeth at once, I swapped out 2 innermost teeth with the last 2 damaged teeth. That puts the grinder back into full operation again. But at $10+ per tooth…….not checking for buried metal, rocks, or other debris turned out to be an expensive lesson learned. And all the damage was done in just a few seconds. Here’s a couple of pics. One shows the damaged teeth compared to a new one in the center. The other pic shows the damaged 6 teeth replaced. With two more to go when replacements can be had.
New Tooth vs Damaged 6 Teeth.JPG WG24 Damaged Teeth.JPG

ALERT to all fellow grinders: check for and try to eliminate any damaging debris in your stump grinding areas. Even if you suspect nothing could possibly be there. Don't do as I did! :cry:

David
 
Last edited:

MC18841

New member

Equipment
B2601, Loader, Mower, Box Blade
May 28, 2021
3
0
1
Oconomowoc, WI
Thanks for the article I just got the woodland mills stump grinder today what camera system did you use if you still remember the model number in manufacturer
 

bird dogger

Well-known member
Vendor Member

Equipment
Kubota B2650 and lots of other equipment
Feb 24, 2019
1,620
1,501
113
North Dakota
Thanks for the article I just got the woodland mills stump grinder today what camera system did you use if you still remember the model number in manufacturer
Offhand, I don't remember the exact model number but will find out for you. Private conversation sent.
If you enlarge the pic you'll see it's a TFT model screen made by Camecho (the maker of the system). I'm sure the screen is a 7" diagonal color monitor and it came with 2 cameras. If you search those criteria on Amazon, Ebay, etc. you should come up with it or very similar model.

I'll see if I can find the purchase documents and report back. Believe at the time the system was around $150. But I could be wrong on that.
 

bird dogger

Well-known member
Vendor Member

Equipment
Kubota B2650 and lots of other equipment
Feb 24, 2019
1,620
1,501
113
North Dakota
Thanks for the article I just got the woodland mills stump grinder today what camera system did you use if you still remember the model number in manufacturer
I believe this it the Camecho Camera System I purchased. I was wrong on price. It's around $85.

The description:
Camecho DC 12V 24V Vehicle Backup Camera System 2 x Rear View Camera Support Night Vision Waterpoof & 7" Monitor with Dual 34ft AV Cables Hardwire for Bus Truck Van Trailer RV Campers

I purchased some shorter video cables found on Ebay to use instead of the longer cables supplied.

good luck with your projects. You'll enjoy that stump grinder!!
 
  • Like
Reactions: 1 user

MC18841

New member

Equipment
B2601, Loader, Mower, Box Blade
May 28, 2021
3
0
1
Oconomowoc, WI
Thanks David, I used the stump grinder on four stumps ( I have lots!) and it works like a champ. You are correct that you get better with some operator time, but the cameras will be great. Did you use the tail light wiring harness for the camera power, or is the cigarette lighter plug the source of power for the screen and cameras? Where are you at in North Dakota? Family friends of mine farm around New England.

Thanks, Mike
 

bird dogger

Well-known member
Vendor Member

Equipment
Kubota B2650 and lots of other equipment
Feb 24, 2019
1,620
1,501
113
North Dakota
Thanks David, I used the stump grinder on four stumps ( I have lots!) and it works like a champ. You are correct that you get better with some operator time, but the cameras will be great. Did you use the tail light wiring harness for the camera power, or is the cigarette lighter plug the source of power for the screen and cameras? Where are you at in North Dakota? Family friends of mine farm around New England.

Thanks, Mike
Hi Mike, I made a power hookup assembly using a cigarette lighter plug for power. You can find all kinds of them off of car cell phone chargers at the thrift store for cheap. LOL! I also added a short 8 pin monitor extension cable to bring the power connection farther back towards that accessory power location. The cigarette power plug helps for a quick easy way to install/remove the setup, as I only put it on for stump grinding so far. Still would like to find a better way to mount the monitor to the top of the dash so it's both more solid and removeable.
If you'd like, I can find the examples of that extension monitor cable and one other that I used. Managing those included long cables is a chore on a short tractor!!
David
 

bird dogger

Well-known member
Vendor Member

Equipment
Kubota B2650 and lots of other equipment
Feb 24, 2019
1,620
1,501
113
North Dakota
Thanks David, I used the stump grinder on four stumps ( I have lots!) and it works like a champ. You are correct that you get better with some operator time, but the cameras will be great. Did you use the tail light wiring harness for the camera power, or is the cigarette lighter plug the source of power for the screen and cameras? Where are you at in North Dakota? Family friends of mine farm around New England.

Thanks, Mike
Mike, I forgot to answer your "location" question. I'm in the Grand Forks, ND area. Opposite end of the state from New England.

Here's the other add ons that were purchased to help clean up the installation from those supplied cables:

This is the monitor extension cable added to the original camera cable to bring the "hookup" farther back towards the accessory power ports. You can get them in various lengths. I used a 3 foot cable. Here's the description of the item: "Car Rear View Backup Camera Recorder Extension Cable 8Pin 3ft 1m Camera Wires"

Also purchased this extra power cable to add the cigarette power plug connector and clean up the wiring a little bit more. (This after I had stepped on or somehow got tangled up in the original mess of wires and pulled some ends off of the first power cable. It can be repaired but this was a much easier option.) This is the description of that cable: 8 PIN Car Video Cable For Car 7 Inch Monitor Connect Rear View Camera Connect

I'm guessing when I damaged the original power cable it caused the very tiny inline fuse to blow. I sourced the fuse in bulk and now have a box of 99 fuses remaining. If you or anybody reading this wants to have a spare or two of these fuses on hand for the price of postage or a "Thank You" .........send me a message. I think I can still find them. :unsure:

David
 

ipz2222

Active member

Equipment
L235, bx2670
May 30, 2009
1,927
32
38
chickamauga ga usa
I just purchased a backup camera from costco that is rear camera wireless and solar powered. The screen display does have to be plugged into 12 volts and with an extra rear camera, the screen becomes split,, 2 screens in one. I plan on putting the extra camera on my camper but now may have to buy one for the bx. At 71, my neck muscles are getting stiffer, harder to turn.
 
  • Like
Reactions: 1 user

kaze

Member
Premium Member

Equipment
Kubota B7000 Cub Cadet 1782 Cub Cadet 78D York Three point rake Woods RM 400 mo
After cutting & clearing a 700 ft. swath of brush, small trees, and a few larger trees along the back side of a row of pine trees, it was time to start grinding all the stumps. I bought a back up camera earlier but never really finished installing it as i only ground a few stumps at a time every now and then. But with 100s of buckthorn, boxelder, small ash and other stumps to grind.....it was time to give the camera a trial run. It was impressive.

It stood up to the vibration, although the display needs a more solid mounting system. The camera, mounted on a bracket on the grinder, stayed put throughout the task and the view on the display was steady and never failed. Here's a couple of pics:
View attachment 60955 View attachment 60956
The system still needs a little tweaking but significantly reduced the need to look back over the shoulder. It really simplifies controlling the depth of cut while moving forward as well as lifting/backing up/ and starting the next cuts.

The tweaking still needed: the camera seems to focus on the cutting wheel, which is fantastic while cutting. But when the grinder is lifted and you're locating the stump to grind....the view below the wheel is kinda washed out so currently I need to look over the shoulder to locate the stump. Once the grinder is lowered within a few inches of the ground or the stump top.....the view becomes much more clear. It may just have been the lighting. It may just need the camera's sun shade to be adjusted. But once the stump is located in front of the grinder you're done looking back for the most part.

This system came with two cameras so I may try mounting the 2nd one topside and looking down and back from the grinder. Then using the split screen function just might fix the need to turn around to initially locate the starting position. The area was somewhat shaded and the display was bright and easy to see. If the grinder started to shake a little too much, so did the display. Hence the need, or want, of a little more solid mount. It was just taped to the deck with duct tape. But if the display was shaking, it was time to lift the grinder a bit anyway.

This was a "wired" system and since it's for autos/rvs the wiring is quite long for the kubota installation. I might just get brave and redo the wiring and connections to make it more tractor friendly with an easy on/off for connections and mounting. All in all, it really was impressive in how much it sped up the process and saved on getting sore neck muscles! At the time purchased, I think the system was well under $100. If I add the 2nd camera or solve the depth of field issue with the first camera I'll update the story for all to see.
All the camera systems seem to take the pain out of a stiff neck. My question is has anyone on OTT ever tried running one of thes stump grinders on a B7100 ??
Thank you Joe
 

TheOldHokie

Well-known member
Lifetime Member

Equipment
L3901/LA525, B7200DT/B1630, G2160/RCK60, G2460/RCK60
Apr 6, 2021
8,931
4,672
113
Myersville, MD
windyridgefarm.us
All the camera systems seem to take the pain out of a stiff neck. My question is has anyone on OTT ever tried running one of thes stump grinders on a B7100 ??
Thank you Joe
I have not but I have used it on an L3901. HP concerns with a B7100 not withstanding I think that grinder will bounce you around pretty good.

Dan