I really like the way the attachment point is set back under the SSQA to keep the blade a little closer. Did you build that? have you had any issues with it?I keep my snow plows stashed away in the woods but I thought it was time to get them out and into the door yard. I may be needing them soon.
View attachment 165772
View attachment 165773
gg
What did you do to or on your Kubota today?
- Thread starter gurn
- Start date
Yes I built it. I stole the main idea. It wasn't mine.I really like the way the attachment point is set back under the SSQA to keep the blade a little closer. Did you build that? have you had any issues with it?
It works well and there is no side thrust like on a plow that is way out front. It can push hard on the banks and hold a line.
It floats on a chain like a truck plow but I can also apply down pressure by dumping the SSQA plate forward for back dragging or attacking ice or hardpack.
The only issue, if you want to call it that, is that, like any plow that angles, the A frame has to be close to parallel to the road surface in order to keep the cutting edge flat so it does not dig in on one corner and lift on the other when the blade is angled. So I needed a way to reset the A frame level from the seat after raising the plow to stack snow or dumping the SSQA to back drag. ( Both raising/lowering the FEL lift arms or curl/dump affect the A frame level because of the set back geometry ). I put a marker on the bucket level indicator for the curl/dump position
And I made a lift arm height marker from some snow stake pieces and magnet mounts - just line up the two side rods with the rod on top of the grill guard. Stole this magnet idea from Chim.
So that no matter how I manipulate the FEL valve to stack snow or what ever I can easily and quickly get back to flat plowing position. Before I had the markers it was guess work or stop and get off the tractor to set it up.
Maybe more than you wanted to know......
gg
Last edited:

I saw that setup on TBN and saved the pics, it's my all time fav FEL plow setup. I had built a rigid one years ago and hated it with a passion. Now I have a frame mounted setup thats fantastic but I hate loosing the loader to install it.
THANKS for all the details. Yes, I did want to know it.Yes I built it. I stole the main idea. It wasn't mine.
View attachment 165882
It works well and there is no side thrust like on a plow that is way out front. It can push hard on the banks and hold a line.
View attachment 165880
It floats on a chain like a truck plow but I can also apply down pressure by dumping the SSQA plate forward for back dragging or attacking ice or hardpack.
View attachment 165877
The only issue, if you want to call it that, is that, like any plow that angles, the A frame has to be close to parallel to the road surface in order to keep the cutting edge flat so it does not dig in on one corner and lift on the other when the blade is angled. So I needed a way to reset the A frame level from the seat after raising the plow to stack snow or dumping the SSQA to back drag. ( Both raising/lowering the FEL lift arms or curl/dump affect the A frame level because of the set back geometry ). I put a marker on the bucket level indicator for the curl/dump position
View attachment 165878
And I made a lift arm height marker from some snow stake pieces and magnet mounts - just line up the two side rods with the rod on top of the grill guard. Stole this magnet idea from Chim.
View attachment 165879
So that no matter how I manipulate the FEL valve to stack snow or what ever I can easily and quickly get back to flat plowing position. Before I had the markers it was guess work or stop and get off the tractor to set it up.
Maybe more than you wanted to know......
gg
I figured I would need to reset the dump/curl for consistency.
Good Stuff. Thanks
Not much to report today, but I did turn the lasagna with the forks from last weekend(cleaned up the crumbs with the bucket)…temp was at 120 and is was charred and smoking on the inside (hard to see in the pic but the fuzziness is smoke). After the tossin’, close to 100 and should have some rain this week and we’ll do it again next week.Today is a beautiful day although a bit windy here.
Before weather gets bad I did final clean up in yard and brought the waste to the compost station. The we cleaned out the chicken run, and then I made the last batch of lasagna for the year.
Looks like rain this week so will toss it a few times this week and next and call it good for the season if it cooks up nice.
View attachment 165633 View attachment 165634 View attachment 165635
I put on my chains today. I snapped some pictures as I went in case someone might not be familiar with the "drive them on" method. Makes the job super easy for what I have.
Make a length of rope with a hook at each end. Lay out the chins outside up. Hook the rope to one end of the chains and hang the loop over a tire lug.


Drive forward a little and check that all is going straight and tight.

Drive forward and stop when your all the way around.

Make the connections, remove the rope, and tighten the side chains.

My front chains are much lighter so I use a rubber bungee thru a wheel slot instead of a rope

gg
Make a length of rope with a hook at each end. Lay out the chins outside up. Hook the rope to one end of the chains and hang the loop over a tire lug.
Drive forward a little and check that all is going straight and tight.
Drive forward and stop when your all the way around.
Make the connections, remove the rope, and tighten the side chains.
My front chains are much lighter so I use a rubber bungee thru a wheel slot instead of a rope
gg
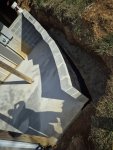
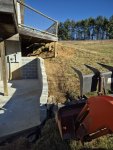
Back filled a retaining wall that we had built.
Attachments
-
 699.1 KB Views: 42
 -
 702.8 KB Views: 41
Looks nice, but you didn't tie back into the earth for stability?Back filled a retaining wall that we had built.
NCL4701
Well-known member
Equipment
L4701, T2290, WC68, grapple, BB1572, Farmi W50R, Howes 500, 16kW IMD gen, WG24
Leaves, leaves, leaves. Three houses/yards. 600’ of gutters. A couple short sections of road. A couple foot paths by the houses we keep clear of leaves. I don’t even want to try to figure the acreage or square footage. With a combination of blower, mower, leaf rake, and grapple it gets done. Started at 8:00 this morning. Spent 30 minutes eating lunch with my wife. Finished working about 6:00 by which time it was pitch dark. Have one footpath and the area around the shed to finish in the morning. Probably 30 minutes more.
For whatever reason, this is one job I just don’t like. Thankfully since getting the pine straw rake and grapple I only do this once a year. Before that had to do it three or four times a year to keep it from getting too deep for the mower to handle. Now if it’s too deep for the mower, use the rake. Too deep for the rake, use the grapple. Too deep for the grapple… that ain’t happening.
Before:


During:
 T2290 mulch/blowing.
 Grapple moves a lot of leaves in a hurry. Hard to believe I used to do this part with a rake and pickup truck.
After:


For whatever reason, this is one job I just don’t like. Thankfully since getting the pine straw rake and grapple I only do this once a year. Before that had to do it three or four times a year to keep it from getting too deep for the mower to handle. Now if it’s too deep for the mower, use the rake. Too deep for the rake, use the grapple. Too deep for the grapple… that ain’t happening.
Before:
During:
After:
Last edited: