Tooth Bar??

Drifthopper

Member

Equipment
2000 L3710 HST w/ Woods 1012 FEL. LandPride FDR2572, 60" Brush Hog: Need 60" BB
Apr 22, 2022
71
58
18
Western New York
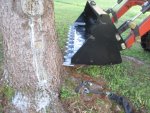
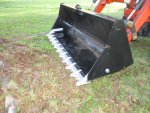
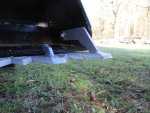
I added one to my Woods loader.
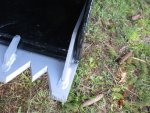
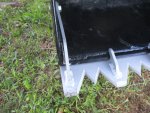
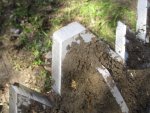
The original bottom cutting edge on the bucket wasn't the straightest so it took a little bit of pounding, grinding, clamping & pushing to get it on, and to get the edge to fit into the tooth bar tabs.
With a little help from the pine tree, got it to fit somewhat tight. Not great.... but good enough for what i could do, with what i have out at our camp.
Then..... after about 4 hours of using it.... some dings and dents.

I'm still not sold on all the rave about them.... i'm kind of not impressed.

Maybe i just have to get more time using it.
 

Attachments

BC2

New member

Equipment
L4060
Apr 20, 2023
23
11
3
TX
View attachment 100020
I started this so I suppose an update is appropriate. BXpanded Pirahna arrived today. Didn’t take time after work to fully install but had to at least see if it fit. Fits perfectly. Just need to punch a couple of holes in the sides of the bucket and it should be ready for action. I have a few projects for it but nothing immediate. If I can remember to do it I’ll follow up with a comparison of performance with and without the tooth bar. I have high hopes for its ability to cut roots and pop out small (3” and under) trees.
I installed the bar perhaps a little differently. In my pictures you can see that the "hooks" on the top side of the bar are pushed up further against the original bucket edge than you show. The hooks don't really fit my bucket edge taper well so there are 4 options not involving welding that I can think of: mount as you show, drill and tap every hook from the top for a set screw to bear down on the bucket lip, put a spacer bar between the bucket lip and the bottom of the hooks, or do what I did.

In my mount, the objective was to take away any rotation or slippage at the two bolts that go through the sides of the bucket. I clamped the bar flat against the bottom of the bucket edge with the hooks as far up against the bucket edge as it would go. I then drilled through the bucket edge and the bar in three places with a letter drill that was just one size bigger than a standard 3/8-16 tap drill (you really don't technically need 75% thread to make it work and a slightly bigger hole makes it easier to tap). While still clamped together, I took a 1/2" transfer punch (the biggest I had), put some arbor spacers on it to make it 3/4" diameter, and punched center marks for the two holes in the sides of the bucket. I then removed the bar and tapped it 3/8-16 and drilled the holes in the bucket lip out to just over 3/8". I used a center drill with a pilot point and twist drills to get to the hole sizes I needed for the 3 holes. The side bolt holes were center drilled and then step drilled to the bolt size from each side of the bucket wall.

Install is finished but haven't used yet so don't know if it works.

Tips:
1. I was afraid before I started that the bucket edge and/or the tooth bar would be hardened and make my solution impossible. I did not check the hardness, but I figured my hole location would be far enough away from welds to minimize the risk from the welding process so all I had to worry about was the steel itself. It turned out that if it is heat treated, it is not hard enough to damage high speed steel cutters or taps.
2. I did have a little bit of trouble getting the center drill to cut well in starting the holes. I think this might have just been due to a little bit of work-hardening of the steel when I punched the center marks or maybe the drill was a tad dull. I eliminated that problem by taking a Dremel tool with a ball end carbide dental burr (a real one, not an imitation - and by the way, the "diamond" ones you can find almost anywhere I have found are not worth beans mostly because I suspect the bond matrix is worthless). I used the dental drill to auger out a small hole down far enough to give the pilot on the center drill a head start, used cutting oil and everything went fine from there on.
3. I tapped the bar because I did not want a nut or a screw head on the bottom of the bar and I wanted the top of the tooth bar up against the bottom of the bucket edge. My grade 8 socket button head cap screws are just long enough to come out almost perfectly flush with the bottom of the tooth bar. Of course there is the risk that if the head gets worn down enough or damaged in use, you might not be able to remove the screw because the Allen key won't work. A Torx or regular hex or regular head height socket head cap screw might solve that if you are worried about it. Or you might be able to fill the hex cavity with something that you can get out with a pick or something. On the threads of the 3 button heads and the two sidewall bolts, I put anti-seize compound so I could get them back off if I want to without worrying too much about them corroding and turning it into a torch project.
4. The bars that mount to the side walls had a little bit of clearance (i.e. they were closer together than the inside dimension of my bucket). You can fill the space with washer(s), but if you do that, you may have to go buy longer bolts. If you just crank down on the bolts, the arms will flex enough to touch the inside wall of the bucket without adding washer(s), so I just went that route. This puts a little side torque on the welds at the tooth bar, and that means there will be a combination of stresses at the weld when you are working but it's probably a fairly long term fatigue problem perhaps not worth worrying about.
5. I'm sure you know by now - wear gloves while handling - these things are surprisingly sharp and that combined with a weight that is not exactly insignificant have the potential to ruin your day.
IMG_1350.JPG
IMG_1351.JPG
IMG_1352.JPG
 
  • Like
Reactions: 1 users

NCL4701

Well-known member

Equipment
L4701, T2290, WC68, grapple, BB1572, Farmi W50R, Howes 500, 16kW IMD gen, WG24
Apr 27, 2020
2,802
4,250
113
Central Piedmont, NC
I installed the bar perhaps a little differently. In my pictures you can see that the "hooks" on the top side of the bar are pushed up further against the original bucket edge than you show. The hooks don't really fit my bucket edge taper well so there are 4 options not involving welding that I can think of: mount as you show, drill and tap every hook from the top for a set screw to bear down on the bucket lip, put a spacer bar between the bucket lip and the bottom of the hooks, or do what I did.

In my mount, the objective was to take away any rotation or slippage at the two bolts that go through the sides of the bucket. I clamped the bar flat against the bottom of the bucket edge with the hooks as far up against the bucket edge as it would go. I then drilled through the bucket edge and the bar in three places with a letter drill that was just one size bigger than a standard 3/8-16 tap drill (you really don't technically need 75% thread to make it work and a slightly bigger hole makes it easier to tap). While still clamped together, I took a 1/2" transfer punch (the biggest I had), put some arbor spacers on it to make it 3/4" diameter, and punched center marks for the two holes in the sides of the bucket. I then removed the bar and tapped it 3/8-16 and drilled the holes in the bucket lip out to just over 3/8". I used a center drill with a pilot point and twist drills to get to the hole sizes I needed for the 3 holes. The side bolt holes were center drilled and then step drilled to the bolt size from each side of the bucket wall.

Install is finished but haven't used yet so don't know if it works.

Tips:
1. I was afraid before I started that the bucket edge and/or the tooth bar would be hardened and make my solution impossible. I did not check the hardness, but I figured my hole location would be far enough away from welds to minimize the risk from the welding process so all I had to worry about was the steel itself. It turned out that if it is heat treated, it is not hard enough to damage high speed steel cutters or taps.
2. I did have a little bit of trouble getting the center drill to cut well in starting the holes. I think this might have just been due to a little bit of work-hardening of the steel when I punched the center marks or maybe the drill was a tad dull. I eliminated that problem by taking a Dremel tool with a ball end carbide dental burr (a real one, not an imitation - and by the way, the "diamond" ones you can find almost anywhere I have found are not worth beans mostly because I suspect the bond matrix is worthless). I used the dental drill to auger out a small hole down far enough to give the pilot on the center drill a head start, used cutting oil and everything went fine from there on.
3. I tapped the bar because I did not want a nut or a screw head on the bottom of the bar and I wanted the top of the tooth bar up against the bottom of the bucket edge. My grade 8 socket button head cap screws are just long enough to come out almost perfectly flush with the bottom of the tooth bar. Of course there is the risk that if the head gets worn down enough or damaged in use, you might not be able to remove the screw because the Allen key won't work. A Torx or regular hex or regular head height socket head cap screw might solve that if you are worried about it. Or you might be able to fill the hex cavity with something that you can get out with a pick or something. On the threads of the 3 button heads and the two sidewall bolts, I put anti-seize compound so I could get them back off if I want to without worrying too much about them corroding and turning it into a torch project.
4. The bars that mount to the side walls had a little bit of clearance (i.e. they were closer together than the inside dimension of my bucket). You can fill the space with washer(s), but if you do that, you may have to go buy longer bolts. If you just crank down on the bolts, the arms will flex enough to touch the inside wall of the bucket without adding washer(s), so I just went that route. This puts a little side torque on the welds at the tooth bar, and that means there will be a combination of stresses at the weld when you are working but it's probably a fairly long term fatigue problem perhaps not worth worrying about.
5. I'm sure you know by now - wear gloves while handling - these things are surprisingly sharp and that combined with a weight that is not exactly insignificant have the potential to ruin your day. View attachment 105090 View attachment 105091 View attachment 105092
Nice job on the install.

The pic of mine I had just gotten it and set it on to see if it fit but it’s not actually installed there so it looks a little sloppier than it ended up. I had thought it might need some attachment points in the center like you did with yours but (for mine) after shoving it on there good by gently but firmly rear ending the drawbar on the Farmall that sits in the stall in front of the Kubota, locking the brakes to clamp it in that position, and installing the factory hardware it was rock solid so I didn’t do anything past that.

Since putting the tooth bar on I’ve used the bucket for wood chips, gravel, and mud so soupy I could barely walk in it. All stuff I could have done just fine without it. I’d really like to know if it significantly improves digging and root cutting but haven’t worked down the list to any of those projects yet.
 

steveh

Member

Equipment
Kubota L4701, forks, Land Pride rear blade, Wallenstein splitter
Dec 1, 2020
63
44
18
Rocky Mountains
Bottom line I’d like to have a tooth bar that is reasonably installable/removable depending on the job at hand. I’m thinking it would be on most of the time but option to remove would be highly desirable.

I don't have a tooth bar, so I don't know precisely how they're attached...with several bolts/nuts? If so, would a small, battery-powered impact wrench carried on the tractor be able to zip off the nuts in two minutes? I am just thinking here.
 

GreensvilleJay

Well-known member

Equipment
BX23-S,57 A-C D-14,58 A-C D-14, 57 A-C D-14,tiller,cults,Millcreek 25G spreader,
Apr 2, 2019
11,421
4,908
113
Greensville,Ontario,Canada
easier to have another bucket.....
EVERY guy using a 'skidsteer' for business around here has smooth bucket, toothed bucket and forks.
 
  • Like
Reactions: 1 user

NCL4701

Well-known member

Equipment
L4701, T2290, WC68, grapple, BB1572, Farmi W50R, Howes 500, 16kW IMD gen, WG24
Apr 27, 2020
2,802
4,250
113
Central Piedmont, NC
I don't have a tooth bar, so I don't know precisely how they're attached...with several bolts/nuts? If so, would a small, battery-powered impact wrench carried on the tractor be able to zip off the nuts in two minutes? I am just thinking here.
The Piranha is just two bolts. Pretty quick off/on.

I suspect two buckets would be preferable but $$$.
 

GreensvilleJay

Well-known member

Equipment
BX23-S,57 A-C D-14,58 A-C D-14, 57 A-C D-14,tiller,cults,Millcreek 25G spreader,
Apr 2, 2019
11,421
4,908
113
Greensville,Ontario,Canada
depends on how valuable your time is....
need to drop the bar..but forgot the $$$ drill....sigh
lose the nut or bolt in the dirt, 'somewhere' ...grrrrr
need to put the bar on, fogortr drill, lost both sets of nuts/bolts and the drill fell off between the barn and the pond.....arrrrrrrrrrrrrrrrrrrrrrrrrrrrrrrrrrrrrrrrrrrrrrrrgh

I usually carry my bucket on my pallet forks to most off site jobs these days...
 

NCL4701

Well-known member

Equipment
L4701, T2290, WC68, grapple, BB1572, Farmi W50R, Howes 500, 16kW IMD gen, WG24
Apr 27, 2020
2,802
4,250
113
Central Piedmont, NC
depends on how valuable your time is....
need to drop the bar..but forgot the $$$ drill....sigh
lose the nut or bolt in the dirt, 'somewhere' ...grrrrr
need to put the bar on, fogortr drill, lost both sets of nuts/bolts and the drill fell off between the barn and the pond.....arrrrrrrrrrrrrrrrrrrrrrrrrrrrrrrrrrrrrrrrrrrrrrrrgh

I usually carry my bucket on my pallet forks to most off site jobs these days...
Very true. If you’re making money with it and time is literally money: 2 buckets.

If not…🤷‍♂️
 
  • Like
Reactions: 1 user

BC2

New member

Equipment
L4060
Apr 20, 2023
23
11
3
TX
Nice job on the install.

The pic of mine I had just gotten it and set it on to see if it fit but it’s not actually installed there so it looks a little sloppier than it ended up. I had thought it might need some attachment points in the center like you did with yours but (for mine) after shoving it on there good by gently but firmly rear ending the drawbar on the Farmall that sits in the stall in front of the Kubota, locking the brakes to clamp it in that position, and installing the factory hardware it was rock solid so I didn’t do anything past that.

Since putting the tooth bar on I’ve used the bucket for wood chips, gravel, and mud so soupy I could barely walk in it. All stuff I could have done just fine without it. I’d really like to know if it significantly improves digging and root cutting but haven’t worked down the list to any of those projects yet.
Thanks.

Good idea to have yet another use for the old Farmall!

My first projects will not be digging either, but that's in the works. May be moving some driveway base course, so am hoping the small amount I will be doing won't dull the teeth because I plan to leave it on while doing that. As sharp as it is, I'm thinking about doing some vine/trash brush clean up under trees. We have a lot of trash vines growing up into and sometimes completely covering decent trees and I'm wondering if it will be sharp enough to just run it at ground level up under the trees close to the trunk and have it shear off the vines at the ground, then wait for them to wilt down and come back in and drag all the vines out. May even try to shear off or uproot small brush/trees. Don't know if that will work. Will be adding an Add-A-Grapple to this bucket since I will be doing a lot of branch trimming and deadfall moving to do a bunch of wood chipping. The tooth bar will help with the grapple function for material that's wider than the bucket. Personal use, not commercial, so maybe time is not exactly equal to money even if one probably shouldn't waste either - depends if running the tractor is just work or is generating "utils" for the operator too.
 
  • Like
Reactions: 1 user

NCL4701

Well-known member

Equipment
L4701, T2290, WC68, grapple, BB1572, Farmi W50R, Howes 500, 16kW IMD gen, WG24
Apr 27, 2020
2,802
4,250
113
Central Piedmont, NC
I know this thread has been dead for a while, but I have finally gotten to the point of using the toothbar for a few things where I could really see the performance difference. Used it to shave the grass off a dust dry clay bank (about the same as a sun dried brick), cut a mess of roots while digging various things, and removing small trees starting by cutting roots off one side and then pushing them over. The tooth bar definitely is an improvement over the smooth front for cutting hard clay and cutting vegetation/roots without plugging. The ability to make continuous cuts without spinning out has much improved my ability to grade accurately, particularly fine grading, with the bucket. All in all, it was worth the cost for my uses.
 
  • Like
Reactions: 1 user