Part III
So, here’s the lower radiator hose bracket
before...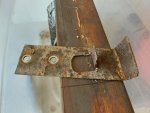
and after...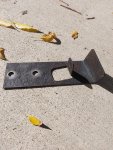 the e-tank.
You can see that the process left it with a dark tint. This was the case with all of the steel parts. Basically everything that would fit got e-tanked first, even the nuts and bolts since they were so bad. I reasoned that throwing stuff in a tank is pretty easy and gets rid of the bulk of the rust and/or softens up the concretious mud. Everything I can do before sandblasting will help keep the sand cleaner. That said-- I probably could have stopped here on the de-crudding/rust removal. Most of these small parts got painted with POR-15 (more on this later), so in retrospect I could have proceeded right to the multi-step POR coating (cleaner/degreaser, metal prep, POR, Top Coat,) but oh no. This is personal. Rust and corrosion is the enemy and must be eradicated, so everything got sandblasted too.
Once again, here's our lower radiator hose bracket after a minute or so in the in the sand blast cabinet...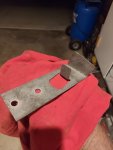
NOW its ready for a coating.
After the e-tank, everything that would fit went into the tumbler-- nuts and bolts and other little things.
Here's the before...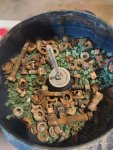 and after tumbler
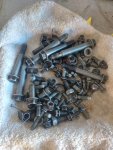 for the nuts and bolts. This process is also very satisfying to crack the tub open, drain and rense copious amounts of liquified gunk and see shiny parts emerge from that mess. I used the Harbor Freight ceramic triangle media and water, with a capful of cleaner/degreaser. If anyone has suggestions for an additive for this I’d love to hear about it. After a few hours in the tumbler I got my first real look at some of the little stuff and not surprisingly found that some of the parts were beyond salvation—too pitted, rounded off, thread damage, etc...I’m pretty sure a few of them just dissolved completely.
I found some ebay listings where folks were parting out RTVs and were selling the nuts and bolts as a lot. I bought one of these (40.00-ish dollars) and ended up using quite a few from it. The hex cap screws common in the cab area did not fare well in general, so I just bought a couple boxes of stainless steel replacements on Amazon for 10.00/25. This was a good investment.
Turnaround Point
I guess you could say this was the first turnaround point. Instead of just disassembling and cleaning, I now had some parts ready for preservation. Let get on it!
I have to apologize in advance: I don't have a single pic or video of the actual plating process. I'll have to set it back up and run through a couple batches to demo it.
I’ve never done any kind of plating, so I went to the internet for ideas. I think I could have taken all my nuts and bolts to a professional plater at a reasonable price, but “the journey is the destination.” I wanted to learn how to do new things and this was one of them. There are many options, but I settled on zinc plating for my first adventure-- easy, cheap, not too dangerous., and if it doesn't work out I'll just acid dip everything and do something else. I’d need a zinc anode, (readily available on Amazon or at home centers for swamp coolers), a low voltage power supply, plastic containers, and ingredients for the solution. The internet has dozens of sources for solutions and good how-to videos. After watching a dozen or so, I settled on this recipe:
I found a variable power supply on OfferUp close by for 20.00. They're 60.00 on up new, but readily available. You can also use a plain old DC wall plug power supply, but I found it helpful to be able to adjust the current with the amount of surface area in contact with the solution in different batches. I stripped a short piece of multi strand copper wire and cut the strands into 3 or 4 inch pieces for hanging stuff. I made a couple of hanging brackets out of copper pipe and thick wire, which was much more elaborate than it needed to be--you just need to be able to suspend parts over your solution. I had three containers:
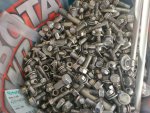
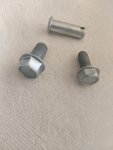
There's a couple in here that still didn't make the cut since I had extras from the ebay purchase, but you get the picture. It’s a little tedious, but rewarding. Put on a good pod cast or whatever and enjoy your cave time!
This is probably a good place to pause for part IV. Next up: Sandblasting!
So, here’s the lower radiator hose bracket
before...

and after...
 the e-tank.
You can see that the process left it with a dark tint. This was the case with all of the steel parts. Basically everything that would fit got e-tanked first, even the nuts and bolts since they were so bad. I reasoned that throwing stuff in a tank is pretty easy and gets rid of the bulk of the rust and/or softens up the concretious mud. Everything I can do before sandblasting will help keep the sand cleaner. That said-- I probably could have stopped here on the de-crudding/rust removal. Most of these small parts got painted with POR-15 (more on this later), so in retrospect I could have proceeded right to the multi-step POR coating (cleaner/degreaser, metal prep, POR, Top Coat,) but oh no. This is personal. Rust and corrosion is the enemy and must be eradicated, so everything got sandblasted too.
Once again, here's our lower radiator hose bracket after a minute or so in the in the sand blast cabinet...

NOW its ready for a coating.
After the e-tank, everything that would fit went into the tumbler-- nuts and bolts and other little things.
Here's the before...
 and after tumbler
 for the nuts and bolts. This process is also very satisfying to crack the tub open, drain and rense copious amounts of liquified gunk and see shiny parts emerge from that mess. I used the Harbor Freight ceramic triangle media and water, with a capful of cleaner/degreaser. If anyone has suggestions for an additive for this I’d love to hear about it. After a few hours in the tumbler I got my first real look at some of the little stuff and not surprisingly found that some of the parts were beyond salvation—too pitted, rounded off, thread damage, etc...I’m pretty sure a few of them just dissolved completely.
I found some ebay listings where folks were parting out RTVs and were selling the nuts and bolts as a lot. I bought one of these (40.00-ish dollars) and ended up using quite a few from it. The hex cap screws common in the cab area did not fare well in general, so I just bought a couple boxes of stainless steel replacements on Amazon for 10.00/25. This was a good investment.
Turnaround Point
I guess you could say this was the first turnaround point. Instead of just disassembling and cleaning, I now had some parts ready for preservation. Let get on it!
I have to apologize in advance: I don't have a single pic or video of the actual plating process. I'll have to set it back up and run through a couple batches to demo it.
I’ve never done any kind of plating, so I went to the internet for ideas. I think I could have taken all my nuts and bolts to a professional plater at a reasonable price, but “the journey is the destination.” I wanted to learn how to do new things and this was one of them. There are many options, but I settled on zinc plating for my first adventure-- easy, cheap, not too dangerous., and if it doesn't work out I'll just acid dip everything and do something else. I’d need a zinc anode, (readily available on Amazon or at home centers for swamp coolers), a low voltage power supply, plastic containers, and ingredients for the solution. The internet has dozens of sources for solutions and good how-to videos. After watching a dozen or so, I settled on this recipe:
- ½ Cup Zinc Sulfate (Amazon)
- 1Tablespoon Salt
- 1 Cup White Vinegar
- 2 ½ Cups Distilled Water
- 2 Tablespoons Karo Syrup
I found a variable power supply on OfferUp close by for 20.00. They're 60.00 on up new, but readily available. You can also use a plain old DC wall plug power supply, but I found it helpful to be able to adjust the current with the amount of surface area in contact with the solution in different batches. I stripped a short piece of multi strand copper wire and cut the strands into 3 or 4 inch pieces for hanging stuff. I made a couple of hanging brackets out of copper pipe and thick wire, which was much more elaborate than it needed to be--you just need to be able to suspend parts over your solution. I had three containers:
- 50/50 muriatic acid (pool supply section of your home center)
- Water for rensing, and
- The solution


There's a couple in here that still didn't make the cut since I had extras from the ebay purchase, but you get the picture. It’s a little tedious, but rewarding. Put on a good pod cast or whatever and enjoy your cave time!
This is probably a good place to pause for part IV. Next up: Sandblasting!

