Here we go, Part part II of "what did I get myself into"
…at this point I have a pile of rusty parts, and a mostly naked frame.


It was overwhelming to stand back and look at this “pile of junk," and I know a great many projects die in the weeds behind the shed at this stage because it can be hard to move to the next. Every single one of those pieces (many of which I can't remember where they go or what they do) now needs hours of cleaning, repairing, fabricating, prepping, painting/plating, and reassembly. Is there a 'right' starting point? I scratched my head for an hour staring at my beloved mess when two separate cat-poster clichés came to me.
"A journey of a thousand miles begins with a single step...AND the journey is the destination"
I'd never strung the two together, but when I did it reminded me that this is a fun project that I should get busy on and enjoy the ride! The worst that's going to happen is I'm going to learn some things, part out this hulk, and tell THAT story instead of this one.
Low Hanging Fruit
For me it made the most sense to start with the smaller parts and work up. I could protect them from the elements while the big parts remained outdoors until I got to them. They’d been mistreated out in the weather for years, so a few more months isn’t going to make a big difference. I plugged up all the engine holes, wrapped up the engine and tranny, and got to work on the rest.
The rebuild stage actually started during disassembly, taking lots of pictures and videos. It's hard for me at least when in "the zone" with the project to pause and do something...administrative, like hydrating, answering the phone, putting tools away... My hands are dirty and I'm making progress! I believe however it is critical to stop (and hydrate!) and document your work in pictures and videos. I’ve gone back to them many times to figure out “…where the hell does this thing go?!” Also, my favorite part of any project is the ‘sweaty thumbs’ at the end, where you get to step back, tuck your thumbs into your armpits, and say, “I did that.” Having lots of pictures and videos (and a couple of leftover parts in their original condition for show-and-tell) is nice at the end.
Sorting and de-rusting
I started by sorting and categorizing the parts, mostly by size and type. I ended up with these main groups:
The pressure washing got me down to the rust…mostly.

In a lot of places it was hard to tell where the clay stopped and the rust started-- It’s easier to tell when you’re down to bare metal, so that’s where we’re going, but getting there would require some new skills, tools and techniques. I’m a believer in acquiring tools when you need them because I’ll need them again. I knew right away I’d need at least three new things for the small stuff rust removal.
First on the hit list was a vibrating tumbler. I’ve always wanted one. I went to OfferUp and found a gently used Harbor Freight tumbler for 30.00 WITH a bag of media. Score!
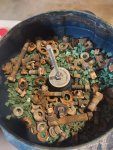
Second, after watching some YouTube videos I made an electrolysis tank...
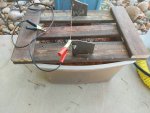
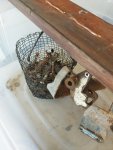
including a wire basket for preliminary work on things that were hard to suspend in the tank.
Finally, I knew I’d also need a sandblasting cabinet, but space is a problem in the suburbs where this project is (mostly) happening. I wanted something small and cheap that I wasn’t attached to so I could get rid of it without heartburn at the end of the project if necessary. I looked for a used counter top blaster but couldn’t find one right away, so I made one from Harbor Freight/Home Depot components.
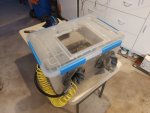
The tote is the water resistant kind with a built in seal. The blast box was cheap and it worked pretty well for a first generation experiment, but there were three points of failure:
The electrolysis tank actually worked really well! I suspended rusty parts (I used plain old bailing wire) in a solution of water and 1 tablespoon/gallon washing soda, inserted sacrificial steel anodes, hooked the positive battery charger lead to the anode and the negative to the rusty bits, plugged it in and went to work on something else. Here are some pics of mine doing its thing...
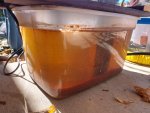
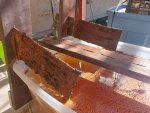 Its very satisfying to walk past and see this thing frothing and churning away rust. These two pics are with the power off as you can't see anything with it running, but look at all that gunk in the bottom!
I had some flat steel scraps for anodes with LOTS of surface area (more surface area=good.) As you can see, it really pulled the rust off. I had to pull the anodes out and scrape them down several times for each batch.
Alas, I've hit the maximum pictures limit for this post, so I guess this is a good place to start Part III. Thanks for reading and see you soon!
…at this point I have a pile of rusty parts, and a mostly naked frame.


It was overwhelming to stand back and look at this “pile of junk," and I know a great many projects die in the weeds behind the shed at this stage because it can be hard to move to the next. Every single one of those pieces (many of which I can't remember where they go or what they do) now needs hours of cleaning, repairing, fabricating, prepping, painting/plating, and reassembly. Is there a 'right' starting point? I scratched my head for an hour staring at my beloved mess when two separate cat-poster clichés came to me.
"A journey of a thousand miles begins with a single step...AND the journey is the destination"
I'd never strung the two together, but when I did it reminded me that this is a fun project that I should get busy on and enjoy the ride! The worst that's going to happen is I'm going to learn some things, part out this hulk, and tell THAT story instead of this one.
Low Hanging Fruit
For me it made the most sense to start with the smaller parts and work up. I could protect them from the elements while the big parts remained outdoors until I got to them. They’d been mistreated out in the weather for years, so a few more months isn’t going to make a big difference. I plugged up all the engine holes, wrapped up the engine and tranny, and got to work on the rest.
The rebuild stage actually started during disassembly, taking lots of pictures and videos. It's hard for me at least when in "the zone" with the project to pause and do something...administrative, like hydrating, answering the phone, putting tools away... My hands are dirty and I'm making progress! I believe however it is critical to stop (and hydrate!) and document your work in pictures and videos. I’ve gone back to them many times to figure out “…where the hell does this thing go?!” Also, my favorite part of any project is the ‘sweaty thumbs’ at the end, where you get to step back, tuck your thumbs into your armpits, and say, “I did that.” Having lots of pictures and videos (and a couple of leftover parts in their original condition for show-and-tell) is nice at the end.
Sorting and de-rusting
I started by sorting and categorizing the parts, mostly by size and type. I ended up with these main groups:
- Nuts, Bolts, and Small Bits (requiring plating rather than paint)
- Brackets, Arms, Mounts, Etc.
- Mid-size parts (Rear Axle, A-Arms, Drive line, ROPS,…)
- Frame
- Engine/Transmission
- Hoses/Cables
- Wheels/Tires
- Wiring Harness
- Seats
- Plastics
The pressure washing got me down to the rust…mostly.

In a lot of places it was hard to tell where the clay stopped and the rust started-- It’s easier to tell when you’re down to bare metal, so that’s where we’re going, but getting there would require some new skills, tools and techniques. I’m a believer in acquiring tools when you need them because I’ll need them again. I knew right away I’d need at least three new things for the small stuff rust removal.
First on the hit list was a vibrating tumbler. I’ve always wanted one. I went to OfferUp and found a gently used Harbor Freight tumbler for 30.00 WITH a bag of media. Score!

Second, after watching some YouTube videos I made an electrolysis tank...


including a wire basket for preliminary work on things that were hard to suspend in the tank.
Finally, I knew I’d also need a sandblasting cabinet, but space is a problem in the suburbs where this project is (mostly) happening. I wanted something small and cheap that I wasn’t attached to so I could get rid of it without heartburn at the end of the project if necessary. I looked for a used counter top blaster but couldn’t find one right away, so I made one from Harbor Freight/Home Depot components.

The tote is the water resistant kind with a built in seal. The blast box was cheap and it worked pretty well for a first generation experiment, but there were three points of failure:
- I used silicone to secure the window to the lid and it worked loose. This connection really needs a frame mounted to the lid with the glass inside the frame. Without it the lid is too flexible to hold it firm. This issue was made much worse by...
- I didn't have a vacuum running to remove the dust= Poor visibility and positive pressure inside the box.
- The glove holes are too close together for comfort. I have wide shoulders so I had to tuck in like I was trying to squeeze through a crowd. If I did a 2.0 version of this I’d use a wider tote and make these holes further apart.
The electrolysis tank actually worked really well! I suspended rusty parts (I used plain old bailing wire) in a solution of water and 1 tablespoon/gallon washing soda, inserted sacrificial steel anodes, hooked the positive battery charger lead to the anode and the negative to the rusty bits, plugged it in and went to work on something else. Here are some pics of mine doing its thing...

 Its very satisfying to walk past and see this thing frothing and churning away rust. These two pics are with the power off as you can't see anything with it running, but look at all that gunk in the bottom!
I had some flat steel scraps for anodes with LOTS of surface area (more surface area=good.) As you can see, it really pulled the rust off. I had to pull the anodes out and scrape them down several times for each batch.
Alas, I've hit the maximum pictures limit for this post, so I guess this is a good place to start Part III. Thanks for reading and see you soon!
Last edited:


