Oil pressure Gauge install B7100
- Thread starter 85Hokie
- Start date


So thinking this thing through - I placed the old sending unit on the T fitting, the T fitting on the adapter (all with teflon) and THEN inserted into the engine block
Am I missing something, if you needed an adapter to go from where the old sending unit was in the block, to the Tee,
what did you use to put the old sending unit into the Tee if it is 1/8" pipe x three?.
Here is my version of this install.....
Started with the Sunpro CP8093 style line 1.5 inch mini triple gauge set;
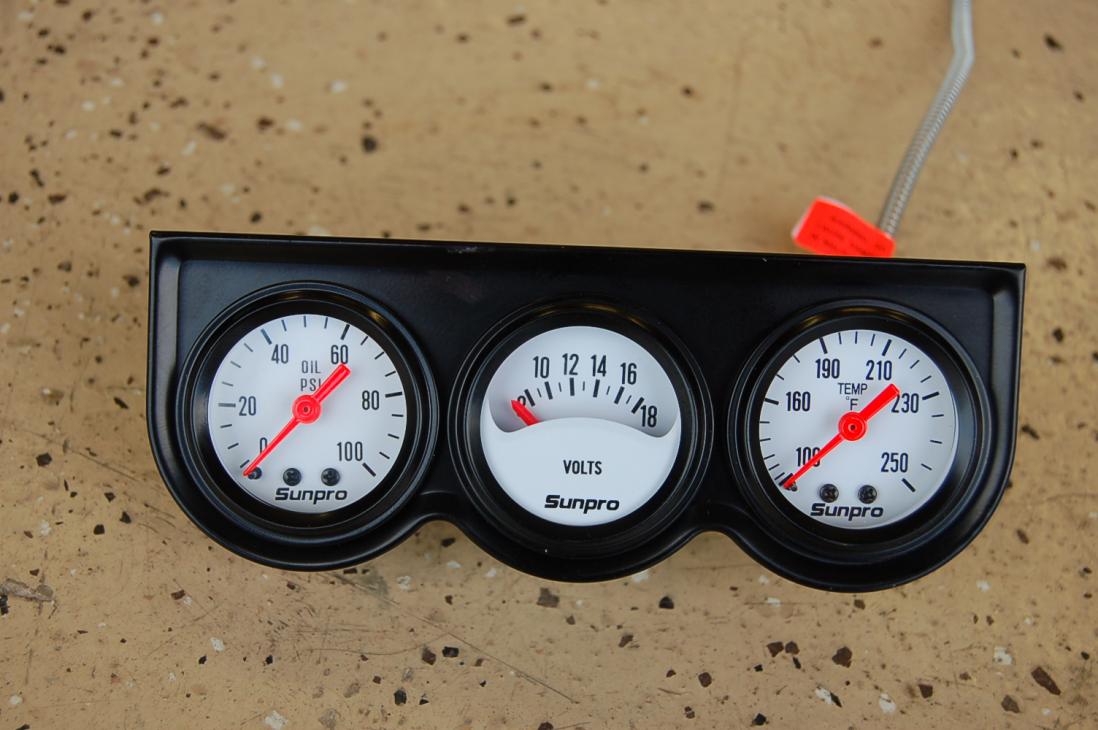
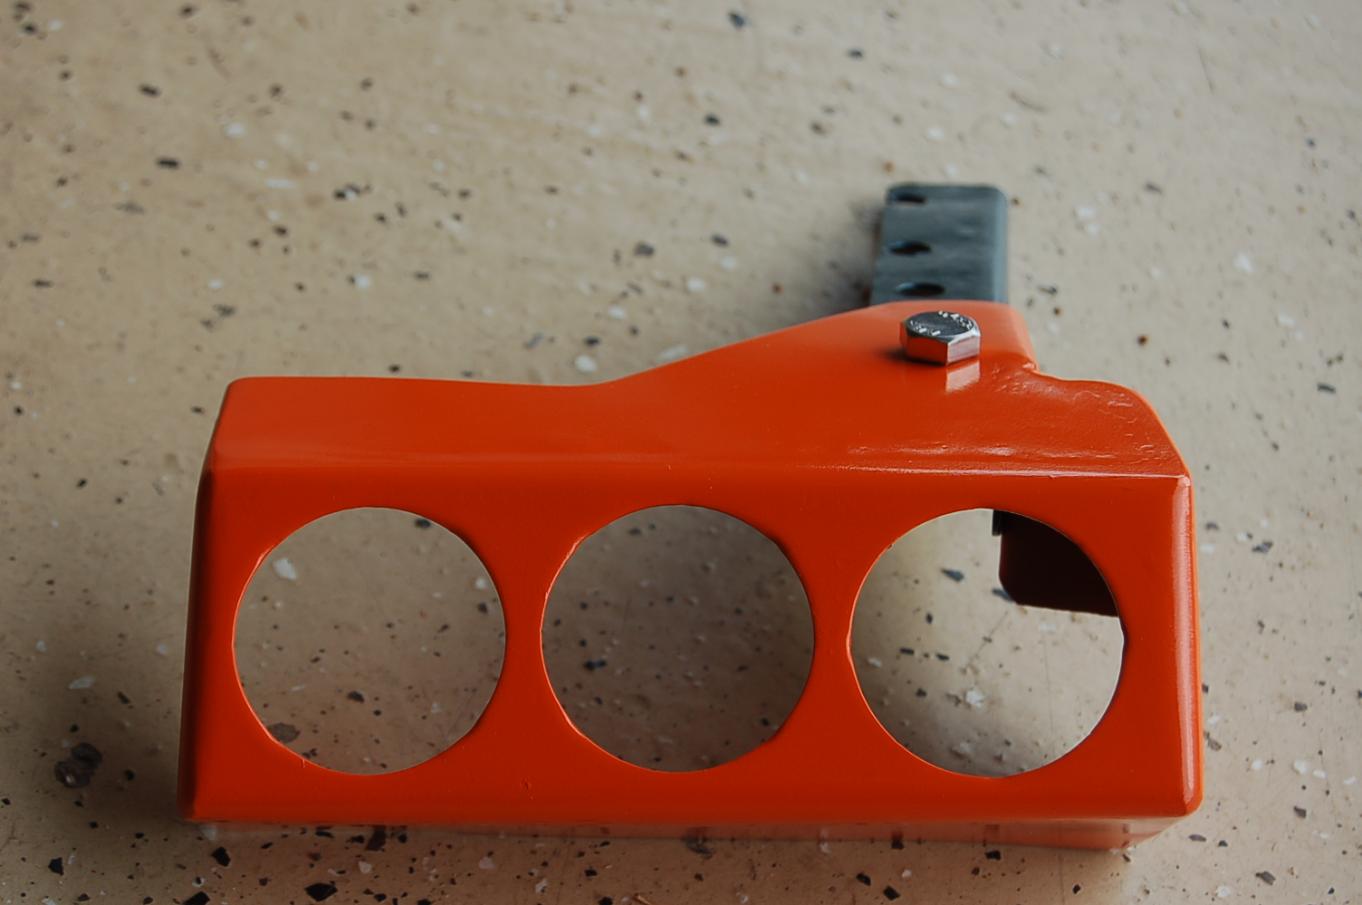
Made a gauge housing;
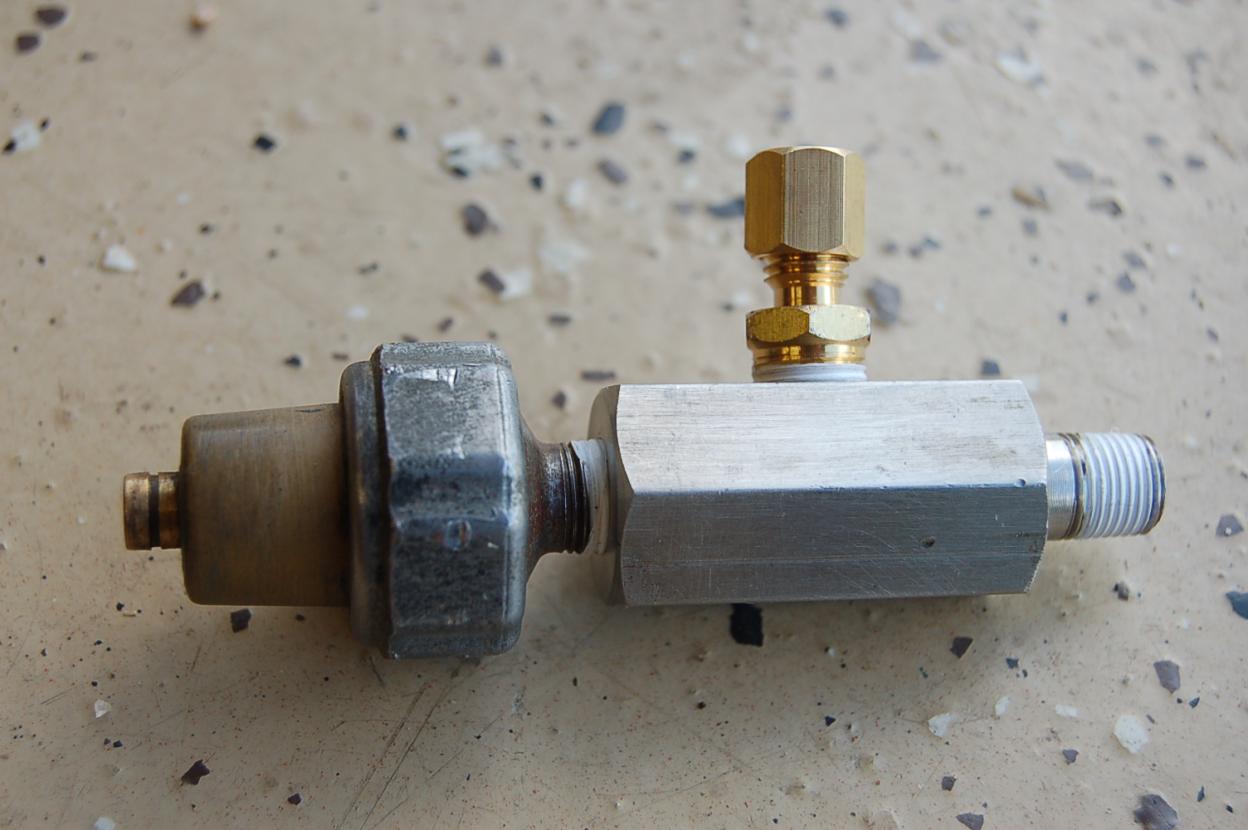
Used this adapter for the oil pressure line / sending unit combo so I could keep the light;
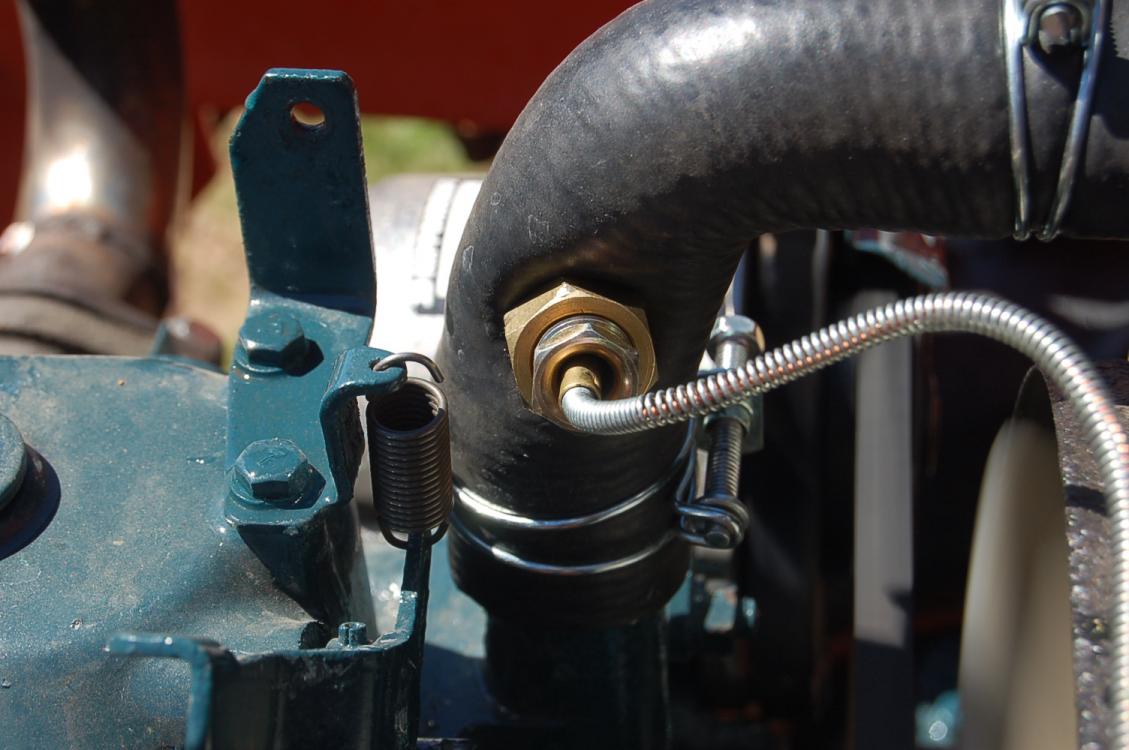
This is the route I went for the water temperature sending unit, albeit temporary,
did not want to experiment with the new Kubota hose. Seems to work fine;
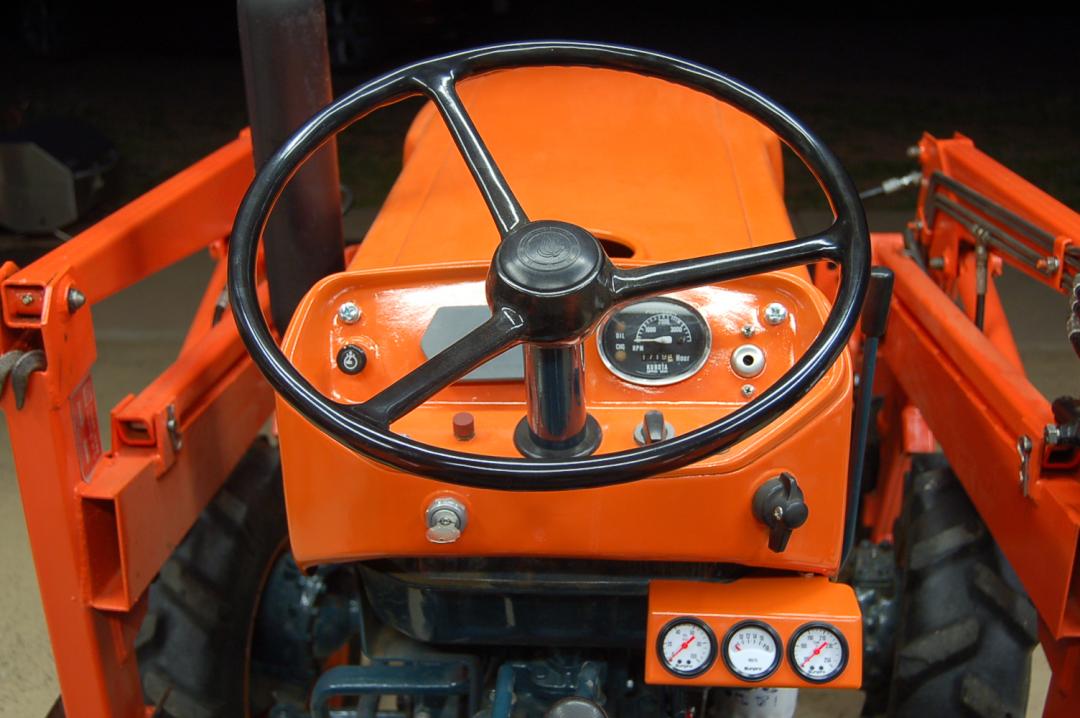
The final install in place and fully functioning;
Also swapped out the incandescent lights for LED lights,
and trashed the poly oil tube and used copper.")
Started with the Sunpro CP8093 style line 1.5 inch mini triple gauge set;
Made a gauge housing;
Used this adapter for the oil pressure line / sending unit combo so I could keep the light;
This is the route I went for the water temperature sending unit, albeit temporary,
did not want to experiment with the new Kubota hose. Seems to work fine;
The final install in place and fully functioning;
Also swapped out the incandescent lights for LED lights,
and trashed the poly oil tube and used copper.
Attachments
-
 89.5 KB Views: 3,647
 -
 80.2 KB Views: 3,018
 -
 87 KB Views: 3,766
 -
 90.1 KB Views: 3,765
 -
 89.7 KB Views: 3,692
85Hokie
Moderator
Staff member
Lifetime Member
Equipment
BX-25D ,PTB. Under Armor, '90&'92-B7100HST's, '06 BX1850 FEL
Bill,
very nice work !!!
Question - does your T have plenty of room against the metal sides? Or was that not a big deal?
What does your engine run temp wise under a heavy load?
very nice work !!!
Question - does your T have plenty of room against the metal sides? Or was that not a big deal?
What does your engine run temp wise under a heavy load?
Not sure what you mean by the metal sides, this was on a 1500 actually not the 7100,Bill,
very nice work !!!
Question - does your T have plenty of room against the metal sides? Or was that not a big deal?
What does your engine run temp wise under a heavy load?
So the only thing I had a problem with putting the T in was I had to grind a little bit off the top of the starter solenoid.
Temps yesterday while mowing a couple of Acres reached about 198
Last edited:
85Hokie
Moderator
Staff member
Lifetime Member
Equipment
BX-25D ,PTB. Under Armor, '90&'92-B7100HST's, '06 BX1850 FEL
"Not sure what you mean by the metal sides, this was until 1500 actually not the 7100,
So the only thing I had a problem with putting the T in was I had to grind a little bit off the top of the starter solenoid."
gotcha - I just figured that anything that was a bit longer than the original would be in the way of something else! Seems like you have to measure to see if something is gonna bump into something else!
Sweet install. Looks great - very professional. Gauge's always make me feel like I have more control over things.......
I'm not a control freak - I'm more of a control enthusiast!
I'm not a control freak - I'm more of a control enthusiast!
After reading this thread several times I purchased the same set of gauges and am installing on my 7100. I asked 85Hokie for some input which has so graciously supplied and am in the process of buttoning up my tractor to do more evaluation on my low pressure issue. I tore it down thinking it was the cam plug and my plug is intact so the oil pressure gauge and temp gauge was needed to trouble shoot.Here is my version of this install.....
Started with the Sunpro CP8093 style line 1.5 inch mini triple gauge set;
Made a gauge housing;
Used this adapter for the oil pressure line / sending unit combo so I could keep the light;
This is the route I went for the water temperature sending unit, albeit temporary,
did not want to experiment with the new Kubota hose. Seems to work fine;
The final install in place and fully functioning;
Also swapped out the incandescent lights for LED lights,
and trashed the poly oil tube and used copper.
85Hokie, tried to get back to you yesterday but got an error said your inbox was full. appreciate your input.
Jim
Last edited:
FYI,
The 1/8-27 BSPT fitting is the same in Subaru's...
A 300 millimeter hose, with a "T" fitting on the end, is made by LMA Auto Parts.
Has 1/8-27 BSPT on the ends, and a 1/8-28 NPT port on the side
http://www.lmaautoparts.com/products/REMOTE_T-PIECE_KIT_1_8BSPT/
Got mine from Demon Tweaks...
http://www.demon-tweeks.co.uk/motorsport/gauge-pipes-adaptors/lma-oil-pressure-remote-t-piece
Use blue thread locker on the last thread or two...
There are two gauges that I like, the digital three gauge setup,
https://www.amazon.com/Auto-Meter-2391-Autogage-Electric/dp/B00062YW06/
and the single oil pressure gauge
https://www.amazon.com/gp/product/B00062YVW0/ref=oh_aui_detailpage_o00_s00?ie=UTF8&psc=1
These are digital, no tubes, just a sender and wires....
Ive heard of friends that do that.Re: Oil pressure install B7100
I did this type of installation on a 4wd Case loader tractor many years ago, with the oil pressure gauge being supplied with a plastic tube. It worked well for a long time, until the day a friend was helping, using this tractor to disk, and not noticing that the plastic tube had broken, and over time the tractor slowly hemmoraged all the engine oil. That little plastic tube resulted in a $3000 engine overhaul. If you must put in a pressure gauge, either use an electronic sender, or a small gauge copper pipe routed in such a way that it won't fatigue due to vibration.
This is an awesome post. I’ve been wanting to do this for a while, now with your guidance. I’m gonna get it done. Did you ever think of using copper tubing?D2Cat brought up a good suggestion,
(LONG POST)
itemize what is needed to install an OIL pressure gauge on a B7100 (or any other tractor) and STILL keep the idiot light!, having paid close attention to what NIW has said about "fittings" being BSPT ,(British) you would think that is strange for the Japanese to use British fittings - but it is quite common :
http://www.ralstoninst.com/news/story/the-difference-between-npt-bspp-and-bspt-seals/
however, damn near all other "fittings" are NPT ......
other than the pitch being slightly off and the tpi being off a smidgen - 27 tpi vs 28 tpi they will almost work together.
However - I really did not want to spend $20 for a freakin adapter! So.....I found this: (still 10 bucks!)
http://www.amazon.com/gp/product/B001DKM4PU?psc=1&redirect=true&ref_=oh_aui_detailpage_o01_s01
T fitting :
http://www.amazon.com/gp/product/B006PKKXM4?psc=1&redirect=true&ref_=oh_aui_detailpage_o07_s00
And gauge:
http://www.amazon.com/gp/product/B00029K00Y?psc=1&redirect=true&ref_=oh_aui_detailpage_o01_s00
And a roll of teflon tape.....
So - I carefully got a small wrench in to get the sending unit wire off, hex with phillips inset, neither was a good tool to get it loose! Thank goodness the pliers were good enough to loosen it. Wire off and the unit came off easily.
Just for S&G's I tried to stick the T adapter (NPT) into the hole in the block, BSPT, I could not get it to start in the thread - even though it should "thread up" to a certain point.
Now the PITA part - my hands could not get the T and adapter and the rest in the tight area, so the engine skirt had to come off - well hell, aint no biggie, 6+ bolts and hold your tongue just right and it came off.
So thinking this thing through - I placed the old sending unit on the T fitting, the T fitting on the adapter (all with teflon) and THEN inserted into the engine block - the fat part of the T needed to spin around the battery hot wire that sits right down in that pathway, so a turn, a push on the wire, another turn, this way ALL THREE fittings spin and tighten with the same amount of force without placing too much on any one fitting. Finally got it snug and turned pointing up.
Now the gauge mounting was simple, however the plastic tubing they give you.......its like playing with a plastic slinky!!!! Aint no way you can fight that freakin coil of plastic without a kink or a kuss !
So - newly bought heat gun came into action, placed the gun on the table on low, pulled the tubing across the face of the gun, slowwwwllly straightened it out to the point where it would be usable.
Found out that I only needed about half of the tubing.....so a snip and I had plenty......now for the ferrules for the tube, well lets open the package of all the nuts and screws and what not......
one ferrule - where is number 2? ...... son of a $#%$#^ - O - I was pissed, a true 1 penny part was gonna keep me from finishing this $##$^$ thing! Looked everywhere - man talk about frustration.........
So picked up the gauge for some crazy reason, rattle in it, WTH? so what to do, shake the hell out of it......something falls on the bench, hits the floor....and pooooof - it too is gone.....never saw it hit the floor, so on hands and knees looking on a plywood floor trying to find this magic part.....nuttin, zip - so.......After about 10 minutes I backed up a few steps and whooop there was something up under the tractor tire - ferrule #2 !!!!! WHo in the sam hell sticks it IN the gauge light socket while the rest is in a plastic sealed bag?????
So - mount the gauge, place nut on one end of the tubing, and the ferrule and tighten the tube to the T fitting - no problem, route the tubing for a semi straight shot to the gauge, repeat the fitting...........
Crank the tractor - looking for leaks, none
SO - double check everything - place the shield back on, and two hours later - I am done!
Reality it would (should take about 30-45 minutes) if I had to do again!
For 30 bucks round trip - money well spent, I'll report back ifn either gauge fails - heard reports of these type of gauges "failing" ......
SO - moving to the lighted end - since I had the temp gauge mounted, I simply tapped in to it's light hot/cold wires.......
so I fire it up again - and son of a beeeeauuucccch - the light on the new gauge works well BUT the other light is now cooked!!! So....back to amazon for bulbs......
another 10 bucks
http://www.amazon.com/gp/product/B00KLHBUJ2?psc=1&redirect=true&ref_=oh_aui_detailpage_o00_s00
but these should be bright! and not burn out!!!!
time will tell!
Definitely gonna do this now thank you for such a great post and detail instructions. Did you ever think of using copper tubing instead of the plastic one?D2Cat brought up a good suggestion,
(LONG POST)
itemize what is needed to install an OIL pressure gauge on a B7100 (or any other tractor) and STILL keep the idiot light!, having paid close attention to what NIW has said about "fittings" being BSPT ,(British) you would think that is strange for the Japanese to use British fittings - but it is quite common :
http://www.ralstoninst.com/news/story/the-difference-between-npt-bspp-and-bspt-seals/
however, damn near all other "fittings" are NPT ......
other than the pitch being slightly off and the tpi being off a smidgen - 27 tpi vs 28 tpi they will almost work together.
However - I really did not want to spend $20 for a freakin adapter! So.....I found this: (still 10 bucks!)
http://www.amazon.com/gp/product/B001DKM4PU?psc=1&redirect=true&ref_=oh_aui_detailpage_o01_s01
T fitting :
http://www.amazon.com/gp/product/B006PKKXM4?psc=1&redirect=true&ref_=oh_aui_detailpage_o07_s00
And gauge:
http://www.amazon.com/gp/product/B00029K00Y?psc=1&redirect=true&ref_=oh_aui_detailpage_o01_s00
And a roll of teflon tape.....
So - I carefully got a small wrench in to get the sending unit wire off, hex with phillips inset, neither was a good tool to get it loose! Thank goodness the pliers were good enough to loosen it. Wire off and the unit came off easily.
Just for S&G's I tried to stick the T adapter (NPT) into the hole in the block, BSPT, I could not get it to start in the thread - even though it should "thread up" to a certain point.
Now the PITA part - my hands could not get the T and adapter and the rest in the tight area, so the engine skirt had to come off - well hell, aint no biggie, 6+ bolts and hold your tongue just right and it came off.
So thinking this thing through - I placed the old sending unit on the T fitting, the T fitting on the adapter (all with teflon) and THEN inserted into the engine block - the fat part of the T needed to spin around the battery hot wire that sits right down in that pathway, so a turn, a push on the wire, another turn, this way ALL THREE fittings spin and tighten with the same amount of force without placing too much on any one fitting. Finally got it snug and turned pointing up.
Now the gauge mounting was simple, however the plastic tubing they give you.......its like playing with a plastic slinky!!!! Aint no way you can fight that freakin coil of plastic without a kink or a kuss !
So - newly bought heat gun came into action, placed the gun on the table on low, pulled the tubing across the face of the gun, slowwwwllly straightened it out to the point where it would be usable.
Found out that I only needed about half of the tubing.....so a snip and I had plenty......now for the ferrules for the tube, well lets open the package of all the nuts and screws and what not......
one ferrule - where is number 2? ...... son of a $#%$#^ - O - I was pissed, a true 1 penny part was gonna keep me from finishing this $##$^$ thing! Looked everywhere - man talk about frustration.........
So picked up the gauge for some crazy reason, rattle in it, WTH? so what to do, shake the hell out of it......something falls on the bench, hits the floor....and pooooof - it too is gone.....never saw it hit the floor, so on hands and knees looking on a plywood floor trying to find this magic part.....nuttin, zip - so.......After about 10 minutes I backed up a few steps and whooop there was something up under the tractor tire - ferrule #2 !!!!! WHo in the sam hell sticks it IN the gauge light socket while the rest is in a plastic sealed bag?????
So - mount the gauge, place nut on one end of the tubing, and the ferrule and tighten the tube to the T fitting - no problem, route the tubing for a semi straight shot to the gauge, repeat the fitting...........
Crank the tractor - looking for leaks, none
SO - double check everything - place the shield back on, and two hours later - I am done!
Reality it would (should take about 30-45 minutes) if I had to do again!
For 30 bucks round trip - money well spent, I'll report back ifn either gauge fails - heard reports of these type of gauges "failing" ......
SO - moving to the lighted end - since I had the temp gauge mounted, I simply tapped in to it's light hot/cold wires.......
so I fire it up again - and son of a beeeeauuucccch - the light on the new gauge works well BUT the other light is now cooked!!! So....back to amazon for bulbs......
another 10 bucks
http://www.amazon.com/gp/product/B00KLHBUJ2?psc=1&redirect=true&ref_=oh_aui_detailpage_o00_s00
but these should be bright! and not burn out!!!!
time will tell!
We installed the oil pressure gauge on both of our Kubota tractors using 1/8" npt Close nipple into the block to a brass tee- next the stock idiot light sender on one of the tees threaded holes then we used two long 1/8" grease gun flex rubber hoses to the gauge .
teflon sealing paste on all the fittings and clamped the flex hosed in a couple of places on the body.
no leaks in over 10 years of use.
oil pressure cold is 80 psi and operating pressure is 50psi
I drilled the top of the radiator and soldered a fitting for the temperature bulb sensor
DT 2201 and DT 185
Hank
North Idaho Wolfman
Moderator
Staff member
Lifetime Member
Equipment
L3450DT-GST, Woods FEL, B7100 HSD, FEL, 60" SB, 743 Bobcat with V2203, and more
Grease gun hoses are an excellent choice!We installed the oil pressure gauge on both of our Kubota tractors using 1/8" npt Close nipple into the block to a brass tee- next the stock idiot light sender on one of the tees threaded holes then we used two long 1/8" grease gun flex rubber hoses to the gauge .
teflon sealing paste on all the fittings and clamped the flex hosed in a couple of places on the body.
no leaks in over 10 years of use.
oil pressure cold is 80 psi and operating pressure is 50psi
I drilled the top of the radiator and soldered a fitting for the temperature bulb sensor
DT 2201 and DT 185
Hank
I am interested in this project. Can you share your project details with us. Parts list and other details please. I am sure that the parts list is vary between the different tractors but possibly most of us can cross reference parts to get the right parts for our project tractor.Re: Oil pressure install B7100
In the past I have always used 1/8" copper line and tossed the plastic junk.
I am interested in this project. Can you share your project details with us. Parts list and other details please. I am sure that the parts list is vary between the different tractors but possibly most of us can cross reference parts to get the right parts for our project tractor.
That was so long ago, not sure where the adapter came from, probably Amazon, as did the gauge set.
The gauge holder/enclosure was a home made part of the install.
@mattwithcats posted a list early on in this thread..... HERE
Last edited by a moderator: