Nice install job. I was noticing the bracket for the hoses at the top of the FEL mount. That just somehow looks backward to me, meaning I would think it would be holding the hoses up, not down, by being under them. I would have preferred the lines being inside the boom too, because that's just begging for them to catch on something and break one of those lines. Not criticizing your work at all, but more aimed at the Kubota design. Looks like you did exactly what the kit required. I guess they didn't want those hoses close to the pretty orange bonnet.So I completed the installation this morning. No leaks and everything works as expected. Assuming you have an intermediate mechanical background this is something you should be capable of doing. Most challenging parts were getting the hard lines and tube stays on the loader arm to cooperate and trying to reinstall the banjo bolt on the rear without removing the seat or the tire. I still need to grind the parking stand a bit to get it to fit properly, but thats a minor inconvenience. All in all, I'm glad that I did it myself and look forward to being able to angle the snow plow going forward without getting off and physically adjusting it. Another big thanks to tthorkil as I couldn't have done it without him!
OEM Kubota 3rd Function Kit Install
- Thread starter je1279
- Start date
je1279
Well-known member
Lifetime Member
Equipment
LX2610 w/ 60" MMM, LP 72" Snow Plow, EA Wicked 55" Grapple, and Woods 60" BB
Thanks. Haha yeah that is the one thing that I'm not a big fan of either, but it is what it is. If you get the optional single point connector for the FEL, all of the hoses actually do that. Fortunately, once I get some land cleared out I won't be spending much time in the woods, but I will be paying attention to that while doing so.Nice install job. I was noticing the bracket for the hoses at the top of the FEL mount. That just somehow looks backward to me, meaning I would think it would be holding the hoses up, not down, by being under them. I would have preferred the lines being inside the boom too, because that's just begging for them to catch on something and break one of those lines. Not criticizing your work at all, but more aimed at the Kubota design. Looks like you did exactly what the kit required. I guess they didn't want those hoses close to the pretty orange bonnet.
Last edited:
I just installed the LandPride 3rd function on my LX2610.Thanks. Haha yeah that is the one thing that I'm not a big fan of either, but it is what it is. If you get the optional single point connector for the FEL, all of the hoses actually do that. Fortunately, once I get some land cleared out I won't be spending much time in the woods but I will be paying attention to that while doing so.
Completely different setup on mine.
Valve is located on the inside of the left loader support.
Hydraulic lines are routed on the inside of the left loader boom, and are hose, not steel.
But, my 2610 does not have the single point loader hydraulic hook up.
Replacing the return line under the seat was a pain.
This photo answered a nagging question that's been bugging me since I saw what I thought to be a discrepancy. If you'll look close, you can see a threaded hole right behind the vent, and what looks like a corresponding hole in the seat mounting plate right above it. Straight to the right, behind the filler plug, there is a bolt with a couple spacers that goes through the plate, and threads into the transmission housing. That bolt doesn't actually appear to be holding anything, other than acting as a dowel to locate the seat support. I've been thinking the whole time that my tractor was missing a bolt. After looking closely at this one, nope, same exact hardware on mine that is on this one. I really need to take a closer look at how that thing is mounted.For those anxiously awaiting an answer, you can complete the installation without removing the rear tire or the seat. You will need to have small hands and be able to contort your body in inhuman ways, but it can be done. I hope to have this wrapped up tomorrow and I will post additional pictures then.
I've noticed quite a bit of flex in the floorboards getting on and off the tractor, too. I'm not what I'd consider a 'big ol' boy' at less than 190lbs, and I wonder about the longevity of the stock step on the LX models, or perhaps fatigue cracks in the floorboard. Am I worrying about nothing?
je1279
Well-known member
Lifetime Member
Equipment
LX2610 w/ 60" MMM, LP 72" Snow Plow, EA Wicked 55" Grapple, and Woods 60" BB
Funny you mention that as I thought something was missing on mine as well. I have the flex with the step also but I'm guessing it's the same setup as they used for the B2650 so I'm not worried about it. This guy added some reinforcements that seem to help.This photo answered a nagging question that's been bugging me since I saw what I thought to be a discrepancy. If you'll look close, you can see a threaded hole right behind the vent, and what looks like a corresponding hole in the seat mounting plate right above it. Straight to the right, behind the filler plug, there is a bolt with a couple spacers that goes through the plate, and threads into the transmission housing. That bolt doesn't actually appear to be holding anything, other than acting as a dowel to locate the seat support. I've been thinking the whole time that my tractor was missing a bolt. After looking closely at this one, nope, same exact hardware on mine that is on this one. I really need to take a closer look at how that thing is mounted.
I've noticed quite a bit of flex in the floorboards getting on and off the tractor, too. I'm not what I'd consider a 'big ol' boy' at less than 190lbs, and I wonder about the longevity of the stock step on the LX models, or perhaps fatigue cracks in the floorboard. Am I worrying about nothing?
Hard to see how he mounted the far ends under the deck. I wouldn't think it would be a smart idea to weld them so they can't be removed. Shouldn't hurt to just take one bolt out somewhere on the frame for each leg of the brace and put them under the existing bolts. Will obviously have to keep bolt length and material thickness in mind. Hard to see properly, but it looks like he used angle for that. I'm thinking box-beam or tube would look nicer (as well as be stronger) and round tube would be one less sharp edge to bump my noggin on when I go after the HST filter change. If I use round stock I can flatten and bend it on the ends to fit, much like the bracing on strut towers on a car. If I use box beam, I can weld a bar stock flange on it and close up the end to keep yellow jackets and dirt daubers from moving in, but will need to leave weep holes to keep it from filling up with water and splitting when it freezes. Hmmmm, sounds like a fun project. I think I already have the materials I need if I go with box beam. Don't want to steal the dude's 5 minutes of fame, just improve the idea a little. If I giterdun, I'll post pics and maybe some drawings so you can copy.
Got no help around today for a while, meaning no one to call an ambulance if I get stupid on the tractor, so this sounds like a good way to spend an absolutely gorgeous day outside. The missus is gone for some training for a new insulin pump to replace all the finger pricking and injections. She's tired of poking herself with needles, and it will also allow her to use one kind of insulin. I try not to get too crazy when I'm by myself. I did that one time, and wound up 30 feet up in a tree with a 6 inch limb on top of my foot in the fork of the tree. I'm a lot smarter than I used to be now. I swear, that limb defied gravity. I never realized hackberry was so springy and had anti-gravity warp drive built in.
High today is supposed to be 70 degrees. WOOHOO! Might have to roll the shirt sleeves up and do little safe projects and soak up some rays. Work on my 2021 farmer's tan a bit.
I need a better Go-Pro camera so I can make a million dollars on a YouTube channel.
No drawings , but here's some photos of what I did today. I free-handed most of the work, so didn't really take any measurements that weren't corrected with an angle grinder and cut-off wheel.
Started on the step stiffening task, but the neighbor needed some help unloading another couple yards of screened top from a trailer. Got a couple scoops off the back but couldn't reach in the trailer very well. We wound up shoveling into the bucket, but it was still a lot faster than handling by wheelbarrow. Took him nearly all day yesterday for the same amount of dirt. He's had a valve replacement, so I try to make sure I help with heavy work when he needs it. Knocked that out pretty quick, picked off a few roots for him while I was at it, then, resumed today's project that would keep me outta trouble. Idle hands, and all that.
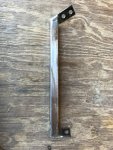
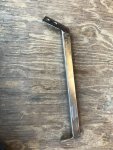
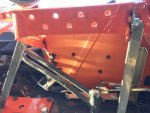
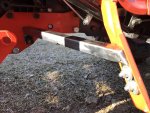
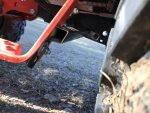
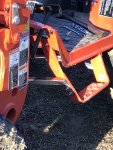
Didn't take any close-ups of the rear brace, but it was very similar to the front brace. Made the braces with 1" square box beam and 1.25" flat bar stock (which really wasn't very flat). Never realized just how hard rolling scale is until I tried to polish up the braces after welding. Welded the bolting flanges to the box beam, and drilled one hole for the tractor end, and two holes for the step end. Wound up using only one hole on the back.
I have learned that I'm an excellent welder, if you leave me alone with a grinder long enough. I didn't learn wire-welding in high school, and high school was a LONG time ago. Marking and cutting the angles on these was fun. Kinda free-handed them, and then what didn't match up, I filled in with the wire. Had to be careful not to blow holes in it, but managed to seal up the front bracket. Still gotta put a cap on the end of the rear brace. and close it up, then I'll drill some holes to keep 'em from filling up with moisture. A little Kubota orange, and these puppies will look like they belong here.
Started on the step stiffening task, but the neighbor needed some help unloading another couple yards of screened top from a trailer. Got a couple scoops off the back but couldn't reach in the trailer very well. We wound up shoveling into the bucket, but it was still a lot faster than handling by wheelbarrow. Took him nearly all day yesterday for the same amount of dirt. He's had a valve replacement, so I try to make sure I help with heavy work when he needs it. Knocked that out pretty quick, picked off a few roots for him while I was at it, then, resumed today's project that would keep me outta trouble. Idle hands, and all that.


Didn't take any close-ups of the rear brace, but it was very similar to the front brace. Made the braces with 1" square box beam and 1.25" flat bar stock (which really wasn't very flat). Never realized just how hard rolling scale is until I tried to polish up the braces after welding. Welded the bolting flanges to the box beam, and drilled one hole for the tractor end, and two holes for the step end. Wound up using only one hole on the back.
I have learned that I'm an excellent welder, if you leave me alone with a grinder long enough. I didn't learn wire-welding in high school, and high school was a LONG time ago. Marking and cutting the angles on these was fun. Kinda free-handed them, and then what didn't match up, I filled in with the wire. Had to be careful not to blow holes in it, but managed to seal up the front bracket. Still gotta put a cap on the end of the rear brace. and close it up, then I'll drill some holes to keep 'em from filling up with moisture. A little Kubota orange, and these puppies will look like they belong here.
Oh, forgot to mention, this kind of adds a little bonus of a bit of a guard for the HST filter. Unless something goes between the two braces, then, the HST filter will be toast. I try not to run through that kind of stuff if I can help it, though. P always treat my machinery like it can be broken, because, usually, it CAN. Especially when I'm using it.
For anyone why may stumble on this thread like I did, you can find the install instructions for the OEM Kubota Third Function valve kit for the LA535 (Part No. B7368) here. It's not the entire LA535 Assembly Instructions, but it's an excerpt from them, and I believe it contains all the relevant info. Click on "Install Instructions" below the diagram. If you have a backhoe, you'll have to follow the steps shown in the "Packing List" link at the bottom.So I just found some helpful information courtesy of Ryan Lynch's YouTube channel. The detailed instructions for the 3rd function kit are included in the loader assembly instruction manual (the LA535 in my case). While I couldn't find this manual online, I did find one for the LA534 which is quite similar and I'm hoping that it provides me with everything that I need. Here is the link in case it is helpful for others as well.

KUBOTA LA534 ASSEMBLY INSTRUCTIONS MANUAL Pdf Download
View and Download Kubota LA534 assembly instructions manual online. LA534 front end loaders pdf manual download.www.manualslib.com
Hope this helps, good luck!

