Rob
Member
Lifetime Member
Equipment
B6000DT / B7100DP /B8200DT/L225/Globe PTO Chipper/Lewis Backhoe/huxley TR66
Warning , very long post i'm afraid, maybe a bit boring for some folks")
Hi all, just thought i would add some details of my recently completed backhoe/loader subframe project.
As from my other post a while back i purchased an old lewis 200 backhoe, which, turned out needing a lot of work on it, anway finally sorted it all out but it did not have a subframe when i purchased it, not a problem i thought , but it has been a tad more involved than i had originally planned to be honest.
I wanted it to fit my B7100 and b8200, here is the 1st issue as the two machines are differing dimensions and we are not talking a few few mm here and there, more like centimeters and inches
After a lot contemplation etc i finally decided on the size and profile of the steel etc that i wanted to use, next stage was to workout how it was going fit and onto what fixing points on the tractor and more importantly wether as a one piece affair or sectional.
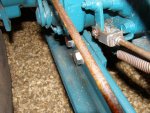
Opted for 12mm L section steel angle fom the main straight sections on both tractor and backhoe , using 12mm flat steel for the tractor subframe mounting brackets and 20mm for the subframe to tractor/engine subframe.
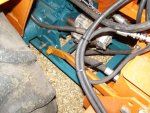
next stage was to fabriacte the basic structure minus mounting brackets as it getting tractor subframe section all square was going to be difficult and also getting both sides parallel was a real bind as there are a lot of moving parts that need to be worked around that need to be factored in to the build, ( brake linkages front and rear, clutch linkages and pedal shaft etc) also the position of the front axle drive shaft where it exits the tractor chassis needs to be factored in the build.
Another area that didnt com to mind until after first basic fitting is the front wheel L- R lock, with ags on and the wheels at full lock L or R you need to make allowance for the tyres not hitting on the front of the subframe, so an angle profile works well.
Yep still more i'm afraid( best get a beer now )
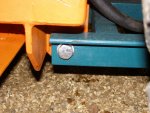
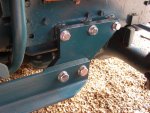
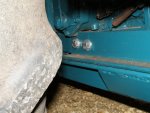
After getting all that sorted out decided to fabriacte the tractor subframe in mutliple sections, front fixing brackets for the front to tractor chassis, rear brackets mounted directly over the rear axle/bottom hitch plates as this aligned pefrectly with my design also stronger than just using the lower gearbox bolts.
middle sections brackets to tractor chassis ( as per original BF300 subframe mounting holes) . i think i burnt out my old pillar drill doing all those 12/16/20/25 mm holes through 12- 20 mm steel
next stage was to get all 10 sections drilled up and profiled etc ready for fitting.
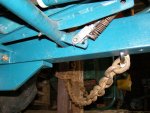
tractor backhoe subframe section was just an enhancement of the original lewis part allbeit differing dimesions and extra reinforment with double cross members welded in place.
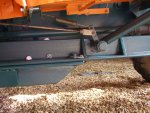
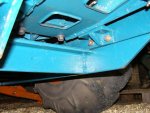
both sections fit together perfectly, and all fit spot on to the tractor with no interfering with brake systems, hoses, chassis parts etc at all.
It really does pay to spend a bit longer and workout all the details from the start as it saves so much hassle modifying parts later.
So after that long blab, i'm well pleased with the way it has turned out and no sign of any problems so far, my welding is not brilliant nor my fabricating skills but its seems to be doing the job.
pics here.
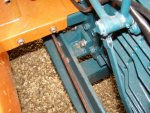
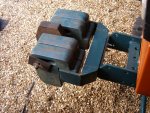
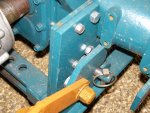
just for the keen eyed peeps out there, the two bolts in pic 2 which have one side milled off one side, they were only a temp fixing for alingment purposes, full bolts were fitted on final fixing.....
rob
Hi all, just thought i would add some details of my recently completed backhoe/loader subframe project.
As from my other post a while back i purchased an old lewis 200 backhoe, which, turned out needing a lot of work on it, anway finally sorted it all out but it did not have a subframe when i purchased it, not a problem i thought , but it has been a tad more involved than i had originally planned to be honest.
I wanted it to fit my B7100 and b8200, here is the 1st issue as the two machines are differing dimensions and we are not talking a few few mm here and there, more like centimeters and inches
After a lot contemplation etc i finally decided on the size and profile of the steel etc that i wanted to use, next stage was to workout how it was going fit and onto what fixing points on the tractor and more importantly wether as a one piece affair or sectional.
Opted for 12mm L section steel angle fom the main straight sections on both tractor and backhoe , using 12mm flat steel for the tractor subframe mounting brackets and 20mm for the subframe to tractor/engine subframe.
next stage was to fabriacte the basic structure minus mounting brackets as it getting tractor subframe section all square was going to be difficult and also getting both sides parallel was a real bind as there are a lot of moving parts that need to be worked around that need to be factored in to the build, ( brake linkages front and rear, clutch linkages and pedal shaft etc) also the position of the front axle drive shaft where it exits the tractor chassis needs to be factored in the build.
Another area that didnt com to mind until after first basic fitting is the front wheel L- R lock, with ags on and the wheels at full lock L or R you need to make allowance for the tyres not hitting on the front of the subframe, so an angle profile works well.
Yep still more i'm afraid( best get a beer now
)After getting all that sorted out decided to fabriacte the tractor subframe in mutliple sections, front fixing brackets for the front to tractor chassis, rear brackets mounted directly over the rear axle/bottom hitch plates as this aligned pefrectly with my design also stronger than just using the lower gearbox bolts.
middle sections brackets to tractor chassis ( as per original BF300 subframe mounting holes) . i think i burnt out my old pillar drill doing all those 12/16/20/25 mm holes through 12- 20 mm steel
next stage was to get all 10 sections drilled up and profiled etc ready for fitting.
tractor backhoe subframe section was just an enhancement of the original lewis part allbeit differing dimesions and extra reinforment with double cross members welded in place.
both sections fit together perfectly, and all fit spot on to the tractor with no interfering with brake systems, hoses, chassis parts etc at all.
It really does pay to spend a bit longer and workout all the details from the start as it saves so much hassle modifying parts later.
So after that long blab, i'm well pleased with the way it has turned out and no sign of any problems so far, my welding is not brilliant nor my fabricating skills but its seems to be doing the job.
pics here.
just for the keen eyed peeps out there, the two bolts in pic 2 which have one side milled off one side, they were only a temp fixing for alingment purposes, full bolts were fitted on final fixing.....
rob
Attachments
-
 95.6 KB Views: 1,054
 -
 97.3 KB Views: 649
 -
 96.3 KB Views: 677
 -
 94.9 KB Views: 597
 -
 94.3 KB Views: 658
Last edited: