Look'n up to see the bottom

OlTrailDog

New member

Equipment
L345DT w/ loader backhoe
Dec 4, 2014
61
0
0
Bozeman, MT
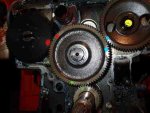
The precombustion chambers from the bottom or cylinder side look like nickel sized circles of machined versus cast metal. I figured this was sort of a bottom plate of hardened metal. From what you are saying these are actually more of a complete chamber insert than a bottom plate and can be removed and installed?

Any ideas on a feasible technique of removal and installation. How about driving the chamber out using a drift through the injector hole? I have the old head to experiment with, but if I screw it up I wouldn't have one to put into the new head.
Would it be best to take the head to a machine shop to remove and press in?

However, I just remembered this is all moot. One of the visible cracks in the old head is in the bottom of the precombustion chamber. Plus, another precombustion chamber that the machinist showed me had what were most likely minute stress cracks in the prechamber gullet leading into the cylinder based on the magnaflux markings.

Since Wolfman's idea sadly doesn't appear an option suggestions on where do I go from here?

If the prechamber inserts are removable, can they be tweaked by a machine shop to decrease the volume by a couple of cc's.

What is the possibility that rebuilding the bottom end will beef up the compression enough to running condition. This could eventually need to be done some time in the future anyway if the tractor continued to be serviceable.

Install the thinner head gasket and see if it runs enough to give to my brother in-law.:D

Purchase a used Kubota rebuilt head that should have the smaller prechambers as OEM (I know where one is) versus using the Kumar brothers new head that I have. Try to Ebay this head that would work fine for most needs.

Scrounge the bowels of the internet to find another cracked head that would have the smaller prechamber inserts to replace the ones in the new head. Doubtful.

Part out the tractor and cut my losses.
 

Lil Foot

Well-known member
Lifetime Member

Equipment
1979 B7100DT Gear, Nissan Hanix N150-2 Excavator
May 19, 2011
7,343
2,305
113
Peoria, AZ
I have been hesitant to jump in on this one, because I can't really put together the exact facts of the scenario that this sounds like from my past.
It's hell getting old.
Anyway this sound suspiciously like a scenario from my high school days, back when dinosaurs ruled the earth. A fellow students' dad was building some sort of hot rod with a flat head V-8 engine & found he had a bad head. (can't remember details) He found new heads, had them serviced & installed, and they leaked/had low compression. (can't remember details) He & our auto shop teacher fought the problem for weeks, until someone figured out they were the wrong heads- identical to the eye, but just different enough to cause a leak-
(between cylinders, into coolant, into crankcase, out the head gasket?) - (can't remember details) They found the correct heads & everything was fine. Sorry I can't be of more help.
 

OlTrailDog

New member

Equipment
L345DT w/ loader backhoe
Dec 4, 2014
61
0
0
Bozeman, MT
I first ordered the head from Grainfarmer. I waited for three weeks and finally contacted them to see what shipping arrival date could be expected. I received little response to my enquiries. After repeated attempts, I finally got a response that they would look into it and let me know the following Monday. Thursday rolled around, and after not hearing anything back from , I contacted them and left a message that I intended to cancel the transaction. That got some reaction and they let me know that due to the weather and because the machine shop they used was back logged and couldn't get to the L345 head until later.

I reply that from ad on their website I was expecting the head was in stock and ready to ship. Plus, if they would had let me know that it still needed to be sent to the machine shop I could have been more patient because I would have understood what was going on. So, the grainfarmer head that you see in the link very well may not even be ready for shipping as of yet. Anyway, that is what led me to purchasing the new head that is cast "Kumar Bros". Most likely this is an Chinese aftermarket casting (like most anything nowadays). This is most likely the cause of the 2 cc difference in precombustion chamber volume. This would also the source of the half width water flange versus the OEM full flange on my head (another freak'n delay and unanticipated expense) and the source of the extra stud hole on the exhaust side (surprise leak while filling up the antifreeze)

The Kumar bros head was sold a V1501 head and there isn't any leaking via the head gasket that was evident when I re-pulled the head. I'm confident that, at a minimum, the discrepancy in pre head and post head compression is due to the thicker head gasket from the kit and the extra volume in the prechamber.

I am really suffering from much cogitation of spirit on which course of action to take. The lack of blow by out either the exhaust or the rocker cover and the cylinder walls being in spec lean toward it not being the rings. Plus, the air escaping from the leak down test clearly was more evident in the air intake and the exhaust pipe versus oil fill hole. But I could be wrong, of course, and it wouldn't be the first time.

I dearly hate the idea of spending another $700 for a head that may or may not solve the issue. Even if the cylinders are in spec and there isn't blow by, there is a limited life between rebuilds and maybe it is time, even if it is a little premature. I really would rather spend the $700 toward parts for the bottom end than a different head. BUT...wringing hands and sighing deeply.

I am mulling a couple of actions before making a decision. After Wolfman mentioned swapping prechambers I poked around this site and came across a couple posts that mention the prechambers falling out or removing them. So, I'm thinking about taking a hardwood dowel (or a drift depending on my success) and seeing if I can remove one from the old head. Perhaps, I can have the cracked one welded and swap the prechambers. Would it be the prechamber or the boring for the prechamber that would be the cause of the excess volume??? Who knows until I get in there.

If that isn't a successful undertaking, I am also considering experimenting with installing the old head gasket and seeing if I have enough compression to get fire in the hole. I have another OEM head gasket on order that I would replace the used one when it arrives.
 

ShaunBlake

New member
Lifetime Member

Equipment
B6100D; B219; Piranha bar; Hodge stabilizers; Filled Ag rears; R322T w/48" deck
Dec 21, 2014
899
1
0
81
Sugar Hill -- next door to Buford, GA
OTD, I don't have your circumstances, yet I feel pain from your travails -- particularly from the vendor (Grainfarmer) who treated you so badly.

You've made light of your issues several times; nevertheless, I don't want to make wisecracks about it. That being said, I am intrigued by your comments about adding JBWeld to make a 'hemi' and a ball bearing to decrease volume. As a livelong (well, hemi- heads actually were developed some time after I was born, but let's not go there...) lover of hemi-heads, I would love to see the results of your developing a hemi- diesel! It boggles the mind!
 

ShaunRH

New member
Lifetime Member

Equipment
L3200
May 14, 2014
1,414
6
0
Atascadero, CA
I think he was clearly joking about the Hemi comments. Those are very precise piston/head measurements going on there.

It sounds like not only is the gasket bigger but the head chambers as well? Yeah, that'll drop your compression but by that much? Not entirely sure there but don't have the micrometer measurements to math it out, so you're following the right path on fixing all of it.

I don't know if you are or aren't, but recommend new head bolts as well.
 

MagKarl

New member

Equipment
L245DT
Aug 2, 2010
663
0
0
Olympia, WA
I don't remember exactly what the numbers were, but early on you mentioned a lead wire squish gap number on the order of 0.8-1mm if I remember right. I don' t know the bore so did not check your gasket math. So if the 0.025" gasket thickness change equates to 2.8cc, then 0.9mm would be about 4cc of cylinder volume above the piston, plus 13cc in the head, you were probably around 17cc total on the old head. Now you have 2 extra cc in the head, plus the 2.8 for the gasket, for a total of around 22cc.

1440cc is 360cc per cylinder. 360/17= compression ratio of ~21 on the stock setup. Sounds about right. Pressure should be 400+.

360/22= compression ratio of ~16 with the new gasket and head. Even with perfect sealing valves and rings, you would be on the very bottom end compression wise in low 300's.
 

ShaunBlake

New member
Lifetime Member

Equipment
B6100D; B219; Piranha bar; Hodge stabilizers; Filled Ag rears; R322T w/48" deck
Dec 21, 2014
899
1
0
81
Sugar Hill -- next door to Buford, GA
... So if the 0.025" gasket thickness change equates to 2.8cc, then 0.9mm would be about 4cc of cylinder volume above the piston, plus 13cc in the head, you were probably around 17cc total on the old head. Now you have 2 extra cc in the head, plus the 2.8 for the gasket, for a total of around 22cc.

1440cc is 360cc per cylinder. 360/17= compression ratio of ~21 on the stock setup. Sounds about right. Pressure should be 400+.

360/22= compression ratio of ~16 with the new gasket and head. Even with perfect sealing valves and rings, you would be on the very bottom end compression wise in low 300's.
Oh, Wild Thing, you make my heart sing when you sling all that 'new math' around! (Voted 5 stars)
 

OlTrailDog

New member

Equipment
L345DT w/ loader backhoe
Dec 4, 2014
61
0
0
Bozeman, MT
I spent the last couple of days dinking around. The prechambers on the old head would come out easily with a dowel and a hammer. But after wailing away on the new head and destroying a couple of dowels with no success, I decided that I'd forgo that experiment before I messed the head up. Anyway if I had to take a wild guess if it was the prechamber insert or the boring for the insert that was the cause of the difference I'd put my money on the boring. If true hat would lead me to a lot of dinking around and no improvement.

So, I installed the old head gasket, put things back together and did a compression test. No marked improvement.

Now I believe I have come to the inevitable...an 'opportunity' to delve deeper into the bowels of this tractor, aka hello bottom end. Perhaps I'll hit the mother lode and discover the valve timing gears are tweaked. But I'll not count on that.

I've looked it over and I do not see any reason that I shouldn't be able to leave the L1720 loader frame on the tractor. Crossed fingers. Largely because it is all in the garage and not running at this point anyway. I will support the tractor/loader rearward at the loader frame at the same location that I would support the tractor anyway. It looks like I can unbolt the front loader frame that hooks to the front axle area. However, I am looking for advice from someone who may have experimented with having to do this before.

I understand that I will need to build a super deep 48mm socket to remove the crank pulley nut. I think this is even deeper on my setup because it looks like the front pto shaft that runs the loader pump has an extension of the pto shaft welded onto it. This is just going to be a whole lot of fun and learning, eh?
 

OlTrailDog

New member

Equipment
L345DT w/ loader backhoe
Dec 4, 2014
61
0
0
Bozeman, MT
In order to provide some continuity I'll post today's findings on this thread.

1) Crankshaft Nut is off. There are some damaged threads on the crankshaft. Actually missing some of the threads in the middle of the threaded area on the crankshaft. How to deal with this? It is doubtful that the remaining threads will torque down to spec without stripping more. Go tight as possible and lock in place with the locking ring? Hit the thread bare area with a wire welder followed by grinding/filing to height and then re-thread?

2) Oil pump is cracked bad and will have to be replaced. It will actually come apart in two pieces when I unbolt it.

3) Attached is a picture of the timing marks. I have rotated the engine many times and the best I can get the timing marks to line up is shown in the pictures. If I turn farther they do not line up but get worse due to the different diameters of the gears. If I keep rotating the engine will it eventually line up if it is in time, i.e. the different diameters mean that the marks rarely line up???

This is where I need some sound advice. WSMs do not say squat about aligning the marks, only here is a picture of what it should be. Not quite helpful enough to proceed. Do I put the put #1 at TDC (the crank cog mark (1 dot) should be at the correct position at 12 o'clock. Should I set #1 TDC, remove and realign idler cog with the crank cog (1 dots), and adjust the cam and pump cogs to match their respective marks (2 dots and 3 dots).

Does it look possible that the engine is in time, but the center idler cog needs to be lifted out and rotated CCW and messed back with the marks in alignment??? That is the timing is correct, only the idler marks are off???

4) The good news is it appears the plug in the end of the cam has be weld tacked in place and I won't have to worry about it falling out, :)
 

Attachments

Last edited:

North Idaho Wolfman

Moderator
Staff member
Lifetime Member

Equipment
L3450DT-GST, Woods FEL, B7100 HSD, FEL, 60" SB, 743 Bobcat with V2203, and more
Jun 9, 2013
29,244
5,538
113
Sandpoint, ID
You don't have to set the motor to TDC or anything else, just get the crank in the right position and then line the rest up like the marks like the WSM drawling and it will be in time.
Yes they will be off after the first rotation but they are right and will come back in time after a number of turns (sorry can remember how many), It a revolving cycle. ;)
 

ShaunRH

New member
Lifetime Member

Equipment
L3200
May 14, 2014
1,414
6
0
Atascadero, CA
There is that much progression in the gear cycle? Wow...

I was looking at that alignment and thinking someone was messing with the center gear! LOL!
 

OlTrailDog

New member

Equipment
L345DT w/ loader backhoe
Dec 4, 2014
61
0
0
Bozeman, MT
Based on your replies and another thread that mentioned coming around every 34th cycle I decided to keep rotating the engine until the crank (1 dot) and idler (1 dot) lined up. Sure enough, when the 1 dot crank/idler finally lined up the cam and pump marks were dead on. Plus the flywheel was TDC 1/4. Thus, the timing was correct and incorrect timing is not a factor in the low compression.

Oh joy, I have been presented with more opportunity to descend deeper into the bowels of the infernal combustion engine. Looks like the next stop will need to be the ring gap and piston skirts in the theory that if the cylinders miced out to spec it should be the rings are wore out. And so it goes.

Half a league, half a league,
Half a league onward,
All in the valley of Death
Rode the six hundred.
"Forward, the Light Brigade!
"Charge for the guns!" he said:
Into the valley of Death
Rode the six hundred.
 

OlTrailDog

New member

Equipment
L345DT w/ loader backhoe
Dec 4, 2014
61
0
0
Bozeman, MT
Now that Pandora's box is open I would like to ask for some opinions on what would you do if you were at the point I am at.

Option 1: There is a possibility new rings would take care of the compression problem given the cylinders were within spec (albeit definitely worn). If I replace the rings only, the remaining life before rebuild will be limited and parts will be increasing harder to locate.

Option 2: Oversize bore the existing liner. Frankly, I have not come across .5 oversized piston/ring sets at the many websites with Kubota parts for the tractors using the 76mm bore, i.e. L185, L235, L245, L285, and L345. If I manage to locate an oversize set the pistons/ring set will run about $100 plus boring costs.

Option 3: Go big. Get a 76 mm set with liner, pistons, rings for $135/cylinder plus liner installation and boring costs.

Since the tractor has a new head I am leaning on going with option 3. I figure it will cost around another grand to accomplish option 3 including the clutch work since I have the tractor apart, but that will should be done for either option.

Use scenario: The loader, backhoe, steering, and four wheel drive worked fine when the tractor was running. The tractor isn't going to receive a lot of hard use. I'm retired and probably shouldn't don't plan on being around long enough to warrant purchasing a newer tractor. It will be used primarily for foundation digging, road gravel work, snow removal, and digging for an assortment of construction needs, e.g. pole barn, fence posts, lifting, moving heavy items, and drag racing the neighbour’s JD.
 

HickoryNut

New member

Equipment
BX25DLB/PForks,Front Blade,3PH,and 3Pt STUFF, BXPanded UA, Piranha, BH Dolly,Rip
Apr 15, 2011
130
0
0
NE Georgia
....and drag racing the neighbour***8217;s JD (love that!)

Option 3. The rig certainly seems worth the rebuild.
 

OlTrailDog

New member

Equipment
L345DT w/ loader backhoe
Dec 4, 2014
61
0
0
Bozeman, MT
And time passes quickly with too much of it spent in the shop instead of in the mountains, deep sigh.

Engine is back from the machine shop and reassembly starts. I am stumped on the torque for the cast oil pan. Can not come up with it in the manual or on line. Only possibility is that it is a general torque for an M10. Hate to ruin the gasket by over torquing. Any hints?

Second question. I've never had the pleasure of dealing with a dual stage clutch. The manual talks about a special tool that is a press of sorts for. I was wondering if I can use a normal centering tool of the appropriate size or dowels? Reattach to the flywheel and adjust the clearances of the arms or levers. Other thought it to take it out to the Kubota and have them adjust it prior to installing it on to the flywheel.

Finally, I just decided to replace the main shaft input seal and gasket while it is apart, after seeing this suggestion on another thread a couple days ago. Too bad I didn't think of this while waiting and waiting for parts and machine work, eh?
 

ShaunRH

New member
Lifetime Member

Equipment
L3200
May 14, 2014
1,414
6
0
Atascadero, CA
Well, if you don't want to overtighten, go for a smaller bolt size coarse thread, here's for 3/8th inch and that's a little smaller than your 10mm...

3/8-16 260 in. lb. (Grade 2); 35 ft. lb. (Grade 5); 50 ft. lb. (Grade 8)

That's for cast iron.

You only need enough holding power for compression of the gasket, and I also use a little goop to make sure it seals also, helps with holding in place while I get the pan up and bolts started.

I think 25-35 ft lbs is pretty common for pan gaskets, someone can correct me if my memory is wrong.

My manual for my L3200 has all the 'special tools' that you need and interestingly enough, the specs for how to 'make' them yourself where applicable. You might be able to fab up the special tool if need be, or someone here might have one they could ship to you to use.

On your last item, my father and grandfather tended to only fix what was broken so I totally understand what you are going through. I, speaking only for myself, like to tear it all down while I'm in there and fix whatever I can get to if I have the time! (That last part is the hard part to get... time!) :D
 

OlTrailDog

New member

Equipment
L345DT w/ loader backhoe
Dec 4, 2014
61
0
0
Bozeman, MT
I called the local Kubota service dept. and left a message. They called me back and said that he couldn't find anything either. He even called Kubota and they didn't have an answer. We were in agreement that using the nominal bolt size torque would probably be too tight given the gasket. So I ended up taking the middle of the road on ShaunH's suggestion...30ft lbs.

Just to top off the day, the main rear seal in the full gasket kit is a tad too big. So, I ended up ordering another one on line for a 1/3 (including shipping) of what I paid for the whole kit. Oh, joy.

I did get around to redoing the the oil pump. The old one had a completely cracked case. I ended up combining the impellers from the old into the 'new' used case for what looked like the best fit.
 

OlTrailDog

New member

Equipment
L345DT w/ loader backhoe
Dec 4, 2014
61
0
0
Bozeman, MT
Well, I've been working on this project for about a year. It has been months since I've updated the progress. Now it is time. I definitely learned some valuable lessons and I thought I would share my experiences because they may be of use to others who might find themselves in similar situations. If you like happy endings read on.

Lesson 1: One important lesson I learned is that if the previous owner strips out the crank shaft nut threads you can have the crank front shaft machined to accept a Toyota Tacoma axle nut. This nut is a couple of mm smaller than the OEM nut and is built to be torqued even more than the OEM crank nut. Put that in your bag of tricks. Anyone want to buy a socket for the OEM nut?

I finished reassembling the rebuilt engine and tractor in August. I borrowed the pre-oiler from the machine shop and I had lightly oiled the cylinder walls while reassembling In eager anticipation I cranked it over with the decompression pulled prior to giving it the old fire in the hole. The tractor would not start and didn't even sound like it was close to wanting to start.

If you remember way back in this thread or a previous thread I had measured the pre-chamber volume on the new Kumar Bros head as compared to the original head and found it to be larger. Since the problem with the tractor was lack of sufficient compression I contacted Kumar Bros and explained the problem. Sid at Kumar Bros said to send the head back and the receipts for the head job and he would at least refund the $700 for the new head.

Lesson 2: Do not do business with Kumar Bros. Months later and four more phone conversations with Kumar Bros in which Sid personally "I give you my word" that he would see that the refund was in the mail....nothing. Lesson two: Sid at Kumar Bros is as both a liar and a thief; and I am out $700, a head, and have given this all over to God for his attention, not mine so I can put that behind me.

While waiting for Kumar Bros refund that never appeared, I purchased a used head that had been rebuilt from Grainfarmer. In September, I installed the Grainfarmer's head and in much anticipation cranked away. The results were not a whole lot better than before. It took an inordinate amount of cranking to get the tractor started, not much different than before the rebuild. When I got the tractor running I spend some days hauling a stone boat I had built to put a load on the rebuilt engine in order to help seat the new rings. I hoped that over time the seated rings would help with the compression, and hence, ease starting the tractor. I retorqued the head and continued to work the TLB. Finally, I decided it was just not right and having to glow plug and crank the engine excessively just wasn't worth putting up with. I ran a compression test and the results were around 325 psi, an improvement but not up to snuff.

At that point I simply had to walk away and take a deep breath. I got busy in October cleaning up some property I purchased near Corvallis, MT and dearly wanted the TLB up and running to clean the place up. Plus, my place over at Kamiah had been burnt over in the Idaho forest fires. Miraculously, my travel trailer in the middle of the burnt over hay field was spared and made the local newspapers. Hallelujay!

During November or December I happened to run across a thread in a Lister tractor forum in which one person commented that if you rebuild the head and don't pay attention to the valve recess you can negate whatever gains you had by rebuilding.

So, my plan was to 1) pull the head and check the prechamber volume and the valve recess on the head rebuilt by Grainfarmer, 2) find a thinner head gasket that would bring my excessive piston to head clearances to spec, and 3) if all else failed I would machine a bushing to go over the injector nozzle to take up some volume in the prechambers, and hopefully, increase compression.

Step one: I checked the valve recess and, lo and behold, they were over spec, i.e. too deeply recessed. I went to the local machine shop and Mark shaved the head .008" and installed a new set of valves to bring the valve recess into spec. Mark also used a barometric pressure chamber to check the prechamber volumes and they were the same as the original head. So unlike the Kumar Bros head, this wasn't a problem.

Lesson 3: When you purchase a rebuilt head you had better check the valve recess cuz you may be wasting you time and money. Plus, if you have a valve job done make sure they met the valve recess specs.

I put the head back on the tractor over Christmas. I used the original head gasket since it is thinner than the Kubota replacement gasket. Piston to valve clearance was better, but still not quite within spec. Since it is winter I plugged the inline heater and an oil pan heater prior to starting. I also came across a tip to pre-heat the intake air with a heat gun. I gave it the glow plugs and the tractor started right up on first crank...Hallelujay! I ran it a couple of days with the same results and since it was time to retorque the head I did another compression test. I am now at 345-350. Not great, but at least the TLB starts readily at the first crank. Shaving the head and having the valves to spec gained me 25psi.

At least I now have a tractor that starts like it should. Now I have decided to get a custom head gasket that will bring my piston to head clearance within spec. I am confident that this will further tweak the compression. And then I will need to be content. I will update this with the final results in a month or so when that is accomplished.

Besides, now that I have a TLB that runs I can start a new thread on what I am going to do to get the three point hitch hydraulics working ;-)
 
Last edited:

Lil Foot

Well-known member
Lifetime Member

Equipment
1979 B7100DT Gear, Nissan Hanix N150-2 Excavator
May 19, 2011
7,343
2,305
113
Peoria, AZ
Congratulations on your progress, and thanks for an excellent report.