L175 Restore Thread

Stumpy

New member

Equipment
L175
Dec 1, 2011
848
3
0
NE Ohio
*Fwooooosh* *Cough Cough!* This thing still work? Has it really been 7 weeks? Yeesh. I got stuck and then school and (and for the last two weeks Mass Effect 3) sucked away the rest of my free time and the tractor got shelved for a while. I worked on it once or twice over that period but kept running up against the wall but I'm good to go now.

Ok last time I mentioned one of the bolts that hold the front axle on had stripped. The are a few different options for repairing stripped threads. Welding in the hole and retapping, brazing or soldering in the hole and retapping, drilling out to a larger thread, or drilling the threads out and installing a threaded plug are all equally strong repairs. Though the plug is largely dependent on how well it's secured in it's hole.

As a rule large cast iron parts can't be welded. The heating of welding tends to setup stresses in the metal which causes the weld to crack again. I could've brazed in the threads but it's tricky at a 90 degree angle and I've never done it before so I threw that out. Drilling the threads out is tricky as as I don't know where oil passages in the block are. There were no good thread sizes that would fit and a plug has the same problem. Thus I'm left with a more medium strength thread repair, the helicoil. While not awful they can be a pain to work with and generally aren't as strong as a cut thread however they are they offer the most strength for the smallest hole in this case.


The repair I had to make to my lathe using a threaded plug. To install a helicoil the old thread is drilled out just large enough that the old threads are removed. Then the larger hole is then retapped using a thread with the same pitch. A specially cut coil is then inserted and this forms the a pseudo thread in the original size.

Drilling straight enough for tapping more than 3/8ths of an inch or so is nearly impossible by hand. The stripped threads were naturally in the engine block which I couldn't very well put in the drill press. So to make sure my thread ends up perfectly straight (being off straight is usually the cause of broken taps) I need a guide for my drill bit and tap. Then my lathe broke again. Weekend before last I got that fixed again and started making my guides.


I'm drilling out a chunk of 1" 6061 aluminum with the same bit that will be used to drill out the threads. The same thing can be done with a 1" thick or greater block of metal on a drill press but I had the aluminum handy. Drills don't leave a very clean or accurate hole bore so doing it this way will allow a little wobble. The correct way to do this would be a drill it out with a slightly smaller bit and then use a reamer or the lathe to open the hole up to the right size to fit the drill bit. Reamers cost money and this being aluminum this will probably be a two or three use part tops so this will be close enough.


The guide is slide over the bit between the block and drill and then held flush against the block. By going slow I was able to keep the guide on the block and drill within a few degrees of straight.


As you can see (probably) all traces of the old threads have been removed.


Another piece was drilled out using a slightly larger bit so it acts as a guide for the tap. Once the tap was started the guide was removed and the hole finished.


The helicoil is already inserted in this picture. Most of the kits come with a threaded plastic guide for this step. The helicoil is threaded onto the insertion tool (basically a bold with a lip to catch the tail on the helicoil) and then threaded into the plastic guide. From there it's threaded into the hole in the block until it's just beneath the surface. You can actually stack helicoils to allow for longer threaded areas but I didn't have room for two. Once it's in the tail (more commonly known as the tang) can be removed with a sharp edged punch and a swift hit with a hammer.
 

Stumpy

New member

Equipment
L175
Dec 1, 2011
848
3
0
NE Ohio
Now that I've got it back on four wheels before I can start putting the engine back together I've got to get my temperature sender on the upper water neck. After several different failed ideas and one large rather large mistake I settled on a soldered on bung that fits into a hole drilled into the water neck.


This is the blue print for the part. If I measured correctly the tip of the sender oughta be right in the middle of the pipe and the tip of the bung will stick out as little as possible.


I spaced on taking pictures while making it but here is the side that inserts into the neck. The bung is .500in because that was the largest bit I had. A quick CAD drawing showed that for minimal obstruction but maximum contact with the walls the bung should be .193in deep.


And the other end. The depth of the threads were copied from the huge 1/2-NPT adapter that came with the gauge.


Looking good so far. The hole is one (32nd) drill size up from the probe (3/8ths) and fit nicely.


I drilled a test hole in the water neck I wrecked and threw it on to see how it looks. That's about what I was shooting for. It's right in the flow and the bung obstruction is minimal. Next time I'll make the same hole in the new neck and solder it in place.


The capillary tube will be routed down along the alternator and be zip-tied to the positive stater lead til it meets up with the wire loom the solenoid trigger wire comes out of. I may have to insulate the wire as it passes over the alternator but we'll see once it's running.
 
Last edited:

Orange Tractors

Member

Equipment
L175 w/Woods L59, Allis Chalmers WD
Jul 19, 2009
323
4
18
Butler, MO
Since you are using a mechanical temp guage; it shouldn't need any insulation, just be careful not to bend the tube tight enough to crimp it.

Robert
 

Stumpy

New member

Equipment
L175
Dec 1, 2011
848
3
0
NE Ohio
Yeah you're probably right, if it can withstand the heat in the gauge's range it'll probably survive anything the alternator can dish out. Still bugs me to see what looks like a wire lying on metal that gets hot :)
 

Orange Tractors

Member

Equipment
L175 w/Woods L59, Allis Chalmers WD
Jul 19, 2009
323
4
18
Butler, MO
If you haven't drilled the new water neck yet, you could try putting the adapter at a about a 45 degree angle to the rear. That should clear the alternator, but I dont know about the exhaust maniflold, maybe run the cap tube along the valve cover?

Robert
 

Stumpy

New member

Equipment
L175
Dec 1, 2011
848
3
0
NE Ohio
Drilled and soldered, however the camera has wandered off.

Yeah I've got to go under the exhaust manifold there's nothing up there really to tie it to. Less heat down there too. The alternator will be cooler than the valve cover, head, or exhaust.

Thanks Kytim!
 

Stumpy

New member

Equipment
L175
Dec 1, 2011
848
3
0
NE Ohio
Updating this with information from the other thread for those who missed it or are reading at a later date.

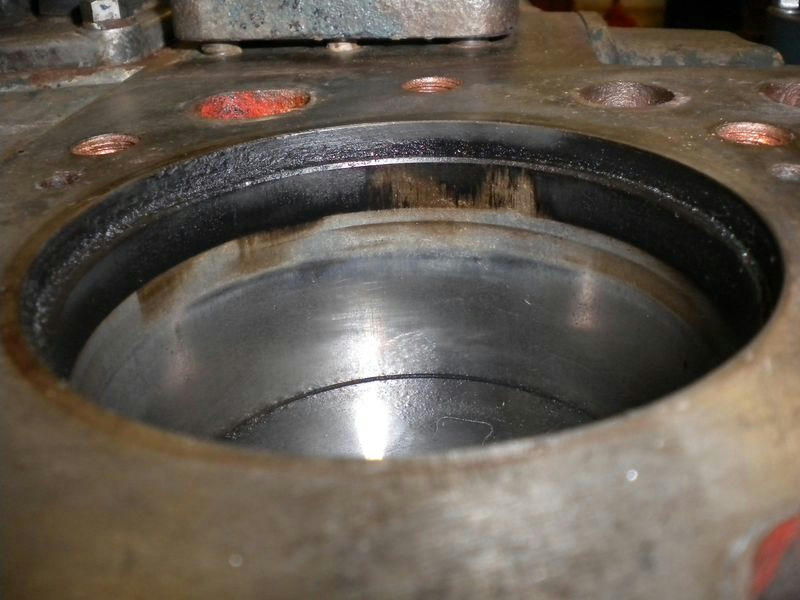
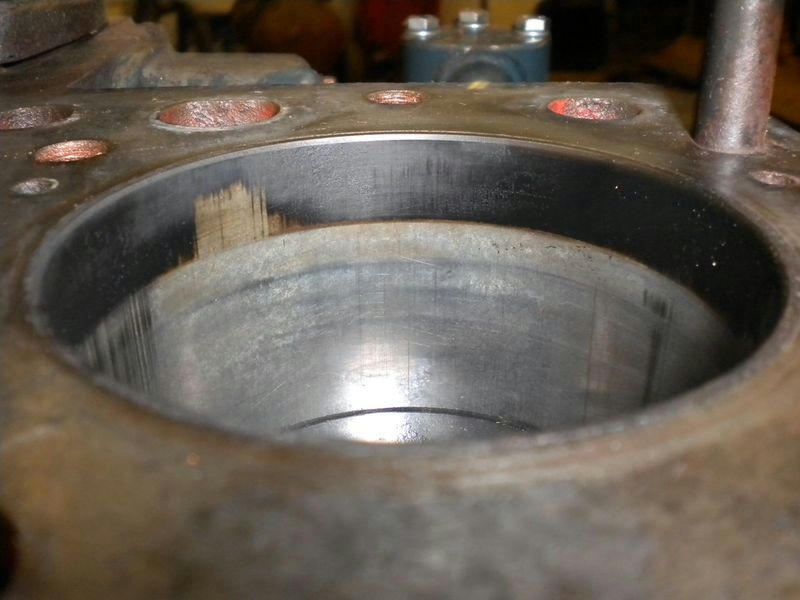
I don't know how I missed it before other than carelessness but as I was cleaning the deck to reinstall the head I noticed the liner on Cyl 1 was sunk farther into the block than on Cyl 2. :( I have no luck with this machine.

Cylinder 1


Cylinder 2


You can see where the old carbon build up used to be and where it's been scraped clean by the rings. I can imagine this thing shifted during the same overheat that knocked the exhaust valve guides loose. The correct path is obvious, renew the rings, liners, and pistons. I'm already over budget for this rebuild and parts would be $400 at Messicks plus whatever the machine shop costs. On top of that it'd mean stripping down and removing all of what I just put back together and then some. I could just kick myself for not noticing it before. I just can't figure out how I missed it. The pistons still move freely. I don't know about the compression ratio but it seemed to run ok before it was disassembled and there aren't any serious scars in the liner walls.

For a while I was sorely tempted to try and pull the liner back up and slap it back together hoping for the best. Between the advice I was given and some though I decided to renew everything. Even if everything went back together ok I wouldn't trust the repair and Steve (Apogee) made the case that the liner was probably warped and would cause low compression.

I just learned most of this myself and while I'm fairly sure it's correct take it with a grain of salt:

The liners in this engine (and several other Kubotas I'm sure if not all of them) are of a thin wall dry liner construction. They are thin sleeves installed in a solid parent bore that are cooled only by conduction with the parent bore which is cooled by the water jacket. This is contrasted with wet liners which are in direct contact with coolant.

The problem with these thin liners is while they're machined perfectly round from the factory when they're installed into the block they tend to warp out of round. This requires them to be machined round and then bored out to the lower limit of the service spec and honed. There is no way around this, I've looked. The advantage to the manufacturers is they can be easily installed in blocks that were designed to run without liners and take up minimal space. I believe I ran across a case of Ford doing this with one of their tractor motors when they started having problems with porous castings. The main disadvanges to me are I've got to get the thing to a machine shop and strip everything off the block. Grinding dust will find it's way into every pore.

There's a few different methods of removing these things. The backyard mechanics (and the simplest) way is to run a weld bead up the inside of the liner (vertically). When the previously molten metal cools it shrinks. There are entire books written on working around weld shrinkage and you can take a piece of plate and bend it into a U with welding via this effect. In this case it shrinks the liner and allows it to drop free. The tricky part is not burning through to the block.

They also make pullers which work similarly to a 3 jaw puller except they use a puck which grabs the bottom of the liner. I can make one with a little effort. This is probably the most reliable method but the most work intensive.

The easiest way is to shrink the liner while making the block expand. This is done by cooling and heating respectively. I'm going to give this a try first. With the water jacket in the block drained of coolant I'll pour boiling water in, let it soak for a while, drain and repeat til it's fairly hot. Then I'll lower a bag filled with heavily salted (near saturation) water and ice into the liner. The salt depresses the water's freezing point allowing it to be colder than normal. With any luck the clearance between the shrunk liner and expanded block will be enough that they'll slide out. If that fails, the sunk liner may give me trouble, I'll have to decide whether to weld or make a puller. AC welders spatter something fierce so I'll have to plan that one carefully.

Insertion of the new ones can be as simple as heating the block and shrinking the liners in the freezer or if one is available a hydraulic press can be used. There may also be some work needed on the parent bore.

Financially it's not as bad as I'd thought but I'll still be counting every penny. AquaForce who did this on this motor a few years ago got away with $180 in machine shop fees plus parts which Steve pointed out to me are available on Ebay for $135 for a piston, ring, and liner set. I talked with the machine shop that did my head and while they wouldn't give me an estimate without looking at it they at least do good work for reasonable prices. They did voice some concern that there was damage to the block since these liners usually have a lip to prevent them from sinking like that. I don't see any evidence of a lip in the pictures I've seen but with that in mind I've decided to remove the pistons and liners and inspect the block before I strip anything apart. From there I'll take the block off, let the shop give me their appraisal, and strip it the rest of the way. If they decide the parent bore on the slipped liner need to be bored out I'll let them handle it but I'm hoping I can just install both liners and save myself that cost. This is going to have to wait til at least mid May though when I've got the time and money. Since I've got to remove the crank and rods anyway it makes no sense not to put new bearings in so you'll get to see that too. See you all then.
 
Last edited:

ScharpeStGuy

New member

Equipment
L225DT / T1460
Apr 22, 2012
9
0
0
Huntsville, TX
Stumpy, great post and project, I hope my L225DT does not take the route your tractor has taken. Sorry for the loss of your father but i can only imagine how proud he is of you and the smiles you are giving him.

Keep up the good work!

Scharpe
 

thespanishfarmer

New member

Equipment
L1501 with rotavator and brush cutter
Apr 28, 2012
37
0
0
Cocentaina - Spain
Hi Matt.
I have just read this post from start to finish (thanks to the link you gave me in my own post) and found it totally immersive. You have done wonders with this old tractor and I am sure many like me have picked up so many tips that will help us should we ever need to do a repair and rebuild ourselves.
You keep finding problems as you work your way through the restoration but you overcome these with your skill and determination. The cylinder liner issue will get resolved I am sure without too much of an outlay.
I like your attitude towards the restoration. You could have just refitted the block and it may have worked ok for a time but you would never have been 100% certain it was not going to fail on you and end up costing you big bucks.
We await the next episode of this thrilling saga later this month. I am sure your Dad would indeed be very proud of you.

Gary
 

gurn

New member

Equipment
Kubota L175
Apr 15, 2011
239
13
0
Nashville,Tn
Yep, it's amazing what you have done so far with so many issues. I can't wait to see the finally. "Fighting!"
 

Stumpy

New member

Equipment
L175
Dec 1, 2011
848
3
0
NE Ohio
Thanks guys. I get the distinct impression I'd be getting a smack upside the head from him for buying another money pit along with a look of approval!

We're getting there, I can see the light at the end of the tunnel. My last exam is the 10th and then I can dig in again.
 

johngwalsh

Active member

Equipment
B5100e
Apr 7, 2012
203
100
43
Munster,Ireland
Wow what a read,Stumpy,lovely work so far.Such a detailed thread.Great to see how positive you stayed through all those obsticles.Cant wait to see how it finishes out.
 

Stumpy

New member

Equipment
L175
Dec 1, 2011
848
3
0
NE Ohio
Ok here we go again. To recap the plan was to get the liners out and then take it to the machine shop for inspection before I took everything else off. The block must be stripped of all parts before machining because the dust from boring\honing will get everywhere. First the pistons need to come out. Drop all 400 oil pan bolts and we can get at the rod bolts.


As you can see they're secured with lock tabs. Rotate each rod to the lowest position and pry them open with a flat head. The bolt torque was surprising low, probably around 40 ft-lbs, we'll see what the book says when it's time for reassembly. The rod cap dropped into my hand then I pushed the piston up. Getting the rings past the ridge at the top of the cylinder took a little more force so using the back of a hammer I tapped on the rod til the rings were clear. Rotate 180 and repeat.

An aside note: I was surprised to see the crank throws were 180 degrees apart. Inline twins can be designed a few different ways but many designers opt for the 360 degree crankshaft as it has an even firing order and while it vibrates like a single cylinder engine it's vibrations can be mostly dampened with a single balance shaft. The 180 degree crank has an uneven firing order and has the same vibration problem an inline 4 does requiring two balance shafts to solve. Though the vibrations are really only problematic at higher rpms and rotating masses so as there are no balance shafts I guess it's not a problem with this little thing.


Pistons don't look too bad, no broken rings. Both the rod shells and crank throws look good so no damage there at least. No surprises in the bore either even though you can't see it. I took dozen pictures trying to get the bore but the camera refused to focus where I wanted it to, short focal length at close range and all. I really need to buy something a little more sophisticated than a point and shoot one of these days. I'm also happy to learn the wrist pin is the full floating type, makes disassembly as easy as it gets.


One problem I did notice though is that the clearance between center main bearing and the liner gives me no room to get a puller in there. So to get these things out the crank will have to be pulled first. Looks like I'm going to have to strip the block first.


First we reinstall my floor jack rig and set it down on a jack stand and remove the front axle again. My pulley wrench is applied again and it occurred to me that since I've got the shifters off I can just engage two gears at the same time and lock the transmission.


Unhook the springs under the governor arm and then pop the gear case off again. I unhooked the hydraulic lines at both ends since they'll be in the way when I lift the block out but they didn't take them completely off (since that would require removing the petals again). I also removed the hydraulic pump and it's gear housing along with the draft tube. You can see the end of the fuel cam shaft here. I also took the starter back off.


Back to the gears. All of these gears are keyed and shrunk fit onto their shafts but thankfully only two have to come off. For the crankshaft to fit through front bearing hole it's timing gear must be removed and subsuqently the race the front oil seal runs on. After carefully removing and cleaning the gasket and oring I removed the race. The pulley key is removed since this piece is also shrunk fit I had to heat it to around 100C with a propane torch and do some light filing on the pulley's keyhole. I then pried it off gently with two screw drivers. A wet rags over the crankshaft keeps the torch from heating the crank and also lets you know when the race is at temperature.


Next is the valve cam shaft. This is again shrunk fit but also has a thrust plate that bolts to the block and when it's removed the gear cam and all will slide right out. Thanks to a perceptive designer there are holes in the cam gear to fit a socket through and with the lifters removed the cam came out like a breeze.


The idler gear just above the cam doesn't have holes but it's bolts came out easily with a wrench though it took a little pulling to get it out of the block. You don't have to mark the gears for reassembly. It's can be hard to see but each gear has a number stamped near one tooth and they line up as shown below.


The fuel cam is a little bit more difficult to remove because of the governor mechanism and the drive gear for the hydraulic pump. The pump gear isn't shrunk on but goes on a spline on the end of the cam shaft and is held in place with a snap ring. Using a snap ring tool (buy a tool it makes this soooo much easier) the gear is quickly removed. Next I forgot to take a picture of it but on the front there is a piece that hold the cam in place much like on the valve cam except this only wraps around a quarter of the shaft. In fact that's important enough I think I'll put it back on and take a picture tomorrow. Remove it and the cam can be slid out partially. Once it's part way out the linkage arms can be unbolted and removed and the cam can be slid the rest of the way out. The rear being didn't want to pass through the front bearing's journal but I measured it and it was sized right so with some tapping it popped out.
 
Last edited:

Stumpy

New member

Equipment
L175
Dec 1, 2011
848
3
0
NE Ohio


Second to last is the oil pump. The gear must be removed before you can get to the pump bolts. Remove the nut and setup the puller and the gear pops right off and the pump is unbolted. It comes into two pieces, the trochoid pump and housing and the back wall which is lightly pressed into the block. It took some careful finagling with two small screw drivers and some time to get it off. There are two gaskets here that will need to be replaced later.


Now with all of this finally out of the way we can remove the crankshaft timing gear. This thing was on there good. Due to the length of the shaft my puller was very nearly to small to pull this, I only had about 3/4 of the bolt threaded in the puller body. On my first attempt it wouldn't budge. While I was eating dinner I set a ziplock bag with ice and water in it on the end of the crank with a rag insulating the gear. After removing the bag and immediately heating the gear again it finally popped loose after a putting a moderate load on the puller.


Now I'm ready to remove the crank but before I can do that I've got to remove the block. I decided to best way to lift it was to make a plate that bolted to the deck and use an engine hoist so I could get it up the work bench. I borrowed a lift from a friend and made my plate. I had some trouble with my stick welder (could not get it lit for some reason) but managed to acceptably TIG a loop onto a piece of 3/16s plate. I then loosely drilled it for four head bolt holes. Tomorrow (well I guess it's today now) I'll go pick up some short bolts and big washers and get that thing outta there.
 
Last edited:

Big Kahuna

Member

Equipment
Kubota 2000 L3010 HST with Loader ,1992 B7100HST , 1979 B6100E & 2007 F2880
Dec 23, 2011
364
8
18
Homer City, Pa.
Stumpy, waiting to see some more on your 175, just love it so far !!!!

Big Kahuna
 

Robert Duncan

New member

Equipment
L175, KM-59, L245DT/1200 FEL, 6' rear blade, 40" tiller, 5' brush hog
Jun 15, 2009
1
0
1
Ann Arbor, Mi
Nice job on the rebuild. Goes like a lot of my projects, starts out as some light work, then progresses to a full teardown.

FWIW, I just removed the water drain cock on the block and screwed the water temp sensor into the block with the proper adapter. When I need to drain I just remove the sensor.
 
Last edited:

Mr. K

Administrator
Staff member
Feb 14, 2009
526
140
43
www.orangetractortalks.com
Stumpy - excellent thread! Our hats off to you! Great pics along with some juicy details. Looks and reads just like one of our own. Sincerely, thank you for taking the time to do this.