Daren Todd
Well-known member
Lifetime Member
Equipment
Massey Ferguson 1825E, Kubota Z121S, Box blade, Rotary Cutter
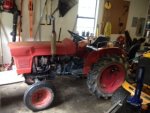
D2cat had asked me in a previous post how I replaced the cam shaft plug. And hopefully this will help out some other folks here as well. I happened to get this little beasty from my father in law. When I got it there was a few issues I noticed off the bat. Wasn't charging right, oil pressure sensor was disconnected, had a push button starter switch added to it. I spent a Saturday tracing out and fixing wiring. In the process I found wires shorted where they run to the horn, clutch safety switch, and the glow plugs. The wires crossed over to the other side of the motor between the engine and fuel tank heat shield. They ended up getting melted down and stuck to the engine block. For those guys who have a l175, l185, l1500, and l1501, plus a few other models. There is enough slack in thew wiring to move it behind the heat shield. Hooked the oil pressure sensor in the process to see if it worked after the wiring was fixed. light came on and stayed on. I brought home my test kit from work, tested the oil pressure off the plug on the oil filter base and only got about 15 psi. So I started searching this forum and found the service notice pertaining to the z750a engine. And then read the post's from the guys that had done this repair. Found the parts manual at www.kubotabooks.com, and got the service manual from www.kubota.servicemanualvault.com.
I started out by removing the radiator and fan shroud. It's not required to remove the front end, but in my case I wanted to flush it also. Jacked the tractor just behind the oil pan, leaving enough room for jack stands, and just enough to take the pressure of the front end. Removed the five bolts for the front end, and disconnected the steering linkage. Then rolled the front end out of the wayhttp://www.orangetractortalks.com/forums/attachment.php?attachmentid=11720&stc=1&d=1401570384
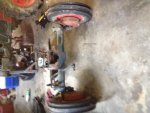
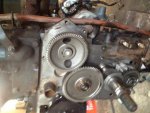
Then on to tackling removing the crank case cover. I removed the nut on the crank shaft using a 2 foot pipe wrench on the front pto shaft and a 1 7/8 wrench on the nut. And with some pressure applied the nut came right off, and no damage to the pto shaft. I know someone will chime in bout proper tool for the job") Couple of heavy pry bars and a little wiggling from either side and the drive pulley came off. removed the alternator to get it out of the way, and removed the fan as well. Pulled the outer bolts that held on the crank shaft cover. The larger bolts are the only ones that need to be pulled. the smaller nut and bolts on the water jacket cover only need to be removed if you plan on accessing the water jacket. And then the fun part of talking the gasket into giving up and allowing the gear case cover to be removed. You also have to disconnect the throttle linkage and plate that bolts to the top of the crank case cover. The inspection cover for the injection pump. Carefully remove the spring that attaches to the throttle linkage, and a small spring that attaches to the crank case cover. A curved set of needle nose pliers works best from the springs. Wiggle the cover back and forth and eventually the gasket will give up and allow you to remove the cover. Total time to get to this point was about 3 hours. Plan on another 4 hours scraping gaskets. Here's some pics, gotta go get the grand kiddo. So will finishg the rest later on http://www.orangetractortalks.com/f...ent.php?attachmentid=11722&stc=1&d=1401572618
Couple of heavy pry bars and a little wiggling from either side and the drive pulley came off. removed the alternator to get it out of the way, and removed the fan as well. Pulled the outer bolts that held on the crank shaft cover. The larger bolts are the only ones that need to be pulled. the smaller nut and bolts on the water jacket cover only need to be removed if you plan on accessing the water jacket. And then the fun part of talking the gasket into giving up and allowing the gear case cover to be removed. You also have to disconnect the throttle linkage and plate that bolts to the top of the crank case cover. The inspection cover for the injection pump. Carefully remove the spring that attaches to the throttle linkage, and a small spring that attaches to the crank case cover. A curved set of needle nose pliers works best from the springs. Wiggle the cover back and forth and eventually the gasket will give up and allow you to remove the cover. Total time to get to this point was about 3 hours. Plan on another 4 hours scraping gaskets. Here's some pics, gotta go get the grand kiddo. So will finishg the rest later on http://www.orangetractortalks.com/f...ent.php?attachmentid=11722&stc=1&d=1401572618
I started out by removing the radiator and fan shroud. It's not required to remove the front end, but in my case I wanted to flush it also. Jacked the tractor just behind the oil pan, leaving enough room for jack stands, and just enough to take the pressure of the front end. Removed the five bolts for the front end, and disconnected the steering linkage. Then rolled the front end out of the wayhttp://www.orangetractortalks.com/forums/attachment.php?attachmentid=11720&stc=1&d=1401570384
Then on to tackling removing the crank case cover. I removed the nut on the crank shaft using a 2 foot pipe wrench on the front pto shaft and a 1 7/8 wrench on the nut. And with some pressure applied the nut came right off, and no damage to the pto shaft. I know someone will chime in bout proper tool for the job
Couple of heavy pry bars and a little wiggling from either side and the drive pulley came off. removed the alternator to get it out of the way, and removed the fan as well. Pulled the outer bolts that held on the crank shaft cover. The larger bolts are the only ones that need to be pulled. the smaller nut and bolts on the water jacket cover only need to be removed if you plan on accessing the water jacket. And then the fun part of talking the gasket into giving up and allowing the gear case cover to be removed. You also have to disconnect the throttle linkage and plate that bolts to the top of the crank case cover. The inspection cover for the injection pump. Carefully remove the spring that attaches to the throttle linkage, and a small spring that attaches to the crank case cover. A curved set of needle nose pliers works best from the springs. Wiggle the cover back and forth and eventually the gasket will give up and allow you to remove the cover. Total time to get to this point was about 3 hours. Plan on another 4 hours scraping gaskets. Here's some pics, gotta go get the grand kiddo. So will finishg the rest later on http://www.orangetractortalks.com/f...ent.php?attachmentid=11722&stc=1&d=1401572618Attachments
-
 40.7 KB Views: 391
 -
 43.5 KB Views: 509
 -
 42.9 KB Views: 586