Kubota B7100HST-D Top link attachment piece MISSING? bolts ..

Russell King

Well-known member
Lifetime Member

Equipment
L185F, Modern Ag Competitor 4’ shredder, Rhino tiller, rear dirt scoop
Jun 17, 2012
5,407
1,441
113
Austin, Texas
From some research I did on what the number on top of the bolts mean…There is some automotive standard used in Japan factories that tell them when installing the bolt what torque to use. I ASSUME that means to pick up the tool that is marked 7 (in your case) and use it to torque the bolt but I never found any charts of numbers to torque. The markings are not bolt strength indicators in any direct manner.

I suggest you take out one of the lower bolts and use it in these holes to make sure of the thread pitch. I know on my tractor Kubota used a lot of fine and extra fine pitch bolts where they wanted extra strength.

Take the bolt to the hardware store and they should have a method to get the pitch identification.

I would get the bolt as snug as you can with a normal sized boxed end wrench or ratchet wrench.
 

TerryKing

Active member
Lifetime Member

Equipment
B7100HST-D
Aug 18, 2024
153
94
28
84
Topsham, Vermont USA
arduinoinfo.mywikis.net
OK Thanks for all the excellent Info! I appreciate the time taken to define things... Ordered a selection of Metric capscrews. Need to check thread pitch for sure.

Russell: " I would get the bolt as snug as you can with a normal sized boxed end wrench or ratchet wrench. " Sounds like 30 Ft-Lb to me...

Need the tractor tomorrow to haul some brush and move some logs. I put a hook/pin on the center drawbar area holes. I'll pull with that, Removed the receiver frame and top link.

Soon I will remove the seat and get a good direct look at those holes...
 

N3BP

Active member

Equipment
B7200DT, B7200HST-D, L2900GST, L3010 HST TLB
Sep 20, 2016
473
201
43
Lebanon, PA
Messicks lists the bolt as part# 01123-51230. A quick search indicates this bolt should be a M12x1.75x30mm. Torque values for this would range 57.2-66.5 FTLBS
 

Attachments

  • Love
  • Like
Reactions: 1 users

TheOldHokie

Well-known member
Lifetime Member

Equipment
L3901/LA525, B7200DT/B1630, G2160/RCK60, G2460/RCK60
Apr 6, 2021
8,931
4,672
113
Myersville, MD
windyridgefarm.us
OK Thanks for all the excellent Info! I appreciate the time taken to define things... Ordered a selection of Metric capscrews. Need to check thread pitch for sure.

Need the tractor tomorrow to haul some brush and move some logs. I put a hook/pin on the center drawbar area holes. I'll pull with that, Removed the receiver frame and top link.

Soon I will remove the seat and get a good direct look at those holes...
Dont sweat the small stuff. Its a standard M12-1.75 8.8 cap screw and dollars to donuts there are two broken off ends in the bottom of those holes. The only thing "special" is they are JIS/DIN fasteners and the head size would be slighltly smaller than ANSI/SAE

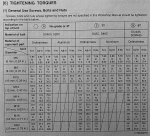
Here is the Kubota chart expkaining their fastener strength numbers and recommended torques. It should be in Section G of all of your WSM's

Dan
1000000374.jpg
 

TerryKing

Active member
Lifetime Member

Equipment
B7100HST-D
Aug 18, 2024
153
94
28
84
Topsham, Vermont USA
arduinoinfo.mywikis.net
Its a standard M12-1.75 8.8 cap screw and dollars to donuts there are two broken off ends in the bottom of those holes.
Thanks to Russell, N3BP (Callsign?), Dan and others...
I'll get some PB into those holes this AM. Tomorrow I'll take the seat off and get a good look. Also check my supply of EZ (EASY.. PLEASE!!) Outs.

The force on these is almost all in shear; not like they needed to be Real Tight..
 

TheOldHokie

Well-known member
Lifetime Member

Equipment
L3901/LA525, B7200DT/B1630, G2160/RCK60, G2460/RCK60
Apr 6, 2021
8,931
4,672
113
Myersville, MD
windyridgefarm.us
Thanks to Russell, N3BP (Callsign?), Dan and others...
I'll get some PB into those holes this AM. Tomorrow I'll take the seat off and get a good look. Also check my supply of EZ (EASY.. PLEASE!!) Outs.

The force on these is almost all in shear; not like they needed to be Real Tight..
If they are broken off they cannot be tight.

The real concern is corrosion. A drill bit will get them right put.

Dan
 
  • Like
Reactions: 1 user

DustyRusty

Well-known member

Equipment
2020 BX23S, BX2822 Snowblower, Curtis Deluxe Cab,
Nov 8, 2015
6,291
4,865
113
North East CT
I would use a left-handed drill bit to remove the broken piece if there is a broken piece in there. I don't care for EZ outs because if they break then it is even more difficult to get the piece out. I remember decades ago that I broke an EZ out trying to remove a broken bolt in the hub of my 1953 Willis Jeep. I took it to the local machine shop and he told me that an easy job just became more difficult. Instructed me to bring it in before I attempted to remove a broken bolt, not afterward. I have followed that advice ever since. I will attempt to drill it out, but if that doesn't work, I leave it for the machine shop to remove.
 
  • Like
Reactions: 1 users

DustyRusty

Well-known member

Equipment
2020 BX23S, BX2822 Snowblower, Curtis Deluxe Cab,
Nov 8, 2015
6,291
4,865
113
North East CT
Dan said "Corrosion could .. "


I gave both holes some P Blaster last night. Be tomorrow before I try. THINK I may have left hand drill??
try to find one that is close to the diameter of the hole. Less chance of going off course as you start to drill it out. Left-handed drill bits are not easy to find, and you need a reversible drill to use them.
 
  • Like
Reactions: 1 user

TerryKing

Active member
Lifetime Member

Equipment
B7100HST-D
Aug 18, 2024
153
94
28
84
Topsham, Vermont USA
arduinoinfo.mywikis.net
Have you confirmed you have two broken bolts?
Hi Ken,
I have confirmed there are no hex bolt heads on those two positions on the top link bracket. And that there is only about 20mm from the top surface until very solid 'bottom' to the holes. And that the parts diagrams show a 175mm long bolt for that position.

I'll get a direct look after removing the seat tomorrow...
----
I did a deep dive looking for a lefthand drill bit in my old SmallStuff drawers I built in 1968. NOPE.

But I DID find a ridiculous monument to the Paranoid Machinist who once had to use a EZ_Out on the broken differential carrier bolt inside the rear end of a 1992 Yukon. In the snow.

PananoidMachinist.JPG
 
Last edited:

ken erickson

Well-known member

Equipment
B7100 hst, 2650 front mount snowblower, L2501 hst qa loader
Nov 21, 2010
1,150
1,875
113
Waupaca Wisconsin
Hi Ken,
I have confirmed there are no hex bolt heads on those two positions on the top link bracket. And that there is only about .20mm from the top surface until very solid 'bottom' to the holes. And that the parts diagrams show a175mm long bolt for that position.

I'll get a direct look after removing the seat tomorrow...
Are u sure 175 mm? Did you see my post, I removed one of mine and it measures only 35mm long.

N3PB states the Kubota parts number correlates to it being 30mm long.

Perhaps you read the thread pitch being 1.75 mm and took it to mean 175mm lenght?
 
Last edited:

TerryKing

Active member
Lifetime Member

Equipment
B7100HST-D
Aug 18, 2024
153
94
28
84
Topsham, Vermont USA
arduinoinfo.mywikis.net
Soons I have SOME 12mm bolt I'll try those holes..
OK figured this out... AFTER I took the seat / frame off

-- I was Wrong about the bolt hole depth. I was measuring blind to a step inside the bolt hole. The bottom is actually 45 mm down from the top link bracket.
-- I ordered a nice asst. of Metric bolts and nuts etc..
TopLinkBolts.-02.JPG

That M12x30mm looked good. AFTER forcing the bracket to align with the hole it went in by hand..
Torqued to 45 FtLb And ALL Good.

TopLinkBolts.-01.JPG


Thanks for being so kindly helpful in a Newbie Panic!!