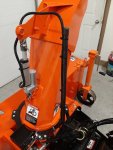
Inexpensive Snow Blower Upgrade!

Victor Machine Works

New member

Equipment
LX2610, LA535, Lx2963, Homestead 55" Grapple, LandPride RB1672, Howard HR30
Dec 17, 2023
6
12
3
Maine
This is an easy and inexpensive upgrade for the deflector chute of your snow blower. I got the idea from a member of this forum (before I was a member) but I cant seem to locate his post to give him credit, sorry! In his post he also did a nice clean install. Anyway as I've been reading this forum awhile and getting good ideas and info I figured that it was time to join and contribute.

Parts List:
$40 linear actuator from amazon
$6 project box from amazon
$15 Latching panel mount plug from amazon
$15 2strand 18 gauge wire from amazon
$8 1/4 Braided cable cover from amazon
$10 double pole double throw momentary toggle switch from amazon
A couple of 1/4 npt cable glands that I had lying around (also from amazon)
A piece of 3"x10" CRS and a length of 1/2" ID pipe for the cable guide.

Just a bit of welding for the cable guide. I pulled my 12v power from the rear 12v auxiliary outlet behind the seat. I did have to drill and tap 2 holes to mount the project box (junction box) but with the Latching panel mount plug it makes for a nice quick disconnect for removing the blower. I had previously modified my joystick with a piece of 1" aluminum pipe with some heat shrink over it for the land pride third function kit (to aid in hiding all the wires) so I 3d printed a toggle switch mount out of a carbon fiber material to mount the switch (and hide the wires). (I think with a little Enginuity one could also use a "project box" for a toggle switch mount on the joystick and have it come out nice and clean). My goal was to have it look and feel as factory as possible and I think it came out pretty well. Anyway I hope someone can get some inspiration from this and I'm happy to help if anyone has questions or concerns please let me know, Thanks!!...... Inspiration for this Project came from member DonyStoy, Thank You!!
kubota snowblower4.JPG
kubota snowblower2.JPG
kubota snowblower.JPG
kubota snowblower3.JPG
kubota snowblower6.JPG
 
Last edited:
  • Like
  • Love
Reactions: 10 users

Dustball

Active member

Equipment
2016 B2650HSDC
Sep 15, 2023
294
172
43
Hudson, WI
Looks great! Are you willing to print/sell a version of your switch housing but to fit the factory 13mm loader lever diameter?
 

DustyRusty

Well-known member

Equipment
2020 BX23S, BX2822 Snowblower, Curtis Deluxe Cab,
Nov 8, 2015
6,237
4,816
113
North East CT
That is pretty slick. The only problem that I saw was the tag that says "on-off" instead of "up-down". ;)
 
  • Haha
  • Like
Reactions: 2 users

Runs With Scissors

Well-known member

Equipment
L2501 TLB , Grappel, Brush Hog, Box Blade, Ballast box, Forks, Tiller, PH digger
Jan 25, 2023
2,442
2,818
113
Michigan
Very clean install sir! That looks Factory (or better).

I really like that 3-d printed mount.

Welcome aboard!
 
  • Like
Reactions: 1 user

woodman55

Well-known member

Equipment
L6060HSTC, RTV 1100
May 15, 2022
927
721
93
canada
This is an easy and inexpensive upgrade for the deflector chute of your snow blower. I got the idea from a member of this forum (before I was a member) but I cant seem to locate his post to give him credit, sorry! In his post he also did a nice clean install. Anyway as I've been reading this forum awhile and getting good ideas and info I figured that it was time to join and contribute.

Parts List:
$40 linear actuator from amazon
$6 project box from amazon
$15 Latching panel mount plug from amazon
$15 2strand 18 gauge wire from amazon
$8 1/4 Braided cable cover from amazon
$10 double pole double throw momentary toggle switch from amazon
A couple of 1/4 npt cable glands that I had lying around (also from amazon)
A piece of 3"x10" CRS and a length of 1/2" ID pipe for the cable guide.

Just a bit of welding for the cable guide. I pulled my 12v power from the rear 12v auxiliary outlet behind the seat. I did have to drill and tap 2 holes to mount the project box (junction box) but with the Latching panel mount plug it makes for a nice quick disconnect for removing the blower. I had previously modified my joystick with a piece of 1" aluminum pipe with some heat shrink over it for the land pride third function kit (to aid in hiding all the wires) so I 3d printed a toggle switch mount out of a carbon fiber material to mount the switch (and hide the wires). (I think with a little Enginuity one could also use a "project box" for a toggle switch mount on the joystick and have it come out nice and clean). My goal was to have it look and feel as factory as possible and I think it came out pretty well. Anyway I hope someone can get some inspiration from this and I'm happy to help if anyone has questions or concerns please let me know, Thanks!! View attachment 118186 View attachment 118187 View attachment 118189 View attachment 118190 View attachment 118191
Impressive. Better than factory, I would say.
 

Donystoy

Active member
Lifetime Member

Equipment
LX2610HSDCC, B/H, Loader, plus numerous other attachments. B7200 sold
Dec 10, 2013
566
217
43
Binbrook, Ontario
Looks similar to mine that I did last year. My switch is on my dash as I have a third function switch on my joystick. Have under $100 in it. Just could not see spending mega bucks on the oem hydraulic system to move a deflector that you can move with one finger.
 

Attachments

  • Like
Reactions: 1 user

Yooper

Well-known member
Lifetime Member

Equipment
3901 LA525
May 31, 2015
1,529
529
113
NE Wisconsin
Got me thinking about getting a 3D printer…again! Very professional looking!
 
  • Like
Reactions: 1 user

skeets

Well-known member

Equipment
BX 2360 /B2601
Oct 2, 2009
14,565
3,324
113
SW Pa
Looks real nice, I would like to see it work.
Oh and one thing, we had a gentleman on here that did tons of mods to his and other Kubota's. And he posted them to help others that may want to do the same thing. Some were simple others down right ingenious. Most of the old timers here know of whom I speak.
Turned out there are some unscrupulous people, that desided to take his ideas and run, makeing bucks of them and labeling them as their own and he got nothing out of it.
I only mention this, as a cautionary tail.
 
  • Like
Reactions: 1 user

monkers1212

New member

Equipment
BX 2380
Jul 13, 2022
1
1
3
Catskills Ny
That looks great! Nice and clean. Where did you get the "plug" going into that little outlet type box? Great work, thanks for sharing it!
 
  • Like
Reactions: 1 user

torch

Well-known member

Equipment
B7100HSD, B2789, B2550, B4672, 48" cultivator, homemade FEL and Cab
Jun 10, 2016
2,619
869
113
Muskoka, Ont.
Looks great! The only comment I have is consider inverting the linear actuator, so that moisture can't run down the piston into the mechanism.
 
  • Like
Reactions: 2 users

Victor Machine Works

New member

Equipment
LX2610, LA535, Lx2963, Homestead 55" Grapple, LandPride RB1672, Howard HR30
Dec 17, 2023
6
12
3
Maine
Looks similar to mine that I did last year. My switch is on my dash as I have a third function switch on my joystick. Have under $100 in it. Just could not see spending mega bucks on the oem hydraulic system to move a deflector that you can move with one finger.
Thank YOU!! Yours was the inspiration, (sorry I couldn't give you credit in the original post!) I really liked the way you managed the wire. I believe I ordered my actuator seconds after seeing you pics, so thanks for helping to fuel the fire!!
 

Victor Machine Works

New member

Equipment
LX2610, LA535, Lx2963, Homestead 55" Grapple, LandPride RB1672, Howard HR30
Dec 17, 2023
6
12
3
Maine
That looks great! Nice and clean. Where did you get the "plug" going into that little outlet type box? Great work, thanks for sharing it!
the plug that i used was a Clinko from amazon, but an amazon search of " 2wire panel mount plug" will pop up dozens to choose from.
 
  • Like
Reactions: 1 user

Donystoy

Active member
Lifetime Member

Equipment
LX2610HSDCC, B/H, Loader, plus numerous other attachments. B7200 sold
Dec 10, 2013
566
217
43
Binbrook, Ontario
Thank YOU!! Yours was the inspiration, (sorry I couldn't give you credit in the original post!) I really liked the way you managed the wire. I believe I ordered my actuator seconds after seeing you pics, so thanks for helping to fuel the fire!!
Happy it worked out for you. Besides the actuator and the switch mine was cobbled together with "stuff" that I had kicking around. The post to hold the wire was some 3/8" threaded rod with 3/8" gas line over it and topped off with the perfect rubber cap that I had in a junk drawer. Most of the wiring was left over from car wiring harnesses from my restoration days. I just have a 2 wire plug similar to a trailer plug hanging out from under the front grill. Mine is a cab model so it was a bit tricky to route the wire. The feed for the switch was tied into the feed to the accessory socket (cigarette lighter socket) on the dash.