Hour meter repair

Carl in France

Member

Equipment
B1400, a box and a single blade plough!
Sep 4, 2019
79
11
8
Haute Pyrénées
Hello all,

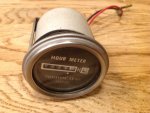
The title says it all. My hour meter has died, in the interim i have thrown in a cheap quartz one but i would like the original back in place if at all possible so was wondering if there is any realistic way of repairing these.
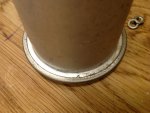
The unit looks to be sealed wuth the front being crimped on all the way round, i have no problem opening this but if i do is it some thing that can then be repaired?
Or, once dead are they an item that can not be repaired?

Cheers all.

image.jpg
 

bird dogger

Well-known member
Vendor Member

Equipment
Kubota B2650 and lots of other equipment
Feb 24, 2019
1,624
1,506
113
North Dakota
Hi Carl,
I used to work on similar instruments years ago. Anything can be repaired if
its not too bad off. If nothing catastrophic has happened, these generally quit working due to a few different reasons. Usually the clock oil or lubrication thickens with age or becomes contaminated with moisture, dust, etc. Other causes could be worn pivot points or tiny brass bushings. At apparently only 700 hours that shouldn***8217;t be the cause. It takes very little to clog up the gear train. Usually a careful cleaning and proper lubing will put them back into operation. An internet search will turn up outfits that specialize in doing that. If you***8217;re careful, handy and up for the
challenge you could attempt it yourself. You wouldn***8217;t be out anything unless
you are really determined to save this at all costs and want to hire it done. Removing the bezel ring so it can be reused is the hard part. Might be hard to find a substitute for the rebuild. If you do decide to tackle it you***8217;ll want to do it in a clean environment, place it in clean pan or tub for the disassembly (there***8217;s a lot of small gears, levers, etc.), and take a lot of pictures. An ultrasonic cleaner works well for the cleaning of parts. Some watch/clock oil can be found online or at a clock repair shop. Sometimes***8230;.They***8217;re made up of sub assemblies and you can clean them without taking them apart.
The little motors rarely burn out but stop due to the same reasons as above. Some penetrating oil on the shafts will usually loosen them up again. You might be successful cleaning out the old motor lube with some alcohol, spray cleaner, etc. Let it dry completely and then re lube with proper oil. Wish you were a little closer***8230;..I***8217;d love to help you out!! Another thought....If the whole mechanism lifts out as a unit....then a careful visual inspection might
reveal the problem. The parts are delicate but you should be able to see the motor output shaft and very carefully and lightly start turning that to determine the problem. If you can separate the motor from the mechanism you could energize that and determine if it or the gear train was the problem and go from there. Good luck!! Will be fun to see all the pics!!:D

Since this was in a tractor I forgot to mention that vibration can cause problems with excessive wear on shaft bushings, etc.
But it could be as simple as vibration caused a motor lead to break off inside the can also. It's anybody's guess until its opened up for inspection.

Regards,
David
 
Last edited:

Pau7220

Well-known member

Equipment
L3650 GST, Landpride TL250 FEL w/ Piranha, 6' King Kutter, GM1084R Finish
Aug 1, 2017
785
279
63
Scranton, PA
I have disassembled a few Stewart Warner tachs for cleaning and lubing. A sharpened paint can opener works very well for the crimp on the bezel.
 

Carl in France

Member

Equipment
B1400, a box and a single blade plough!
Sep 4, 2019
79
11
8
Haute Pyrénées
Thank you for the replies gents, and the time taken to post.

I will give this a go, more likely this coming winter when the outdoor jobs lessen. From your comments David i think it may well be interesting as i also repair old clocks, though this will clearly be different.
Initially though the interesting part will be the crimp on the bezel. However every job is just lots of single jobs so i will just think of that one part before moving on to the next.

image.jpg
 

twomany

Active member

Equipment
B7200
Jul 10, 2017
793
138
43
Vermont
There is/ was a youtube video posted by a fellow that made a very good job of removing and reinstalling instrument bezels. It is often required when restoring old motorbikes.

I suggest you search a bit, and gain the experience of those who have done it.

An aside

My B7200 has a mechanical tach and hour meter. The drive and the cable were trashed when I got it. An expensive couple of parts, but the tach works just fine now. The Hour Meter however, never changes. Clock works must be missing a tooth in there somewhere. ;-)
 

Carl in France

Member

Equipment
B1400, a box and a single blade plough!
Sep 4, 2019
79
11
8
Haute Pyrénées
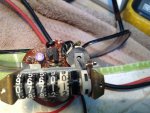
Well, i decided to do it now so after stripping the works from the housing i found that the gears were dirty and not moving so a blow out and brush up freed all up and the counters shift as they are designed to do.
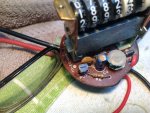
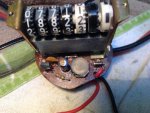
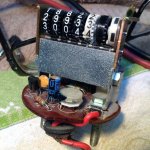
However.... Power is not reaching where ever it is meant to reach ...i presume this as the little arm that sits in the small coil does not raise up and down thus turning the first wheel....and as the 12v routes through a circuit board i am now stumped as i do not have the knowledge to check all the little bits that are attached to that circuit board!
I am a quick learner if some one can point me in the right direction though.

Cheers all.

image.jpg
 
  • Like
Reactions: 1 user

bird dogger

Well-known member
Vendor Member

Equipment
Kubota B2650 and lots of other equipment
Feb 24, 2019
1,624
1,506
113
North Dakota
Well, i decided to do it now so after stripping the works from the housing i found that the gears were dirty and not moving so a blow out and brush up freed all up and the counters shift as they are designed to do.
However.... Power is not reaching where ever it is meant to reach ...i presume this as the little arm that sits in the small coil does not raise up and down thus turning the first wheel....and as the 12v routes through a circuit board i am now stumped as i do not have the knowledge to check all the little bits that are attached to that circuit board!
I am a quick learner if some one can point me in the right direction though.

Cheers all.

View attachment 45115
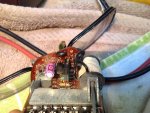
Carl, that's an interesting and different clock mechanism. Evidently that circuit board is a timing circuit that sends an electrical pulse to that coil every 6 minutes......1/10 of an hour to jog that lever and the 1/10 hour wheel. If you could somehow find a schematic for that timing circuit through the manufacturer we could help you trouble shoot the components. I'm not an electronics expert but it can't be that complicated. Can you post a pic of any tags or model numbers on the device? Even some close up pics of the individual components might shed a clue as to what kind of a timing circuit they're using. There's got to be some electronic gurus on OTT that can help, too.

Regards,
David
 

Jim L.

Active member
Jun 18, 2014
855
158
43
Texas
Carl

The easy way out would be to purchase a new replacement meter.

But if you are keen on repairing then the first step is to learn soldering and desoldering, electronics style. An amateur radio operator or a local vocational school could have you doing that in short order.

Checking the arm in the solenoid which moves the counters, does it move freely or is it frozen?

There are 2 blue cans labeled C1 and C2. These are electrolytic capacitors which should have reached the end of life. They are polarized so plus must be to plus and minus to minus.

Looks to be some plastic cased transistors. These also would be first suspects. There should be numbers on these devices by which the replacement devices may be chosen.

A good project for winter weather.
 

William1

Well-known member
Lifetime Member

Equipment
BX25D
Jul 28, 2015
1,124
315
83
Richmond, Virginia
I am no electronics whiz, I know just enough to know I am clueless. But....

Most common fail point is salts on the circuit board. Next most common next is the capacitors. lastly is the solenoid. Very, very rare is it a IC.

I see rust on your board. Which means water infiltration.

The cheapest fix is cleaning the board.
Getting unpurified water (rain or drips from weed spraying) on to it, the water drys, leaving behind minerals and salts. These can 'short' the board and prevent timing signals (very low power) from making the transistor (which is a switch) operate. So you need to literally wash the board.
Take some distilled water and a clean tooth brush. Dip the toothbrush in the water and simply scrub (gently) both sides of the board. Do not be afraid of getting things wet. Do be careful not to scrub too hard. You just want to get any deposits on the board into suspension in the water. Dip the brush in the water alot, let the excess water on the board drip off. When you think it is as clean as it will get, use some low pressure air (canned air is gentle) and blow dry. Let sit in the sun (like on a window sill) for a few days.
Next, use a Q-Ip and some Isopropyl Alcohol and gently rub the board. It'll dry quick.
Lightly lube the clockwork. Ensure the plunger in the solenoid moves freely and power it up.

If the cleaning fails, next I'd change out the capacitors. Same ones or higher voltage is what you want. You do want the rating (uf) to be the same or very close. Watch polarity.
 

Carl in France

Member

Equipment
B1400, a box and a single blade plough!
Sep 4, 2019
79
11
8
Haute Pyrénées
Thank you for your help gents.

Local training is not an option where i live, so i tend to learn myself but pointers are always well received.
The plunger and gears all move well and correctly so i will look elsewhere for the fault and as suggested start with cleaning the board. I will look to follow your steps from there.

I agree i could easily keep the cheapo chinese counter i have in there but this may not last and i admit to wanting to repair this one. I tend to repair any thing here if i possibly can so even if this is a slow job i will work my way through it. Besides i still enjoy learning new skills and gaining knowledge and electronics are new to me when it comes to circuit boards so thank you once more.
 

Jim L.

Active member
Jun 18, 2014
855
158
43
Texas
I suggest getting a small soldering iron, small diameter electronic solder (no acid, not plumbing), small braid for de-soldering, needle-nose pliers.

Find an old circuit board to practice soldering and removing components. Just the right amount of heat, too much and the trace conductor will lift off of the board. Not enough heat, and you will have a cold joint which is not conductive.

Keep good photos of your meter board as you go. Some of the components such as transistors may be out of date but proper replacements can be found.

The circuit is fairly simple: a timer and a driver for the solenoid. The components to be replaced are inexpensive. When you are ready to identify components, post your pictures and numbers or colors or other ID marks to get suggested replacements.
 

bird dogger

Well-known member
Vendor Member

Equipment
Kubota B2650 and lots of other equipment
Feb 24, 2019
1,624
1,506
113
North Dakota
Thank you for your help gents.

I tend to repair any thing here if i possibly can so even if this is a slow job i will work my way through it. Besides i still enjoy learning new skills and gaining knowledge and electronics are new to me when it comes to circuit boards so thank you once more.
Couldn't agree more with you, Carl.:) Google is your friend, especially when starting from ground zero....or almost. Also youtube is full of instructional videos.
For instance: If you can see the label on a part it might say 2N2904, for example. Google "2N2904" and it will tell you its a PNP transistor and give you all kinds of info on that part. Google "How to test a PNP transistor" and it will show you how to test it with a common multimeter. (Which you can purchase pretty cheap nowadays) You may have to remove the part from the circuit board until you more understand what you're doing, etc. The same applies to the other components. Some, such as the diodes, need only one end freed up in order to be tested. The capacitors are trickier....some meters have a capacitance checker on them depending on the capacitors value or you can by a dedicated capacitance meter. (But its probably cheaper and easier to just replace the darn thing if you suspect it bad). :) For the resistors (the things with colored bands on them) if they don't look burnt they're most likely good. But again, you can google "Resistor color code" and it will tell you the value of each colored band and thus the resistance of that particular resistor. Your cheap multi meter will confirm whether the resistor is then equal or close to that resistance value. You'll probably encounter seeing the ROY G. BIV and a few other methods to quickly learn the values.
Some methods we learned in trade school years ago are not PC today!:)
There's also got to be videos on youtube showing techniques to remove/replace components on a circuit board using soldering pens and solder suckers. If you like to do things yourself those tools come in handy all the time.....even working on other electrical projects.

Hope this helps give you a few ideas on getting started.
Regards,
David
 

William1

Well-known member
Lifetime Member

Equipment
BX25D
Jul 28, 2015
1,124
315
83
Richmond, Virginia
Thank you for your help gents.

Local training is not an option where i live, so i tend to learn myself but pointers are always well received.
The plunger and gears all move well and correctly so i will look elsewhere for the fault and as suggested start with cleaning the board. I will look to follow your steps from there.

I agree i could easily keep the cheapo chinese counter i have in there but this may not last and i admit to wanting to repair this one. I tend to repair any thing here if i possibly can so even if this is a slow job i will work my way through it. Besides i still enjoy learning new skills and gaining knowledge and electronics are new to me when it comes to circuit boards so thank you once more.
Hey Carl, it has been a month, I am real curious how you made out.