
Front mount flail mower from mid PTO

Paul Allwood

Well-known member
Lifetime Member

Equipment
Kubota B7200HSTD, RC60-72H MMM, homemade FEL, forks & ballast box, rotary hoe
Jul 8, 2025
740
1,349
93
Baranduda, Victoria, Australia
Could you mount a slip clutch to the existing stub shaft and just have one universal joint involved? In other words just eliminate the sliding part of the shaft completely?

But I really think you only need around 100 to 150 mm of overlap on the shaft. Why are you thinking of 400 mm total?

Of course you need some extra space for the shaft to collapse but your mower seem rigidly mounted at the distance shown by your picture above. So maybe you just need the shaft short enough to fit onto the stub on the mower and then extend into locking position with 100 mm overlap remaining.
Thanks Russell. Given that the mower will need to move up and down, a little sideways, and tilt up and down, how would it work with only one uni joint ? I'm not sure I understand your suggestion - how would the slip clutch help me ?

The 400 mm was purely my guess at the minimum length of overlap to stop the shaft wobbling at 2500 rpm.

Edit: After some google searching this morning it looks like the most common minimum PTO shaft overlap is 6 inches as you suggested, not 14 inches as I had guessed. I'll need to have a more careful look at the range of motion for the mower and what this does to the PTO shaft length so I can maintain the minimum overlap of 6 inches and sufficient clearance to not bottom out. I'll also lower the linkages pivot points where they attach to the tractor and the mower to get them closer to the height of the PTO shaft to minimise the length change as the mower goes up and down.
 
Last edited:

Paul Allwood

Well-known member
Lifetime Member

Equipment
Kubota B7200HSTD, RC60-72H MMM, homemade FEL, forks & ballast box, rotary hoe
Jul 8, 2025
740
1,349
93
Baranduda, Victoria, Australia

Tractor time with Tim had a problem with the PTO turning backwards.
Thanks Jeff (?). Every time I make something I wonder if I'm doing the right thing. It always seems like a great idea at the start, but then I always start thinking of other ways I should have done it. So I really like that he makes a good case for front mounted mowers.

I also like the shaft that goes from the crankshaft to the front PTO/3 point assembly. It looks to be about the size I could use.
 
Last edited:
  • Like
Reactions: 1 user

Paul Allwood

Well-known member
Lifetime Member

Equipment
Kubota B7200HSTD, RC60-72H MMM, homemade FEL, forks & ballast box, rotary hoe
Jul 8, 2025
740
1,349
93
Baranduda, Victoria, Australia
Thanks - something that length to suit 1-3/8" 6 spline shaft at each end would work nicely. But at over $500 I'll start by shortening the shaft I have. Once I've got all the bits in place properly I'll check the movement and range of motion properly. Then I can work out how short I can adjust the linkages and the drive shaft. I don't think it will be too bad if the mower ends up a little further out than it was when I tested it a couple of days ago - it was easy to maneuver and I've still got hydraulic steering to add.

I'm interested in your thoughts on another idea....I'm thinking of using a hydraulic cylinder in place of the diagonal link to give me side shift. I do have several trees to mow around, but having never used a front mounted mower I'm not sure how useful this feature would be.
 

Paul Allwood

Well-known member
Lifetime Member

Equipment
Kubota B7200HSTD, RC60-72H MMM, homemade FEL, forks & ballast box, rotary hoe
Jul 8, 2025
740
1,349
93
Baranduda, Victoria, Australia
And another suggestion.
What about plates mounted on the tractor that have vertical slots cut in them, two plates per bracket with a plate on each side of each bracket. The mower brackets could mount to the plates with pins, and the mower could move up and down within the limit set by the length of the slot.
This would also limit side to side movement if the plates are made strong enough.
Thanks for the suggestion. I can see how this could work well for up and down movement. But I can't quite work out how to make it work if one side goes up and the other side goes down at the same time as preventing side to side movement. Any further suggestions ? The bar has been set pretty high by RWS, but I'm often better at understanding pictures.

Edit: I think I found something that might be what you're describing - sorry it's the wrong colour.

Screenshot_20260905-192652~2.jpg

A bit closer. It looks like the but in the red circle pivots up and down, and the slit 3 and pin in the white circle allows one side of the mower to raise while the other side lowers.

Screenshot_20260905-192652~4.jpg

The interesting thing here is that they have the linkages pivot pretty much in line with the PTO shaft pivots....that's what I've been working on today.
 
Last edited:

Paul Allwood

Well-known member
Lifetime Member

Equipment
Kubota B7200HSTD, RC60-72H MMM, homemade FEL, forks & ballast box, rotary hoe
Jul 8, 2025
740
1,349
93
Baranduda, Victoria, Australia
This afternoon I was just sitting, looking at the front of the tractor, thinking. I was thinking that I needed to check the clearance between the mower PTO shaft and the front left tyre. Turns out that on full right lock the front left tyre just impacts the uni on the PTO drive shaft to the mower.

PXL_20260906_060355965.MP~2.jpg

One of the full lock limiting bolts before and after adjustment - 2 threads was enough. Same on the opposite limiting bolts on the other side.

PXL_20260906_060449147~2.jpg

PXL_20260906_062110508~2.jpg

About 1/2" clearance between tyre and PTO shaft uni joint after adjustment.

PXL_20260906_062231929.MP~3.jpg

Another crisis averted.
 
Last edited:
  • Like
Reactions: 2 users

Chanceywd

Well-known member
Lifetime Member

Equipment
Kubota L2501DT BH77 VIRNIG URG60-CT 1950 8N WC-68
Mar 26, 2021
862
858
93
central ny
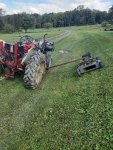
You said you would like to see my side hill mower. I took a couple pics yesterday but forgot to take a view from behind or in front to show the down hill or up hill angle, only have some from the seat!

First one is where my hitch attaches, One long pin and attach the hydraulic cylinder.
Second is mounted and attached to the mower.
Next with raised and using my foot I show a little of its movement.
Next is mowing the hill when it is rising away from me.
Then mowing the slope below me.
And last is it raised while I turn and go back to the lower side.
I used to do this with a push mower and a weed wacker but old age and arthritis made me want to do easier.
It only takes a few minutes to hang the hitch.

Bill
 

Attachments