First Uh-oh, 2150 ROPS mount is stripped

BadDog

New member

Equipment
B7100D TL and B2150D TLB
Jun 5, 2013
579
2
0
Phoenix, AZ
Oh well, there is always something, and I expect it, though I'm constantly amazed at the shear stupidity of some folks.

There was a lot of gunk on the back of this thing, whether 3 point or PTO seals or from the dismounted back hoe I wasn't sure, wasn't particularly worried, figured it's just a matter of sorting it out. Pressure washed it and now I can see that the gunk around the ROPS bolts wasn't just gunk. Some dipshit welded the bolt heads to the ROPs brackets, and some of those are going to (not be) fun to get out and grind down. That's on top of the fact that most, if not all, of the bolts are stripped in the casting, so if you give it a good tug, you can see it (and welded bolts) move. I never thought to check that, oh well. And the weld is so poor that several have broken out and can be almost removed by simply pulling. My guess is they vibrated loose, probably missed and/or ignored due to accessibility with the hoe on, and in the end some POS half tightened (what would) and then welded the heads, as if that's going to help. The term "too stupid to live" comes to mind, and it would be true if they ever rolled it (I can't help but think, too bad they didn't). Can you tell I'm not looking forward to fixing this mess?

Anyway, once I get it all apart, no idea what I'll find. Looks like the damage is mostly contained within the outer axle extension castings, which is where the ROPS mounts on this model. But I expect they cost more than acceptable from Kubota, and used parts on a fairly limited model are going to be pretty much non-existent (though I'll look). If the housing is otherwise intact, I'll probably use thread repair (helicoil etc) to address this, and should be superior to original anyway.

A quick search turned up nothing at all, so is it safe to assume this (stripped bolts, not moron with a welder) is not common?
 

skeets

Well-known member

Equipment
BX 2360 /B2601
Oct 2, 2009
14,665
3,523
113
SW Pa
Come on dog,,, man don't hold this stuff all in
ya got to let it out,,,
now tell us how you really feel LMFAO:D
 

BadDog

New member

Equipment
B7100D TL and B2150D TLB
Jun 5, 2013
579
2
0
Phoenix, AZ
Come on dog,,, man don't hold this stuff all in
ya got to let it out,,,
now tell us how you really feel LMFAO:D
I don't think you really want to know... :eek:

Yeah, I may go SAE, but I hate to mix up fasteners on something that isn't already screwed up (i.e. domestic vehicles). Of course when I price 12 (I think?) metric thread repair coils I may change my mind.
 

MagKarl

New member

Equipment
L245DT
Aug 2, 2010
663
0
0
Olympia, WA
I'm with lsmurphy, drill and tap oversize. You'll need to anyway to make room for inserts, oversize will be cheaper and you'll end up with a larger fastener.
 

BadDog

New member

Equipment
B7100D TL and B2150D TLB
Jun 5, 2013
579
2
0
Phoenix, AZ
Yeah, I can always go up size and stay in metric too, depending on what size I can find available, and what I find when I get in there. I'm sure (hoping) the worst part is correcting that fine bit of fabrication repair. But who would think that is an acceptable way to fix a problem like that?
 

Russell King

Well-known member
Lifetime Member

Equipment
L185F, Modern Ag Competitor 4’ shredder, Rhino tiller, rear dirt scoop
Jun 17, 2012
5,490
1,492
113
Austin, Texas
You will probably find out that the threads on the bolts are fine or extra fine metric thread. On my L185F they were 12x1.25 thread and high strength bolts.
 

seanbarr

New member

Equipment
B7100DT (sold) - Branson 3520H
Feb 1, 2013
384
7
0
Deer Park, WA
Stop!

Before you finalize your choices, consider timeserts. I had badly damaged threads on my B7100 (for the ROPS) and I really like this stuff. You get to retain the original bolt size, it's all steel, spreads the gripping power over a larger area, and is very easy to install.

While researching these timeserts, I've learned that it wasn't uncommon for car buffs to install them BEFORE the threads gets damaged when dealing with aluminum. I can see why.
 

BadDog

New member

Equipment
B7100D TL and B2150D TLB
Jun 5, 2013
579
2
0
Phoenix, AZ
I've used helicoil, threadcerts, and others in the past. And yes, I've put them into aluminum parts (heads, intakes, etc) more than once to eliminate problems before they happen. I don't think I've ever used Timeserts specifically, but they look much like other solid (as opposed to coil) inserts I have used in the past. Never looked into metric, but I'm sure they are out there.

A small update. I wasn't able to make much progress on fixing the idiot welding repair, but I did get one bolt out (straight out). The holes are completely gone and will require significant oversize to repair. It must have been really hammering in there for a long time. I wonder if the canopy weight cantilevered up there had anything to do with it? In any case, I think drilling and tapping oversize will be way too oversize in the end, certainly so if that hole I have exposed isn't the worst. So I think thread repair kits of one sort or another are going to be the best case repair at this point. I just hope the housing isn't busted out too bad for even that type of repair. Oh well, even that can be dealt with, so we'll see how it goes.
 

BadDog

New member

Equipment
B7100D TL and B2150D TLB
Jun 5, 2013
579
2
0
Phoenix, AZ
On the up side, I did get the welded on ROPS off and all the bolts (that were there...) out except for 2 twisted off flush. Due to the many stripped holes, I'll be drilling and tapping oversize anyway, so I'll just drill them out rather than fight to get them out. Fortunately the housing itself appears intact, though the missing bolts caused hidden breaks in the side support brackets for the hoe frame. These will have to be refabricated as repair looks like more trouble than rebuilding. That took some doing, 1/2 steel plate actually broken! To be fair, it was at a stress riser from a bolt hole, but still, really! And you wouldn't believe how many bolts were loose in key locations. PO obviously didn't have a clue regarding routine maintenance and upkeep. The signs are all there for filter and fluid changes, everything clean and obviously replaced but without the signs of a last minute catch up effort. But beyond the routine stuff, the things that were missed (by him in general and me on the sale inspection :() were just astounding. My excuse is 115* heat and typical gunge buildup in all the areas where I might have caught this, but that's still no comfort at this point.

That darn ROPS was supposed to have 14 12-1.75 bolts holding it. There was not one on the tire side, and there should be 3 on each side. And of the 8 going in from the rear, there were only 6 in place, two were twisted off with the heads welded on, and the remaining 4 were ALL either stripped completely (one just pulled out without turning) or wiggly in the hole. Also found out numb-nuts bubba with a welder also welded the fenders(!!!) to the ROPS rather than fix the broken (on one side) and missing (stripped, full of dirt anyway) bolts on the other.

And just to make it interesting, the side plates for the hoe frame had bolts in the way of the welded ROPS bolts. But the side plate bolts were both interfering with the ROPS bolts (points hit when turning) AND were ultimately too long to remove with the ROPS in place. Chicken and the Egg, again. I couldn't get access to the welded bolts because of bolts in the way that couldn't come out till the ROPS was removed. I thought I would have to cut those long side plate bolts, but ultimately got some of the welded bolts out with air chisel, and 2 out by drilling the heads and then using air chisel to break remaining weld. Of course then I realized that the stub was acting as a locating pin so the ROPS bracket wouldn't clear the side plates and bolts. So Drilled them further and forced it sideways to finally get it clear. What can you do but laugh and share the fun, right? :cool:

Oh the sins that can be hidden under grease gunk-dirt. Now to figure out exactly how to fix. Almost all are blind holes and not terribly deep, so insert/coil repair isn't going to be convenient due to needing a bottoming tap. And I don't have much metric stuff, so going up to 13 or 14 mm means buying both starting tap and a bottoming tap at the least. Using an insert, if it doesn't have a standard OD thread, presents an additional problem there as an odd-ball proprietary thread bottoming tap will be needed. Oh the fun...


I also decided to
 

MagKarl

New member

Equipment
L245DT
Aug 2, 2010
663
0
0
Olympia, WA
I'm glad you can see why some of us suggested going oversize SAE instead of metric or inserts based on hardware and tap availability. Are the holes already too sloppy for 1/2"?
 

BadDog

New member

Equipment
B7100D TL and B2150D TLB
Jun 5, 2013
579
2
0
Phoenix, AZ
Unfortunately (fortunately?), other than the 2 twisted off bolts, and some polished ROPS brackets where I ground down the weld that didn't come off with the air chisel, all visible evidence of the mess is gone, and I didn't think to take pictures. About all I thought of when looking at it was throttling the guy with the welder, and the guy(s) who didn't notice several dozen bolts vibrating loose.

Also unfortunately, yes, it won't work with 1/2". Apparently I made a mistake in the original calcs, but a friend set me straight in that a straight conversion from 12x1.75 to 1/2-13, assuming the major diameter of the 12x1.75 isn't enlarged at all, yields only about a 40% thread when drilled and tapped for 1/2-13. I don't know metric fasteners very well, and he also told me that the next standard metric fastener would be 14x1.5. Iis there such a thing as standard metric? I hate metric with all their arbitrary thread pitches, nothing on hand ever fits anything. Anyway, looks like it's helicoil, or 14x1.5, or 9/16x12. Both 14 mm and 9/16 are about the same size, and helicoil (type) repair requires a larger still hole.

Then there are the ends of the axle extension housings where the sides of the ROPS bracket, the hoe bracket, AND the fenders are supposed to bolt on. With the wheel flange, even getting in there to drill and tap is going to be a pain, and it doesn't look like removal of that flange/axle is going to be easy. <sigh>
 

MagKarl

New member

Equipment
L245DT
Aug 2, 2010
663
0
0
Olympia, WA
In your case I'd go 9/16" and wouldn't think twice.

My tractor is already mixed metric and SAE, the loader and backhoe are SAE and the tractor itself is metric.
 

BadDog

New member

Equipment
B7100D TL and B2150D TLB
Jun 5, 2013
579
2
0
Phoenix, AZ
9/16 is definitely the way I'm leaning.

Now to figure out how to get the twisted off bolt out from behind the axle flange WITHOUT removing the extension housings, and without calling in bubba with the metal glue. :D But I may try to weld an extension to the stub to back it out. Or I may buy that 90* Milwaukee 1/2 drill I've been contemplating (but couldn't justify) for years. Yeah, that's the ticket!
 

lsmurphy

Active member

Equipment
B7001
Oct 19, 2012
1,197
5
36
Parrrottsville TN
9/16 is definitely the way I'm leaning.

Now to figure out how to get the twisted off bolt out from behind the axle flange WITHOUT removing the extension housings, and without calling in bubba with the metal glue. :D But I may try to weld an extension to the stub to back it out. Or I may buy that 90* Milwaukee 1/2 drill I've been contemplating (but couldn't justify) for years. Yeah, that's the ticket!


Short 1/4 bit on an angle die grinder may do.

Got air?
 

BadDog

New member

Equipment
B7100D TL and B2150D TLB
Jun 5, 2013
579
2
0
Phoenix, AZ
Short 1/4 bit on an angle die grinder may do.

Got air?
Yes, I've got plenty of air. And I've got a small 90* drill, which has no "balls", and spins far too fast for anything bigger than 1/8" in steel.

Further examination of the end bolt holes (behind the tire) indicates they may be salvageable, if I can get the 2 twisted off bolts out without further damage. The stipped holes out there appear to possibly be due to bolts that were too short, or they didn't get ripped out till they were already loose(they were all gone, except for the broken remains). Only the first 3 to 5 or so threads are missing, the rest seem intact, though perhaps a bit loose. And, it's an open flange, so with a bit of grinder work on the back to flatten it out, I think I could even put a nut, or a machined and threaded "C" plate back there. With only 6" of room, even the Milwaukee 90* drill won't fit with enough room for even a stubby drill. So I think I may be doing the weld extract. Too bad they are both just below surface, which makes it harder, though I've done it before.

The rear bolts holes are worse, and they are the blind holes. Some are missing almost all their threads, others are just very wiggly in the cleaned out holes, so definitely got to go over size there, probably 9/16.

I also got the other hoe frame off in spite of damaged bolts, including 2 big 1" bolts at the front tie to the loader frame that were installed with nuts down and left with over 1" of exposed thread. Thread hanging down, I'm sure you can imagine what happened to that. I almost had to cut off the extended thread to get the nut off, but finally managed to get it. I also found that both rear support "wings" (for lack of a more accurate term) are broken. I knew the right side was, but the left I thought was intact and was planning to use as a pattern. So that's 2 pieces of 5/8" (I think) plate steel actually fractured like cast iron. It must have either been a bad batch, or LOTS of flex resulted in work hardened fatigue, never seen the likes in plate that heavy. So I'll be trying to remake both side without a decent pattern, oh joy.

So the saga continues. I always considered the hoe a "project", but didn't count on that including the entire hoe frame, other than straightening the bent right side. But life goes on, and this fall when it cools off, I think I'll eventually get it done. It may take till next weekend since I need some supplies that I can't get on Sunday, but it will soon be a safe and functional TL even if not a TLB for a while.

You win some, you loose some, I guess it was time for a loose. But as long as the base tractor is solid, or can be made so within reason, it's not a total loss, and I can deal with the rest, even if I don't like having to spend the extra time on it. When it's all said and done I could likely have about paid for a functional TLB for what I'll have in it in parts and labor (at minimum wage even) without all the hassle and time I could spend on other more productive projects. But what are you gonna do? What else can you do but suck it up and move on...
 

MagKarl

New member

Equipment
L245DT
Aug 2, 2010
663
0
0
Olympia, WA
One way to salvage threaded holes where only the last few threads are good is to switch from bolts to studs. Studs can be driven clear to the bottom where good threads may still remain, and held in place with Loctite. This doesn't work in many applications because the studs can be in the way for assembly.

If you could post some pictures to go with your text, it would help us help you.
 

BadDog

New member

Equipment
B7100D TL and B2150D TLB
Jun 5, 2013
579
2
0
Phoenix, AZ
Yeah, that would be nice. But the holes in question are the sides, and the ROPS has to slide over those, so studs won't work.

As you guys may have noticed, I'm not particularly picture oriented, but I finally got out there to take some pics.

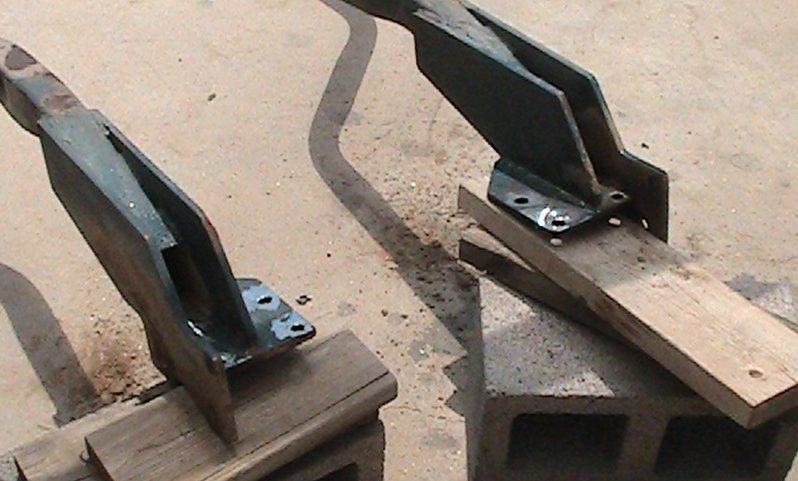
The first shows the ROPS as it lay from where I ground off the welded buggers left after removing the bolts.


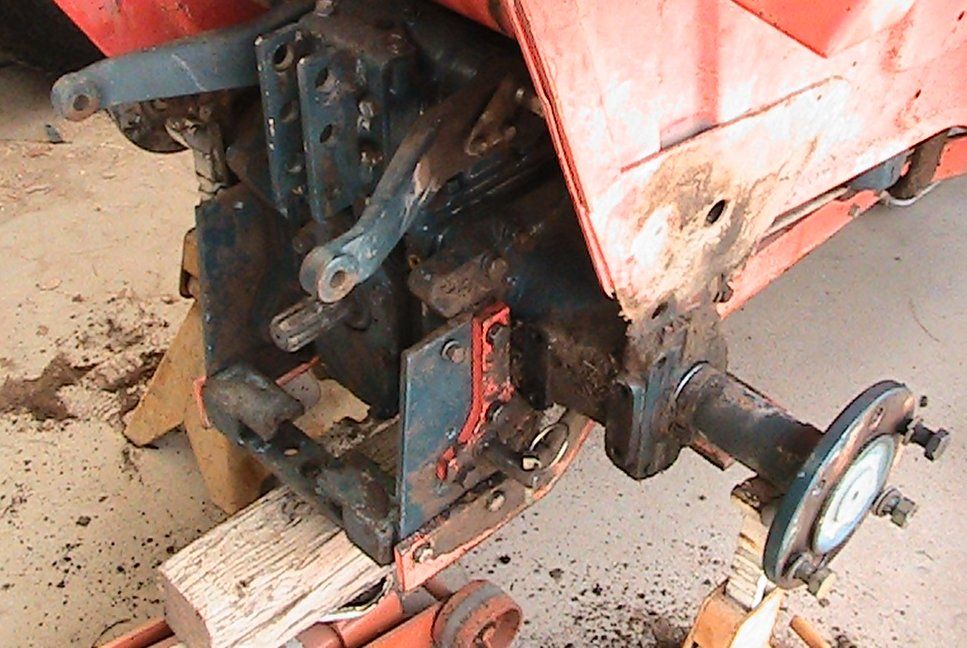
Next one shows the ROPS mounting area. 4 bolts to the rear, and the 2 rear bolts on the side flange behind the axle flange. The front 2 holes on the side are used by the hoe frame, and as you can see, they are completely covered in gunk, so the frame was just floating there.


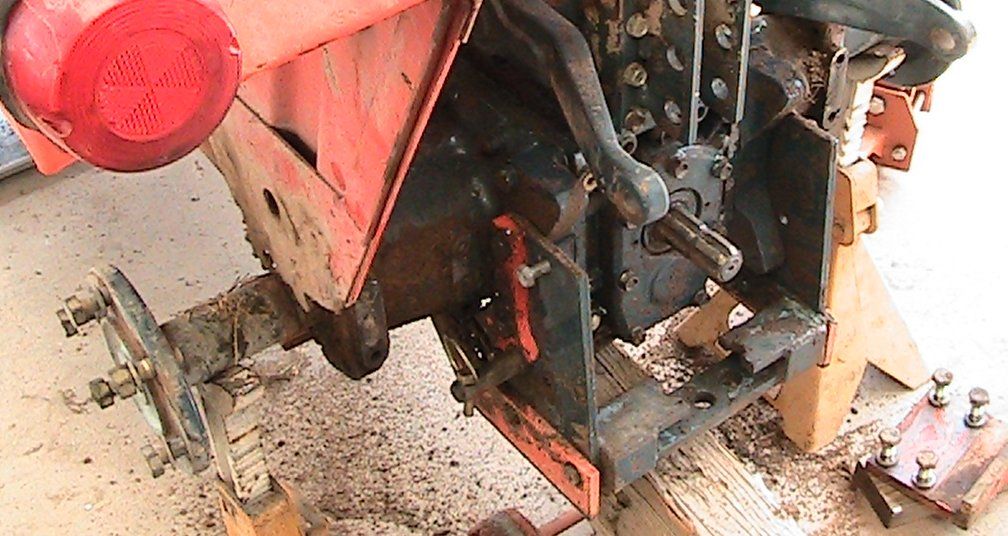
Next is the opposite side where you can clearly see that the fender has been riding on the axle itself, after those dirt dobber welds holding it to the ROPS bracket failed. When I bought it I knew the fenders were loose, not not terribly so (turned out to be somewhat captured between hoe frame and ROPS), I just assumed bolts vibrated out, or simply loose. With all the accumulated greasy crud and dust/grass you couldn't really see anything in there. No real signs of damage or stress breaks or anything like this anywhere else. It was ALL under the greasy crud accumulation.


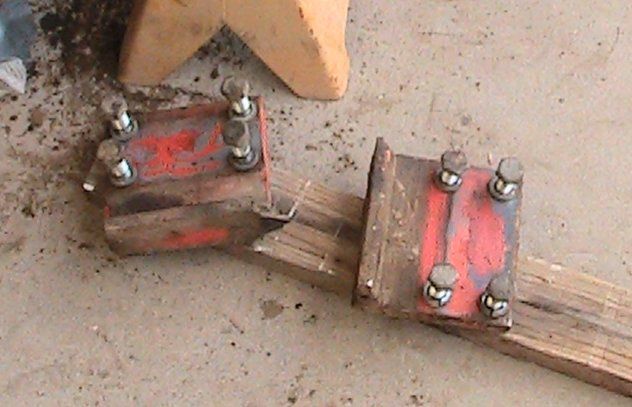
Last are the broken rear "wings" for the hoe frame. They are broke on both sides at the same point, just below the lower 3 point arm pins. That's 5/8 thick steel that is fractured like cast iron. You can see the remains as the orange verticals on the side of the PTO housing in the pictures above. The main plate with threaded holes is 3/4". I'll have to cut the broken plates out and make new ones to weld on. I thought the one on the left side was intact and was going to use it as a pattern, but I was wrong. I wonder if Kubota has a dimensioned drawing of that area. Sure would be nice not to reverse engineer it from the side of the housing.