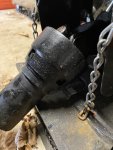
BX5455HD snowblower driveline protector.

Whiskey Mike

Member

Equipment
B2601 BX5455HD, RCK60-32,
Feb 16, 2022
42
15
8
Brewer, Maine
I am having difficulty determining how the flared male end of the driveline protector attaches to the rear of the blower. Without a manual I'm struggling.

What I did: When attempting to access the zerk fitting in the ujoint immediately after the rear gearbox, I needed to move the end of the protector. I did this by pressing on the white tabs of the nylon ring. I did succeed at detaching the flared end. Now I cannot figure out how to replace it properly. I may have parts backwards in the pic here as I have been fumbling with it all.

I need a "driveline protection for dummies" instruction manual, lol.

protector pic.jpg
 

Mowbizz

Well-known member

Equipment
Bx25d
Aug 19, 2021
514
296
63
New Hampshire
I went out and looked at mine in the garage and I can’t even see the “nylon ring”
It must be hidden by another part?
 

Whiskey Mike

Member

Equipment
B2601 BX5455HD, RCK60-32,
Feb 16, 2022
42
15
8
Brewer, Maine
It should be under the flared end of the protector? The white tabs of the ring showed through corresponding notches on the flare. I pressed in on those tabs, and pulled the protector back. That is when the nylon ring and (spring clip?) came out, but with an unexpected pop.
 

Mowbizz

Well-known member

Equipment
Bx25d
Aug 19, 2021
514
296
63
New Hampshire
It should be under the flared end of the protector? The white tabs of the ring showed through corresponding notches on the flare. I pressed in on those tabs, and pulled the protector back. That is when the nylon ring and (spring clip?) came out, but with an unexpected pop.
This is what mine looks like (don’t see any nylon tabs or flared end?)
 

Attachments

Whiskey Mike

Member

Equipment
B2601 BX5455HD, RCK60-32,
Feb 16, 2022
42
15
8
Brewer, Maine
On yours the tabs are black. you can see them peeking through the holes on the fat end of the protector. I thought that by depressing the tabs would release the protector. It released, but not smoothly, and I'm struggling with the reassembly!
 

Mowbizz

Well-known member

Equipment
Bx25d
Aug 19, 2021
514
296
63
New Hampshire
On yours the tabs are black. you can see them peeking through the holes on the fat end of the protector. I thought that by depressing the tabs would release the protector. It released, but not smoothly, and I'm struggling with the reassembly!
Ahh okay. That’s the trouble with taking stuff apart blind! Things go pop!
 

Russell King

Well-known member
Lifetime Member

Equipment
L185F, Modern Ag Competitor 4’ shredder, Rhino tiller, rear dirt scoop
Jun 17, 2012
5,361
1,414
113
Austin, Texas
I assume the other end is similar so look there?

I also assume the white part could come off the shaft and be installed either direction? If you are not sure which direction is proper then take it off and see which way fits into the black cover the best. I would guess it should have the tabs closer to the black part and it is currently in backwards if it was off the shaft. But looking closely at your picture the ramp looks like you would be pushing up the ramp slope so it looks correct for the black part to be installed by pushing.

The copper looking spring is probably supposed to be in a groove of the.white part to help hold the white bearing piece together.

You may need to use a small screwdriver to put in the slots of the black plastic cover and then gently pry the black hole over the tab. I assume that all the holes are in line so you will have to get all three lined up and starting onto the tabs at one time. It may help to get the pto shaft off and figure it out on a bench and then replace it on the implement and tractor.

If you know the brand of shaft then you may be able to find a video of how to get the cover on or off. This may be covered in the implement operation manual?
 
Last edited:

Whiskey Mike

Member

Equipment
B2601 BX5455HD, RCK60-32,
Feb 16, 2022
42
15
8
Brewer, Maine
Good stuff there Russell thank you. Especially removing it to a bench. The blower is currently installed which has made getting to things a little harder.

Not sure what you are referring to with the ramp, but I believe you are right about the reversed white ring. Also, I now believe the metal ring should be toward the blower end of the drive shaft. (or towards the ujoints). If I can get the metal ring into the groove on the white ring, it should serve to expand the white ring a bit, thereby holding the tabs into the slots on the flared end of the protector.

I'll try again when the rain stops. Thanks for your reply!
 

Russell King

Well-known member
Lifetime Member

Equipment
L185F, Modern Ag Competitor 4’ shredder, Rhino tiller, rear dirt scoop
Jun 17, 2012
5,361
1,414
113
Austin, Texas
The white ring has tabs. At the end of the tab it looks like there is a slight ramp (taper) on the tab.

If there is I assume that the lower level of the taper would be towards the black plastic so you would be able to push the black cover towards the u joint and up the ramps.

Hope that makes some sense!
 

thebicman

Active member

Equipment
B2601 + BX2755HD + 50" box blade
Feb 2, 2017
333
97
28
Ottawa, ontario
It looks from your picture that the ring may fit inside the white retainer. Then the cover gets pushed over the two together. It's probably going to be a tight fit.
 
  • Like
Reactions: 1 user

NoJacketRequired

Active member

Equipment
B7510 & LA302 FEL & B2782 blower, B7510 & B2781 blower, B2410 & B2550 blower
May 25, 2016
432
68
28
Ottawa, Ontario
I am having difficulty determining how the flared male end of the driveline protector attaches to the rear of the blower. Without a manual I'm struggling.

What I did: When attempting to access the zerk fitting in the ujoint immediately after the rear gearbox, I needed to move the end of the protector. I did this by pressing on the white tabs of the nylon ring. I did succeed at detaching the flared end. Now I cannot figure out how to replace it properly. I may have parts backwards in the pic here as I have been fumbling with it all.

I need a "driveline protection for dummies" instruction manual, lol.

View attachment 88973
The copper ring fits inside the aft lip of the white nylon ring and in that compressed state prevents the white nylon ring from moving aft over the swelling on the black metal shaft.

To put it back together you need to get a tool (slot screwdrivers, times 2) to push aft on the white ring at the same time you slide the black protective cover forward with its square holes aligned with the protruding tabs on the white ring. This will take some force as the black plastic protector has to expand enough to go over the white plastic tabs. Once properly assembled the black plastic protector can't move aft up the shaft toward the tractor.

Note: the best way to grease this u-joint fitting is to slide the shaft off the quick hitch splines then separate the forward and aft halves of the driveshaft. Now with them in two pieces you can bend the u-joints to extreme angles, fully exposing the grease zerks.

Also note this task is truly a PITA and is made much easier with a lever-lock style grease gun coupler. (Which I don't have but have borrowed once and thought, "Gee, I gotta buy one of these.")
 
  • Like
Reactions: 1 user

Whiskey Mike

Member

Equipment
B2601 BX5455HD, RCK60-32,
Feb 16, 2022
42
15
8
Brewer, Maine
OK NoJacket, that was extremely helpful and you have given me renewed hope that this can be put back right. It is still messed up.

To clarify a few things in your message... The order of assembly would therefore be as shown in my photograph above? Those items are in the correct order then as depicted? Interesting that at the other end of the driveline (between blower and frame) has the metal ring toward the aft u-joint, and the nylon rings "lip" toward the front of the tractor. Getting the ring inside that lip is going to be fun!

The dealer suggested I remove the drive shaft from the snowblower. However, I was unable to slide the short driveline off the reduction box shaft. Dumb question follows... once the set screw is off the key, and the bolt removed, the ujoint/drive shaft "should" slide off of the shaft to the reduction box, correct? The key remains in its machined slot during the separation process? (I'm thinking yes, as there is no apparent way to remove the key completely first). Regardless I couldnt get anything to budge and was not about to deform anything trying.

I'll take another look this week and try your suggestion, Thank you!
 

DustyRusty

Well-known member

Equipment
2020 BX23S, BX2822 Snowblower, Curtis Deluxe Cab,
Nov 8, 2015
6,237
4,816
113
North East CT
Those keyed shafts can be quite tight to disassemble, and sometimes you need to put some heat on them and then tap them off with a drift pin and a hammer. When reassembling, use some grease on it to keep it from developing rust on the splines.