Another Remotely Operated Quick Attach

chim

Well-known member

Equipment
L4240HSTC with FEL, Ford 1210
Jan 19, 2013
2,120
1,242
113
Near Lancaster, PA, USA
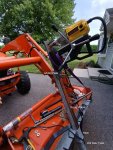
A couple weeks ago I wired a switch and extended wiring to a trailer plug to the outside of the cab. Earlier this week I fabbed up a couple tabs and visirted the local hardware store for a couple bushings and longer bolts. Today it's been wrapped up except for wiring between the plug just outside the cab to the linear actuator. It was tested with jumpers, but other duties called so it'll be done done next week.

First thing was drilling the two tabs that go on the post of the QA mechanism. The tractor helped with this. It was parked with the bucket dumped enough to make the back about horizontal. That gave access to everything and was a handy work surface. A scrap piece of galvanized 2x2 tube slipped down through the receiver hitch that's welded into my slotted chain grabber. Then a scrap piece of flatbar from an old mower deck was clamped to the 2x2 tube. Then the "added plate" was clamped to the flatbar to give the mag drill a place to fasten to. That plate is for drilling stuff that doesn't have sufficient steel for the base of the mag drill to grab. It's a good bit larger than the magnet footprint with a "target hole" that can be roughly located over the proposed hole in trhe material below. It came in handy a few times. After drilling holes in the flatbar, the two needed pieces were cut fromm it.

The collars from the hardware store had an OD very close to the holes in the QA handles and an ID that wasn't too sloppy for the bolt. The thickness was just enough to provide a tight bolt-up of the QA mechanism and allow enough clearance for the tab to rotate on it. Another stroke of luck was one of the annular cutters from the mag drill kit was perfect for the OD of the collars.

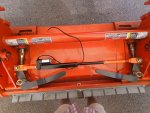
Second picture shows the parts for the "driver's side". The 1/2" SCH 40 steel pipe was a pretty decent fit for the one end of the linear actuator. It was drilled and bolted through the actuator's piston. One of the nuts was welded to the end of the pipe so the allthread could be threaded in or out in case there's a need to make any adjustments. The other nut and end of the allthread were welded to the tab that goes on the QA mechanism. The new bolts were cut down to allow for the additional length needed for the collar.

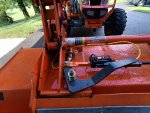
Next photo shows the "passenger's side". That end linear actuator had a square boss that was very close to the inside dimensions of some oddball light gauge square tube saved from some other project. A teensy bit of effort with a big single cut file made it fit nicely and it was bolted to the square end of the actuator. Then the other end of the square tube was simply welded to the tab.

Last picture is after a quick rattle can job on the newly fabbed parts. Greased her up and did the old in 'n out a few times using the spray rig's extension cord before dropping the loader and mowing. Wifey and Sweet Pea had me on a tight schedule in order to make it to the restaurant before it closed :) The final wiring will have to wait till next week. Not very much. Just a cord fastened to the loader arm to keep it out of harm's way and a plug on the end toward the cab.
 

Attachments

  • Like
Reactions: 9 users

Runs With Scissors

Well-known member

Equipment
L2501 TLB , Grappel, Brush Hog, Box Blade, Ballast box, Forks, Tiller, PH digger
Jan 25, 2023
2,442
2,818
113
Michigan
Looks nice man.

I am interesting in doing basically the same thing

What are the specs for the actuator?
 

chim

Well-known member

Equipment
L4240HSTC with FEL, Ford 1210
Jan 19, 2013
2,120
1,242
113
Near Lancaster, PA, USA
Looks nice man.

I am interesting in doing basically the same thing

What are the specs for the actuator?

Thank you. It's an 8" stroke which is just right. The rating is 225# and below is the information from an Amazon order for the actuator.

I want to get it connected properly to the switch and cycle it to make sure there's enough "oomph". It does work, but the one latch seems to push the actuator to its limit. I want to see if there's some sticking on the one latch, a need for a better connection, or if there's a need for more force. The test with a jumper was a bit suspect itself - tips of the wires touching a connector rather than a good solid connection. I want to test it better before recommending that actuator. That will happen this coming week.

ECO LLC 8 Inch 8" 225lbs 0.55in/sec (14mm/s) Automatically Linear Actuator Motor 1000N DC12V
 

GreensvilleJay

Well-known member

Equipment
BX23-S,57 A-C D-14,58 A-C D-14, 57 A-C D-14,tiller,cults,Millcreek 25G spreader,
Apr 2, 2019
11,421
4,908
113
Greensville,Ontario,Canada
you'll probably see one latch close then the other,same with hydraulic version....
mine only need 4" of travel but it was snail slow so it's a dust collector now.
kinda good idea to get up and stretch legs once in awhile.... ;)
 

fried1765

Well-known member

Equipment
Kubota L48 TLB, Ford 1920 FEL, Ford 8N, SCAG Liberty Z, Gravely Pro.
Nov 14, 2019
7,843
5,066
113
Eastham, Ma
Thank you. It's an 8" stroke which is just right. The rating is 225# and below is the information from an Amazon order for the actuator.

I want to get it connected properly to the switch and cycle it to make sure there's enough "oomph". It does work, but the one latch seems to push the actuator to its limit. I want to see if there's some sticking on the one latch, a need for a better connection, or if there's a need for more force. The test with a jumper was a bit suspect itself - tips of the wires touching a connector rather than a good solid connection. I want to test it better before recommending that actuator. That will happen this coming week.

ECO LLC 8 Inch 8" 225lbs 0.55in/sec (14mm/s) Automatically Linear Actuator Motor 1000N DC12V
Your concept/design seems excellent.
The amount of force available to electrically set the locks is the big question.
My L48 TLB came to me with bucket locking powered by the 3rd function, through a diverter.
The small hydraulic cylinder/piston used for my locking system has adequate force!
 

Hkb82

Well-known member

Equipment
M7060, Ford 5600, can-am defender
Nov 17, 2021
387
312
63
42
Ontario Canada
Great work. I was thinking of also doing something like this but my current tractor is alo/global and I after using it for a bit compared to ssqh. I wasn’t sure it was worth the work. With the alo connection I Only having to release the pins and do not having to get back off to lock pins in after attachment is on.
Your tread has again got me thinking of a winter tinkering project. Once again, nice work and nice additional creature comforts.
 

chim

Well-known member

Equipment
L4240HSTC with FEL, Ford 1210
Jan 19, 2013
2,120
1,242
113
Near Lancaster, PA, USA
Spent some time wrapping it up today. I borrowed a scale to check the two latch assemblies against each other because the right latch (as viewed from the seat) seemed to max out the linear actuator. I disconnected the actuator and clamped Unistrut 90° fittings on the end where you'd place your hand.

It took about 25# to move the left side and 30# to move the right side (viewed from the seat). This was at the tip of the handle. I didn't measure and do math, but the 25# and 30# there would translate to a lot more where the actuator connects because of the leverage difference. looked like the one new bolt may have been a tad long. After taking maybe 1/16" or so off and reinstalling it, the effort to move the latches matched up pretty closely. While the 225# actuator does operate the latches OK, I'd choose something with more force to compensate in case the latches get dirt or snow packed in them. If it fails at some point, it'll be a simple swap with everything in place.

As mentioned earlier, the wiring in the cab was completed and a tail with a trailer Flat 4 plug sticks out between the windshield and the hood. At first I planned to run a cable between that and the actuator by following the hydraulic lines on the inside of the loader frame. Started to do just that but it looked kinda ugly and there didn't seem to be a route from the loader arm to the actuator that didn't have a lot of exposed cable behind the bucket (or forks, or whatever). Ended up fishing it through the loader arm instead. It made a cleaner installation and there's a path where it doesn't look very vulnerable.

Had a 15 minute rain delay today, so the "done, done" actuator and wiring were wet when they posed for the picture. There's also a link to a half minute video of it operating. It takes about 15 seconds to latch or unlatch. That falls relatively close to the advertised speed of .55" per second.


Attachments

Last edited:
  • Like
Reactions: 3 users

Runs With Scissors

Well-known member

Equipment
L2501 TLB , Grappel, Brush Hog, Box Blade, Ballast box, Forks, Tiller, PH digger
Jan 25, 2023
2,442
2,818
113
Michigan
I like it a lot.

The lag time isn't as bad a was thinking, but still a little long.

Nice write up and I the video really helps to "put things into perspective"

Thanks for sharing.
 

Hkb82

Well-known member

Equipment
M7060, Ford 5600, can-am defender
Nov 17, 2021
387
312
63
42
Ontario Canada
I also like it.
Like scissors said it’s a bit slow but so am I most days getting on and off the tractor. Rain day sounds like a perfect situation for what ya built. No more getting soaked switching attachments for you my friend. Great job and thanks for the pics and video
 

edritchey

Well-known member
Lifetime Member

Equipment
A bunch of cute little Kubotas
Jul 19, 2014
1,107
806
113
Wellsville, PA
I was lucky when I converted mine over to be hydraulically operated I was able to use all the stuff Kubota uses on the LA1055 loaders on my LA1065 the only stuff I have to come up with was the hydraulics and I was able to get a cylinder, hoses and valve at a good price. All in all it still cost me almost 1400 bucks but it was worth every penny to me because I go between the bucket and forks all the time.

Here is a picture of it
69902654493__2761E9A4-0E5B-44D1-B4D1-718108C2F99A.jpeg
 
  • Like
Reactions: 2 users

Hkb82

Well-known member

Equipment
M7060, Ford 5600, can-am defender
Nov 17, 2021
387
312
63
42
Ontario Canada
That’s one fancy ssqh you got I’m a little jealous.
 
  • Like
Reactions: 1 user

chim

Well-known member

Equipment
L4240HSTC with FEL, Ford 1210
Jan 19, 2013
2,120
1,242
113
Near Lancaster, PA, USA
I was lucky when I converted mine over to be hydraulically operated I was able to use all the stuff Kubota uses on the LA1055 loaders on my LA1065 the only stuff I have to come up with was the hydraulics and I was able to get a cylinder, hoses and valve at a good price. All in all it still cost me almost 1400 bucks but it was worth every penny to me because I go between the bucket and forks all the time.

Here is a picture of it
View attachment 108063
Very nice Ed. I'm sure there's no concern with power since it's hydraulic.
 
  • Like
Reactions: 1 user

ve9aa

Well-known member

Equipment
TG1860, BX2380 -backblade, bx2830 snowblower, fel, weight box,pallet forks,etc
Apr 11, 2021
1,202
982
113
NB, Canada
A couple weeks ago I wired a switch and extended wiring to a trailer plug to the outside of the cab. Earlier this week I fabbed up a couple tabs and visirted the local hardware store for a couple bushings and longer bolts. Today it's been wrapped up except for wiring between the plug just outside the cab to the linear actuator. It was tested with jumpers, but other duties called so it'll be done done next week.

First thing was drilling the two tabs that go on the post of the QA mechanism. The tractor helped with this. It was parked with the bucket dumped enough to make the back about horizontal. That gave access to everything and was a handy work surface. A scrap piece of galvanized 2x2 tube slipped down through the receiver hitch that's welded into my slotted chain grabber. Then a scrap piece of flatbar from an old mower deck was clamped to the 2x2 tube. Then the "added plate" was clamped to the flatbar to give the mag drill a place to fasten to. That plate is for drilling stuff that doesn't have sufficient steel for the base of the mag drill to grab. It's a good bit larger than the magnet footprint with a "target hole" that can be roughly located over the proposed hole in trhe material below. It came in handy a few times. After drilling holes in the flatbar, the two needed pieces were cut fromm it.

The collars from the hardware store had an OD very close to the holes in the QA handles and an ID that wasn't too sloppy for the bolt. The thickness was just enough to provide a tight bolt-up of the QA mechanism and allow enough clearance for the tab to rotate on it. Another stroke of luck was one of the annular cutters from the mag drill kit was perfect for the OD of the collars.

Second picture shows the parts for the "driver's side". The 1/2" SCH 40 steel pipe was a pretty decent fit for the one end of the linear actuator. It was drilled and bolted through the actuator's piston. One of the nuts was welded to the end of the pipe so the allthread could be threaded in or out in case there's a need to make any adjustments. The other nut and end of the allthread were welded to the tab that goes on the QA mechanism. The new bolts were cut down to allow for the additional length needed for the collar.

Next photo shows the "passenger's side". That end linear actuator had a square boss that was very close to the inside dimensions of some oddball light gauge square tube saved from some other project. A teensy bit of effort with a big single cut file made it fit nicely and it was bolted to the square end of the actuator. Then the other end of the square tube was simply welded to the tab.

Last picture is after a quick rattle can job on the newly fabbed parts. Greased her up and did the old in 'n out a few times using the spray rig's extension cord before dropping the loader and mowing. Wifey and Sweet Pea had me on a tight schedule in order to make it to the restaurant before it closed :) The final wiring will have to wait till next week. Not very much. Just a cord fastened to the loader arm to keep it out of harm's way and a plug on the end toward the cab.
Great job Jim. I like it!
 

fried1765

Well-known member

Equipment
Kubota L48 TLB, Ford 1920 FEL, Ford 8N, SCAG Liberty Z, Gravely Pro.
Nov 14, 2019
7,843
5,066
113
Eastham, Ma
I was lucky when I converted mine over to be hydraulically operated I was able to use all the stuff Kubota uses on the LA1055 loaders on my LA1065 the only stuff I have to come up with was the hydraulics and I was able to get a cylinder, hoses and valve at a good price. All in all it still cost me almost 1400 bucks but it was worth every penny to me because I go between the bucket and forks all the time.

Here is a picture of it
View attachment 108063
Excellent,......and hydraulics are definitely the way to go, to get the locking force needed.
 
  • Like
Reactions: 1 users