Runs With Scissors
Well-known member
Equipment
L2501 TLB , Grappel, Brush Hog, Box Blade, Ballast box, Forks, Tiller, PH digger
My grandpa used to say that, and it seems to be applying to me, with this damn “Carriage stop” project.
Well, here we are, with a little “free time” and I decide that its time to conquer Mount “Carriage Stop”….
This will be my 3rd attempt……...
This appears to be a fairly simple project that should be “within arms reach”…….But I keep F’ing it up…...
Originally, I had these “grandiose plans” of a "micrometer stop” and such, but now I am just focused on something that “kinda fits, ok” on the lathe ways…….
Well, I drag out the “plans” once again, then lop off a hunk of steel……..
 z
z
Now in the past, I have tried to use a “large piece” of material, and get 2 parts out of it.
But that has proved problematic, by leaving me with pieces that are difficult to grab, since they are so small……So the “new plan” is to use larger pieces and have more “waste”, hopefully increasing my chances of success.
I am also trying to remove the part "as few times as possible" so I don’t have to “locate” the sides too many times, and I am also trying to do as many “operations” as I can at the same time.
I also decide to use my “Kurt” vise instead of the “Chi Com” one that I normally use. The thought here is that the “Kurt” will be more accurate, also increasing my odds of success.

I get everything set up and pick out a “new” cutter.

Using a dead blow mallet and my parrallels, I get the blank set up and machine 5 sides, AND mill out the “major part” of the “valley"

So far, so good…………And now its time to locate the finished sides so that I can accurately drill the bolt holes.

using the DRO, I use a “center drill” to start the holes, then keep working up to the finished heloe size.

ASIDE: I am beggining to like these “collets” more and more.
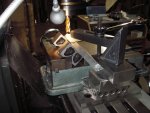
A little later on, there is an instance (pictured below), where the drill chuck simply would not have fit, so using collets, to "save space” was very helpful…….but I’m getting ahead of myself

Well here is the "tough part" for me.
I can’t figure out how to mill that 45 degree angle successfully without removing the part and resetting it.
I decide that I will try to mill the “deepest” part of the valley first, then the 45 degree angles.
BTW…….I have discovered that the “work order” thing is a big deal………Thinking through what should be cut first, second……is tougher than it seems.
Anyway, I chuck up my “Brand new” endmill…….and commence to “snap it off” in short order
@##$$%%%^%’er ……Sum-Bitch!!!!!!!!!!!!!!!
I have a hard time with smaller endmills………..Sometimes, less is more I guess….

So now I switch to my “used” one…...

Well try as I might, this one is just not going to “cut it” (pun intended)
It’s just “plowing” through this steel, leaving a “trail of tears” in it’s wake.

Well, here we are, with a little “free time” and I decide that its time to conquer Mount “Carriage Stop”….
This will be my 3rd attempt……...
This appears to be a fairly simple project that should be “within arms reach”…….But I keep F’ing it up…...
Originally, I had these “grandiose plans” of a "micrometer stop” and such, but now I am just focused on something that “kinda fits, ok” on the lathe ways…….
Well, I drag out the “plans” once again, then lop off a hunk of steel……..
Now in the past, I have tried to use a “large piece” of material, and get 2 parts out of it.
But that has proved problematic, by leaving me with pieces that are difficult to grab, since they are so small……So the “new plan” is to use larger pieces and have more “waste”, hopefully increasing my chances of success.
I am also trying to remove the part "as few times as possible" so I don’t have to “locate” the sides too many times, and I am also trying to do as many “operations” as I can at the same time.
I also decide to use my “Kurt” vise instead of the “Chi Com” one that I normally use. The thought here is that the “Kurt” will be more accurate, also increasing my odds of success.
I get everything set up and pick out a “new” cutter.
Using a dead blow mallet and my parrallels, I get the blank set up and machine 5 sides, AND mill out the “major part” of the “valley"
So far, so good…………And now its time to locate the finished sides so that I can accurately drill the bolt holes.
using the DRO, I use a “center drill” to start the holes, then keep working up to the finished heloe size.
ASIDE: I am beggining to like these “collets” more and more.
A little later on, there is an instance (pictured below), where the drill chuck simply would not have fit, so using collets, to "save space” was very helpful…….but I’m getting ahead of myself
Well here is the "tough part" for me.
I can’t figure out how to mill that 45 degree angle successfully without removing the part and resetting it.
I decide that I will try to mill the “deepest” part of the valley first, then the 45 degree angles.
BTW…….I have discovered that the “work order” thing is a big deal………Thinking through what should be cut first, second……is tougher than it seems.
Anyway, I chuck up my “Brand new” endmill…….and commence to “snap it off” in short order
@##$$%%%^%’er ……Sum-Bitch!!!!!!!!!!!!!!!
I have a hard time with smaller endmills………..Sometimes, less is more I guess….
So now I switch to my “used” one…...
Well try as I might, this one is just not going to “cut it” (pun intended)
It’s just “plowing” through this steel, leaving a “trail of tears” in it’s wake.

 .
.