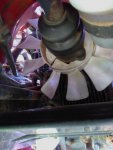
A colleague says that he writes software because he is lazy and wants to do less work. The thought was contagious so here is the lazy (easy) way to replace the notorious broken HST fan on a BX25.
There are many documented ways to do this: Remove deck and drive shaft, cut holes and remove drive shaft, remove drive shaft then split and rivet, scab on split fan over remnants with self-tap tools, hoist engine and move forward, use a 3d printed click together fan (cool!).... and perhaps more I missed. Here is a new way:
0: Back machine up onto car ramps to get easier access and remove bottom shield/plate.
1. Cut and peel off old fan using utility knife and channel lock pliers. (Trick: you just need to expose the two 12mm head bolts that hold the fan to the universal joint)
2. Use a 12mm ratcheting box end wrench to remove the two bolts. (Trick: rotating drive shaft so that the bolt is at the lowest position helps)
3. Cut/peel away old fan.
4. Cut a single slit in new fan hub ( from center rectangle opening to the mid point of the two blades midway between the two round bolt holes... DO NOT CUT FAN IN HALF)
5. INSTALL THE FAN BACKWARDS!!!! <<<< THIS IS THE TRICK TO AN EASY LIFE!!!! The blades rotate in the same direction, this trick allows the 2 bolts to be exposed for installation. The net effect is to simply move the fan ~ 1.5" further from the HST... not a big sacrifice. With the slit in the fan, it is easy to twist over the thin splined HST shaft BETWEEN THE HST BODY AND DRIVE SHAFT UNIVERSAL.
5. Rotate the drive shaft so that the bolt hole is in he lowest position. With your head under the HST and feet out the left side of the tractor, use your left fingers between the gaps in the cross tubes to apply pressure to push the bolt axially into place after using your right hand to pick up the bolt and place it approximately in place. THIS IS THE TOUGH PART... someone with small long fingers would be best. Once you get a few threads to grab, use the ratcheting box end to drive the first bolt in only half way. Rotate the shaft 180 degrees to bring the second bolt hole to bottom and repeat. Then tighten both bolts home.
Last edited:


