With some recent discussion about battery packs for our cordless tools and how expensive they are to replace, I thought I’d share what I had come up with to rebuild the battery packs for my cordless tools: A mini spot welder for lithium battery packs and other cordless tool packs. And if you are just a little bit tech savvy, willing to learn, careful with your planning, layout and building process, it’s not a complicated procedure. And the best part: it’s not expensive!
It started when my locksmith buddy said he had been unsuccessful finding a replacement battery pack for his portable key programmer that could operate from an internal Lithium-ion battery pack when no AC plug in was available (which happened quite often). The replacement packs were terribly expensive when they were available but everywhere he checked now the response was NLA (No longer available).
When he mentioned it to me, I suggested we just build his own battery pack and maybe a spare at the same time. He never thought that was possible. Since the lithium-ion battery is very heat sensitive, connections should not be soldered together unless you’re extremely quick! Instead, to make the connections a mini spot welder is used.
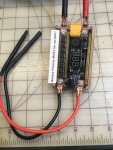
A commercial duty spot welder runs a few hundred dollars. But a portable mini spot welder that requires you to provide your own power supply (think 12vdc car battery) can be had in the $25 range. That’s what I paid for mine, including delivery.
You do have to be careful when using it, as there is no “reverse polarity” protection and you can fry the control board if you’re not careful. You’d be out the $25 if you hooked it up wrong. Hence, my reminder label on its cover.
But for $25 this one has variable settings to adjust for higher/lower heat output when using different thicknesses or doubling of the nickel strips used to connect the battery terminals together.
When you touch the two probes to the terminal strip to be welded, the controller can deliver either 1, 2, or 3 very quick pulses of high current whose duration can also be shortened or lengthened for the different heat settings. The settings are selected with the push buttons seen on the control board. Its duty cycle isn’t rated for steady production, but for home use, this has been great! And it doesn’t matter if the batteries are lithium, Nicd, etc.
Nicd battery packs may be somewhat simple with just the batteries and possibly a thermal sensor to monitor the heat buildup when charging or using the battery pack.
The lithium battery packs, however, most likely have their own BMS (Battery Maintenance System) contained on a small circuit board which gets connected properly into the battery pack while being put together. You might even be able to reuse the original from the weak pack you are rebuilding.
You can also buy a proper BMS for the actual battery pack being built. You’ll need to know the packs voltage, current rating, the # of cells in series/parallel, etc. It sounds more complicated than it really is. Plus, there are many “how to” videos and instructions online for various configurations to guide you.
Some pre planning and thinking before you start putting the pack together is needed. And be careful to keep the connections isolated and insulated where necessary. Allow for the connection leads from each battery cell to the appropriate connection point on the BMS being used.
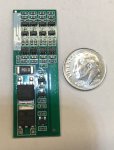
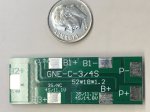
Selecting the proper BMS will protect your battery pack from being over charged or discharged below its safe cut off voltage level. It will also monitor each individual cell for voltage and if there’s a problem it will open up the battery’s output circuitry. A simple BMS for a cordless drill, etc. might run in the $10 range +/-. The BMS for this 4-cell, 14.4 vdc pack pictured was under $10 delivered. Larger and more complicated battery packs might require more complicated and expensive BMS modules.
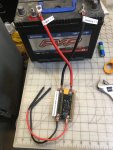
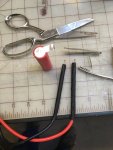
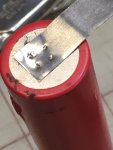
Here’s a pic of the mini spot welder with its welding leads and my car battery power supply. I used the bad battery pack cells (red) for trial spot welding to set the right heat settings on the device before welding the connection tabs to the new (blue) batteries. Pulling on the connection points with a pair of pliars left the welds on the battery terminal after ripping through the nickel tabs. A good weld.
Make a drawing of how the pack you are rebuilding is laid out (copy the pack being replaced). Then once you have the heat setting selected, the order of connecting the batteries together properly, and the layout of the tabs for the wired connections to the BMS, it’s time to start spot welding those connections.
Here are some pics of the battery pack being made for the key programmer. And a pic of the purchased BMS and the spare battery pack being put together. The clear tape used is a high temperature tape made for this purpose and is readily available. The chart is a guide for choosing the proper size nickel strips for the connections based on the ampacity needed. The strips can also be doubled up(or more) for the ampacity required.


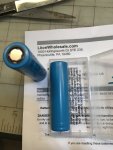
In one of the pics you can see where I purchase my Lithium-ion batteries from. They also have other types, different amp hour ratings, brands, sizes, accessories, etc. at a most reasonable price and very reasonable shipping charges.
For a cost example: If the locksmith could have found a ready to buy replacement battery, he said it was in the $100+ price range. The replacement battery packs we built had twice the amp hour capacity vs the original. Each pack had 4 batteries at a cost of $28 per pack. The BMS were about $8 each with delivery. Each pack with double the capacity totaled $36 to build after the purchase price of $25 for the spot welder and a roll of that tape.
Now we’re using the welder to rebuild both of our cordless drills, flashlights, impact drivers, etc. battery packs. I may even rebuild my very old Makita drill’s 7.2 volt battery pack……if I can find it.
Now you can rebuild the old battery packs for your cordless grease guns.
It started when my locksmith buddy said he had been unsuccessful finding a replacement battery pack for his portable key programmer that could operate from an internal Lithium-ion battery pack when no AC plug in was available (which happened quite often). The replacement packs were terribly expensive when they were available but everywhere he checked now the response was NLA (No longer available).
When he mentioned it to me, I suggested we just build his own battery pack and maybe a spare at the same time. He never thought that was possible. Since the lithium-ion battery is very heat sensitive, connections should not be soldered together unless you’re extremely quick! Instead, to make the connections a mini spot welder is used.
A commercial duty spot welder runs a few hundred dollars. But a portable mini spot welder that requires you to provide your own power supply (think 12vdc car battery) can be had in the $25 range. That’s what I paid for mine, including delivery.
You do have to be careful when using it, as there is no “reverse polarity” protection and you can fry the control board if you’re not careful. You’d be out the $25 if you hooked it up wrong. Hence, my reminder label on its cover.
But for $25 this one has variable settings to adjust for higher/lower heat output when using different thicknesses or doubling of the nickel strips used to connect the battery terminals together.
When you touch the two probes to the terminal strip to be welded, the controller can deliver either 1, 2, or 3 very quick pulses of high current whose duration can also be shortened or lengthened for the different heat settings. The settings are selected with the push buttons seen on the control board. Its duty cycle isn’t rated for steady production, but for home use, this has been great! And it doesn’t matter if the batteries are lithium, Nicd, etc.
Nicd battery packs may be somewhat simple with just the batteries and possibly a thermal sensor to monitor the heat buildup when charging or using the battery pack.
The lithium battery packs, however, most likely have their own BMS (Battery Maintenance System) contained on a small circuit board which gets connected properly into the battery pack while being put together. You might even be able to reuse the original from the weak pack you are rebuilding.
You can also buy a proper BMS for the actual battery pack being built. You’ll need to know the packs voltage, current rating, the # of cells in series/parallel, etc. It sounds more complicated than it really is. Plus, there are many “how to” videos and instructions online for various configurations to guide you.
Some pre planning and thinking before you start putting the pack together is needed. And be careful to keep the connections isolated and insulated where necessary. Allow for the connection leads from each battery cell to the appropriate connection point on the BMS being used.
Selecting the proper BMS will protect your battery pack from being over charged or discharged below its safe cut off voltage level. It will also monitor each individual cell for voltage and if there’s a problem it will open up the battery’s output circuitry. A simple BMS for a cordless drill, etc. might run in the $10 range +/-. The BMS for this 4-cell, 14.4 vdc pack pictured was under $10 delivered. Larger and more complicated battery packs might require more complicated and expensive BMS modules.
Here’s a pic of the mini spot welder with its welding leads and my car battery power supply. I used the bad battery pack cells (red) for trial spot welding to set the right heat settings on the device before welding the connection tabs to the new (blue) batteries. Pulling on the connection points with a pair of pliars left the welds on the battery terminal after ripping through the nickel tabs. A good weld.


Make a drawing of how the pack you are rebuilding is laid out (copy the pack being replaced). Then once you have the heat setting selected, the order of connecting the batteries together properly, and the layout of the tabs for the wired connections to the BMS, it’s time to start spot welding those connections.
Here are some pics of the battery pack being made for the key programmer. And a pic of the purchased BMS and the spare battery pack being put together. The clear tape used is a high temperature tape made for this purpose and is readily available. The chart is a guide for choosing the proper size nickel strips for the connections based on the ampacity needed. The strips can also be doubled up(or more) for the ampacity required.


In one of the pics you can see where I purchase my Lithium-ion batteries from. They also have other types, different amp hour ratings, brands, sizes, accessories, etc. at a most reasonable price and very reasonable shipping charges.
For a cost example: If the locksmith could have found a ready to buy replacement battery, he said it was in the $100+ price range. The replacement battery packs we built had twice the amp hour capacity vs the original. Each pack had 4 batteries at a cost of $28 per pack. The BMS were about $8 each with delivery. Each pack with double the capacity totaled $36 to build after the purchase price of $25 for the spot welder and a roll of that tape.
Now we’re using the welder to rebuild both of our cordless drills, flashlights, impact drivers, etc. battery packs. I may even rebuild my very old Makita drill’s 7.2 volt battery pack……if I can find it.
Now you can rebuild the old battery packs for your cordless grease guns.

