B2601 DIY Forks

sthoms

New member

Equipment
B2601
Mar 26, 2020
14
2
3
Parkdale, OR
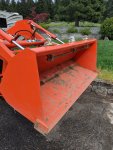
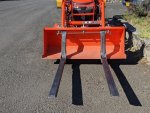
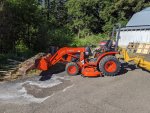
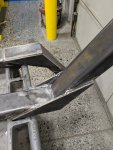
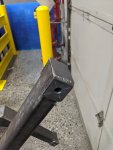
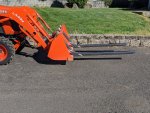
Taking a lot of cues from this website, I designed a fork system that augments my bolt-on hooks.

I already had the two outside set of hooks from Ken's when I decided to do this project. But for it, I had to add the middle set. The middle clevis needed to be modified to allow the 5/8" rod to clear. Makes for a great mock-up of a fork truck with an adjustable width by sliding.

The tractor maxes out well before the forks. Could only lift a pallet of retaining block about a foot above the tractors hood. I used 3/16" tube and 1/4" plate. If I re-did these, think I would use 1/8" tubing and plate instead.
 

Attachments

  • Like
Reactions: 1 user

Lil Foot

Well-known member
Lifetime Member

Equipment
1979 B7100DT Gear, Nissan Hanix N150-2 Excavator
May 19, 2011
7,515
2,545
113
Peoria, AZ
Nice fab, really nice welds.
 

802Driver

Active member

Equipment
LX2610SU 60" Bucket Land Pride54" Box Blade Farm King 4572 Rear Blade
May 18, 2020
125
91
28
Manitoba, Canada
Taking a lot of cues from this website, I designed a fork system that augments my bolt-on hooks.

I already had the two outside set of hooks from Ken's when I decided to do this project. But for it, I had to add the middle set. The middle clevis needed to be modified to allow the 5/8" rod to clear. Makes for a great mock-up of a fork truck with an adjustable width by sliding.

The tractor maxes out well before the forks. Could only lift a pallet of retaining block about a foot above the tractors hood. I used 3/16" tube and 1/4" plate. If I re-did these, think I would use 1/8" tubing and plate instead.
Now, that's smart, love how they aren't just mounted off the bottom of the bucket lip, I like how they are levered off the top, brilliant. (y) Nice job.
 

sthoms

New member

Equipment
B2601
Mar 26, 2020
14
2
3
Parkdale, OR
Now, that's smart, love how they aren't just mounted off the bottom of the bucket lip, I like how they are levered off the top, brilliant. (y) Nice job.
Yeah, the bucket lip ones looked enticing, easy and cheap. Hated the moment they would put in the bucket lip though. Ruin the flat line when plowing then. :)
 

sthoms

New member

Equipment
B2601
Mar 26, 2020
14
2
3
Parkdale, OR
None at all, but I'll go take a pic and confirm.

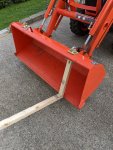
But not surprised, I designed it to help prevent that. The moment diagram puts a nearly straight load "into" the bucket lip. The top mounts take a nearly straight load "out" of the top bucket.
I added a picture to see it better. The fork is free to "slip" on the bucket lip, so cant even put a vertical load on it. :)
 

Attachments

Old_Paint

Well-known member
Lifetime Member

Equipment
LX2610SU, LA535 FEL w/54" bucket, LandPride BB1248, Woodland Mills WC-68
Dec 5, 2020
1,732
1,728
113
AL
Me LIKEY!!

Was gonna comment on the gorgeous welding too, but read through all the comments first. Pass the welding flowers on to your fabricator. Did you put anything under the edge of the bucket lip at all, or just let the back of the forks rest against the edge? I really like that attachment scheme. I may order some more of the d-ring clevis mounts and plagiarize your design. I'm assuming you used solid 5/8" round stock for your hinge.

Dunno if I want 'em that long, but it makes sense to be able to go completely under a 4' pallet. Maybe a shorter set for work like moving timbers and stuff that needs to be chained close to the bucket to stabilize it. I don't think you'll be disappointed that you used the heavier box-beam. 1/8" tube might buckle. 1/8" plate for the gussets probably would have been sufficient, though.

My only concern with that design is that if you have the forks moved toward the middle of the bucket (with no cutting edge installed) that it might push the middle of the bucket down and damage it. The middle seems to be the weak point on the stock buckets.
 

chim

Well-known member

Equipment
L4240HSTC with FEL, Ford 1210
Jan 19, 2013
2,111
1,225
113
Near Lancaster, PA, USA
.....................I'm assuming you used solid 5/8" round stock for your hinge...............................My only concern with that design is that if you have the forks moved toward the middle of the bucket (with no cutting edge installed) that it might push the middle of the bucket down and damage it. The middle seems to be the weak point on the stock buckets.
I wouldn't worry about the lower edge of the bucket. The forces required to lift the load are pulling out on the 5/8" rod and pushing back against the cutting edge.

If I had a concern it would be for the 5/8" rod, especially if the tops of the forks aren't close to the clevis mounts.
 

Old_Paint

Well-known member
Lifetime Member

Equipment
LX2610SU, LA535 FEL w/54" bucket, LandPride BB1248, Woodland Mills WC-68
Dec 5, 2020
1,732
1,728
113
AL
I wouldn't worry about the lower edge of the bucket. The forces required to lift the load are pulling out on the 5/8" rod and pushing back against the cutting edge.

If I had a concern it would be for the 5/8" rod, especially if the tops of the forks aren't close to the clevis mounts.
You have a point about loading on the rod, but one method to fix that is hardened steel rod, not mild steel. For most anything I'd be picking up around here, wider fork spacing is better, ergo, they'd pretty much always be at the outer edges. Then it's just the shear strength of the rod to worry about.

How far below the edge of the bucket do they go? I was just thinking out loud about some sort of notch or cleat that the edge of the bucket goes into, sort of like the cleats on a Piranha bar which align the bar to the bucket. That might also distribute a little more of the force on the 5/8" rod. One method to solve that would be a 11/16" ID sleeve through the top of the bar, rather than just drilled holes. Something that won't wobble, but has enough clearance that a little sand/dirt won't make it seize on the rod. A sleeve would spread the force and better avoid bending the rod.

I still like the design, though, and the fact that it uses some commercially available hardware like the bolt-on d-rings, and avoids the soft spots of the bucket. Not only that, but the mounts can still be used for clevis inside the bucket, or the grab hooks on the top. Very nice utilization of the mod. Maybe copy the design to 1" x 1" box beam and make a bunch of 'em with a spacer to make a brush fork. Better hurry up and copyright the design. :D
 

sthoms

New member

Equipment
B2601
Mar 26, 2020
14
2
3
Parkdale, OR
I wouldn't worry about the lower edge of the bucket. The forces required to lift the load are pulling out on the 5/8" rod and pushing back against the cutting edge.

If I had a concern it would be for the 5/8" rod, especially if the tops of the forks aren't close to the clevis mounts.
I did bend the 5/8" rod once when I flipped the bucket up while raised. The forks went over the top and bent it. Operator error? ;-(
 

sthoms

New member

Equipment
B2601
Mar 26, 2020
14
2
3
Parkdale, OR
I'll let them know next time I see them. :)

Nothing added onto the bucket other than the Bolt-On clevis/hook mounts. I am kind of OCD in the modification area. Limit myself of non-reversible mods. (drilling, welding,...) Love using factory mounts whenever possible. Yes, that was standard 5/8" rod. I have full prints if needed.

Yeah, the gussets could definitely go to 1/8" and I agree, I'd shorten the forks also. They were built to hold a full 48" pallet, but think you could shave 2-4" easy and not loose any ability.

I was worried about that also, but the angle they hit at will give only a small percentage down force. Guaranteed to be WAY less than ones clamped on there though, so I made peace with it.


Me LIKEY!!

Was gonna comment on the gorgeous welding too, but read through all the comments first. Pass the welding flowers on to your fabricator. Did you put anything under the edge of the bucket lip at all, or just let the back of the forks rest against the edge? I really like that attachment scheme. I may order some more of the d-ring clevis mounts and plagiarize your design. I'm assuming you used solid 5/8" round stock for your hinge.

Dunno if I want 'em that long, but it makes sense to be able to go completely under a 4' pallet. Maybe a shorter set for work like moving timbers and stuff that needs to be chained close to the bucket to stabilize it. I don't think you'll be disappointed that you used the heavier box-beam. 1/8" tube might buckle. 1/8" plate for the gussets probably would have been sufficient, though.

My only concern with that design is that if you have the forks moved toward the middle of the bucket (with no cutting edge installed) that it might push the middle of the bucket down and damage it. The middle seems to be the weak point on the stock buckets.
 

sthoms

New member

Equipment
B2601
Mar 26, 2020
14
2
3
Parkdale, OR
Yeah, had the 5/8" rod handy and free. :) But since 98% of the time they are on the outside, I went with it.

The forks go ~1-2" below the bucket. Designed on purpose to drag on the ground to get a pallet without dragging the bucket. I did think about welding an angle iron, with the vee facing the bucket" on the part that touches the bucket lip, but decided against it. That would only enhance a bending moment on the lip.

Since I bent my 5/8" bar, although due to operator, I was thinking 11/16" also. Have to see if it will work though. You need some sloop to get the bar into the clevis holes. I get one side of the rod into the left side clevis, at a slight angle. Then I pull the rod forward to sit in the middle clevis. Once there, the bar just slides sideways through the right side clevis.

Drawings attached. Just giving back to this forum. :)


You have a point about loading on the rod, but one method to fix that is hardened steel rod, not mild steel. For most anything I'd be picking up around here, wider fork spacing is better, ergo, they'd pretty much always be at the outer edges. Then it's just the shear strength of the rod to worry about.

How far below the edge of the bucket do they go? I was just thinking out loud about some sort of notch or cleat that the edge of the bucket goes into, sort of like the cleats on a Piranha bar which align the bar to the bucket. That might also distribute a little more of the force on the 5/8" rod. One method to solve that would be a 11/16" ID sleeve through the top of the bar, rather than just drilled holes. Something that won't wobble, but has enough clearance that a little sand/dirt won't make it seize on the rod. A sleeve would spread the force and better avoid bending the rod.

I still like the design, though, and the fact that it uses some commercially available hardware like the bolt-on d-rings, and avoids the soft spots of the bucket. Not only that, but the mounts can still be used for clevis inside the bucket, or the grab hooks on the top. Very nice utilization of the mod. Maybe copy the design to 1" x 1" box beam and make a bunch of 'em with a spacer to make a brush fork. Better hurry up and copyright the design. :D
 

Attachments

JimmyJazz

Well-known member

Equipment
B2601
Aug 8, 2020
1,219
738
113
Pittsburgh, Pa
The unasked question is how much weight will you will be lifting? It seems to me that if enough weight was applied the bucket would open like a mouth. I am no engineer but you see bent buckets frequently. The failure point would be the forks failing to hold the bottom edge of the bucket. Cant really see all the details . Occasionally on old farm tractor buckets you will see a metal support welded from the top to the bottom of the bucket right down the center for extra strength. Adding the extra support would be easy and might provide some measure of safety. Looks great. Have fun be careful.
 

Old_Paint

Well-known member
Lifetime Member

Equipment
LX2610SU, LA535 FEL w/54" bucket, LandPride BB1248, Woodland Mills WC-68
Dec 5, 2020
1,732
1,728
113
AL
The unasked question is how much weight will you will be lifting? It seems to me that if enough weight was applied the bucket would open like a mouth. I am no engineer but you see bent buckets frequently. The failure point would be the forks failing to hold the bottom edge of the bucket. Cant really see all the details . Occasionally on old farm tractor buckets you will see a metal support welded from the top to the bottom of the bucket right down the center for extra strength. Adding the extra support would be easy and might provide some measure of safety. Looks great. Have fun be careful.
That is exactly what I was talking about. I just didn't want to come across as a know-it-all, nor a critic. I like the ingenuity and the design, and CERTAINLY, the cost effectiveness. If there was some sort of groove or hook on the heels of the fork that captured and used the rigidity of the lip on the bucket edge, like the ones on a Piranha bar, for example, that would effectively connect the top of the bucket to the bottom like the brace you describe, and you could probably lift the front of the tractor with the forks then. It would greatly reduce the stress on the hinge rod, and make them a little more stable when closer together.

Having worked for a swimming pool construction company to get through college, I've seen many backhoes with the bucket brace you mentioned. I've done my time in hard labor for whatever crime I may ever commit. It's exactly that experience that makes me always look for "a better way". Stay tuned, 'cause I may plagiarize his design a little and build me a brush fork. I can us that a lot more than I can use pallet forks.
 

JimmyJazz

Well-known member

Equipment
B2601
Aug 8, 2020
1,219
738
113
Pittsburgh, Pa
That is exactly what I was talking about. I just didn't want to come across as a know-it-all, nor a critic. I like the ingenuity and the design, and CERTAINLY, the cost effectiveness. If there was some sort of groove or hook on the heels of the fork that captured and used the rigidity of the lip on the bucket edge, like the ones on a Piranha bar, for example, that would effectively connect the top of the bucket to the bottom like the brace you describe, and you could probably lift the front of the tractor with the forks then. It would greatly reduce the stress on the hinge rod, and make them a little more stable when closer together.

Having worked for a swimming pool construction company to get through college, I've seen many backhoes with the bucket brace you mentioned. I've done my time in hard labor for whatever crime I may ever commit. It's exactly that experience that makes me always look for "a better way". Stay tuned, 'cause I may plagiarize his design a little and build me a brush fork. I can us that a lot more than I can use pallet forks.
Its funny you would mention the brush fork. I called Everything Attachments this afternoon and wanted to know why they didn't offer a quick attach brush fork suitable for a compact tractor. I was told Ted would be back tomorrow. There may be some advantages over the bucket attached type in my opinion . Better visibility of the load being one. Another is the weight of a log for example would be transferred back adding stability and adding lifting capacity. Cheaper than a grapple. No 3rd function required. It should have a large guard similar to those seen on most forklifts. Medium/Light duty. Maybe weigh around 200lbs? , 2 ft tines? , $350? Tell Ted!
 
Last edited:

JimmyJazz

Well-known member

Equipment
B2601
Aug 8, 2020
1,219
738
113
Pittsburgh, Pa
That is exactly what I was talking about. I just didn't want to come across as a know-it-all, nor a critic. I like the ingenuity and the design, and CERTAINLY, the cost effectiveness. If there was some sort of groove or hook on the heels of the fork that captured and used the rigidity of the lip on the bucket edge, like the ones on a Piranha bar, for example, that would effectively connect the top of the bucket to the bottom like the brace you describe, and you could probably lift the front of the tractor with the forks then. It would greatly reduce the stress on the hinge rod, and make them a little more stable when closer together.

Having worked for a swimming pool construction company to get through college, I've seen many backhoes with the bucket brace you mentioned. I've done my time in hard labor for whatever crime I may ever commit. It's exactly that experience that makes me always look for "a better way". Stay tuned, 'cause I may plagiarize his design a little and build me a brush fork. I can us that a lot more than I can use pallet forks.
Usually that type of design found on larger equipment allows for the forks to flip out of the way when not in use. Those may but they appear kinda long. A nice job nonetheless.
 

Old_Paint

Well-known member
Lifetime Member

Equipment
LX2610SU, LA535 FEL w/54" bucket, LandPride BB1248, Woodland Mills WC-68
Dec 5, 2020
1,732
1,728
113
AL
Usually that type of design found on larger equipment allows for the forks to flip out of the way when not in use. Those may but they appear kinda long. A nice job nonetheless.
Yeah, he built them much like what you see on commercial/industrial telehandlers. The purpose there is not so much to get them out of the way as it is make them quicker and easier to adjust than a forklift without finite settings and also prevent breaking the curling cylinders if it's tilted too far forward. The farther forward the head is tilted, the more the curling/tilt cylinders are extended, and the weaker they are. So, anything that can't pivot at the top of the bucket is going to put a lot more force on the curling cylinders, and put them at risk. He done good making sure they can't create a risk to his bucket cylinders.
 

sthoms

New member

Equipment
B2601
Mar 26, 2020
14
2
3
Parkdale, OR
Some questions I am seeing through the thread...

Weight Capacity: I had 16 blocks about 50# each equally spread on a 48x48" skid. It could lift it, but would stall, although at a high enough position to get them onto a truck bed. I still think the 3/16" wall tubing is overkill, unless you plan on lifting 400# out on the tips.

Bucket Lip Concerns: Doing a moment/shear diagram, with the you will see that there is limited downward force on the lip, it is mostly directed inwards. I purposely did not add a catch on the back of the forks to "hold" the lip. Otherwise you would be putting a lot more force on the lip. Ideally, those upward legs of the forks would be 90deg. to the edge of the bucket and then would put absolutely zero down on the lip. I went with the 55deg. angle for design/material simplification. You could add an "L" end up on the top of the forks to do that though I guess. But based on an observed 900# max lift, hydraulic limitation, I estimate 258# max. per fork (900*COS(55)/2) on the lip at each position. I can easily stand on the lip without worry, and I weigh more than that. :)

Inspiration: Yes, these were designed to mimic a fork truck with horizontally movable forks positioners. Thought it would make the forks much more usable long term. (think brush forks are mentioned) I also liked the free pivoting to allow easy entrance into pallets, never thought of the curing cylinder safety. I also wanted a system that minimized modifications to the bucket. Since I already had Ken's hooks on the outsides, before I even dreamed of having forks, only having to add a center hook seemed ideal.
 
  • Like
Reactions: 1 user

sthoms

New member

Equipment
B2601
Mar 26, 2020
14
2
3
Parkdale, OR
To keep everyone up-to-date...
I just tried a piece of 11/16" rod, wont fit, at least without drilling the clevis hook holes. Which I am not a fan of. So I am sourcing a piece of 5/8" oil-hardened tool steel.