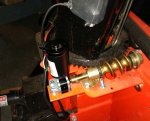
12 vdc gearmotor for a snowblower chute rotater
- Thread starter flyidaho
- Start date
And....done! NO out of pocket cost, short of buying another socket for the one I welded onto the shaft, just so I could end up with the common 1/2" sq. tool hole so I could quickly attach my impact driver with it's 1/2" driver end. The Kubota Orange TITAN STRAP (I reported on these a couple years ago here, super handy, forget bungees these are way better https://titanstraps.com/shop-straps/) was a nice touch I thought, wouldn't want a color clash..... Hopefully, the driver will stay in position, it doesn't seem to want to go anywhere even without the Titan strap. Of course, if it does, I will no doubt only realize it when I see DeWalt Yellow pieces flying out of the chute.
One thing, I can't reach it (the impact driver trigger) from the driver seat....., but since my rotational needs are so modest, I can live with getting out of the tractor (no cab, I'm already out) when needed. But, since I left the shop, I realized that the blower was in the full down position, and it's quite possible that with the three point arms UP all the way, I'll be able to reach it, that would be an unexpected bonus, and just goes to show how not over thinking something sometimes leads to a happy ending. Stupid luck I call it.
As for the power of the impact driver: judging by how much muscle power it takes to equal the torque it provides on my trailer lug nuts, as compared to how much muscle power it took to hand rotate my original hand crank rotater, I have at least double the torque now. The speed is FAST, didn't time it, but 10 or 15 seconds. First real world test tomorrow, judging from the wind I can hear outside.
Attachments
-
100.2 KB Views: 448
I new Dewalt tools were good for something! Do you keep your rig parked outdoors and away from things in case it catches fire?And....done! NO out of pocket cost, short of buying another socket for the
shelkol
Active member
Lifetime Member
Equipment
bx-2200, Woods BH6000 backhoe, Tach-N-Go quick attach bucket, snow blower
You now need a 1/2" u-joint and long extension  I realize that will ore than double your out of pocket cost!
Nice idea though! I'm rethinking mine now
Nice idea though! I'm rethinking mine now
I take the driver out to my pole barn where the tractor lives, and take it back in the shop when done, no more of a hassle then pre heating or putting on my snowmobile suit (no cab, don't want one either) before blowing. DeWalt tools are very popular among the construction crews I work with in my crane business. I have 2 others besides the impact driver, and find their bang for my tool buck excellent. AND, I was a long time Milwaukee tool guy before. Sounds like you had a bad experience, or maybe heard of one. I also have three ebikes, and a pluginPrius, so batteries, good batteries with a quality battery management system/BMS don't concern me much, though I do respect the power they contain!I new Dewalt tools were good for something! Do you keep your rig parked outdoors and away from things in case it catches fire?
shelkol: By cutting down part of my blower's 3 point hitch, the upper hole I don't use anyway, I was able to achieve a straight on connection to the auger shaft. BUT, I didn't weld it on perfectly in line, so it does have just a bit of a wobble, and yeah a u joint will be the quick and easy way to fix that. Along with a 6 or 8" extension (my expenses are going thru the roof), only needed so can get far enough away from the chute's movement, and then I'll also have enough room to fab up a holster/toolrest, for the impact driver, something more secure and quicker to install each time (like with a velcro strap, screwed to the holder so it can't get lost) then the way I pictured it earlier, which actually works OK. This will also serve to give equal access the trigger that reverse direction, and also make it easy to reach even down a ways. The speed of this thing, if you give full throttle on the trigger, is almost too fast, a slight feathering is all that's needed, slow it isn't!
DeWalt isn't bad but the batteries are stupid priced. Far as catching fire, never had that happen but I have 'found the smoke' in 3 of them so far and the smoke smells like rice paper.
I buy HF Bauer 20 volt Li Ion now. Bit easier to 'find the smoke' in them but the asking price is also much better, like 1/3 of the DeWalt, batteries too.
They too stink like rice paper.
if I was flush and not frugal, I'd buy Bosch or Metabo but I'm not independently wealthy.
Think I would still have used a linear actuator. Fully self contained, totally weatherproof and low amp draw.
I found that with the addition of a 3" extension and a universal joint, the driver is positioned perfectly between the blower flange for the three point pin. With one side cut down anyway, which I did to make the shaft connection about perfect. Then all it took was a scrap length of bungee cord, which I had in the shop's misc. bungee bin, with one end bolted to the blower, and the hook end, once the driver is set in place, hooked onto a flange on the blower. I timed how long it takes me to "install" the driver, 2 seconds, about the same to pull it when parking the tractor. I also timed the rotation speed of the chute: 180 degrees in 3 seconds! Fast enough, ha ha, and in actual use I feather the trigger to go slower. The last thing was to raise the blower into it's transport position to make sure nothing got crunched.
I'm calling this project complete, BETA testing is over. Zero out of pocket expense, as i won't replace my tool kit with another 1/2" drive x 3/8" socket (which I used to weld onto the shaft) as if I am messing with something that small I use my 3/8 or 1/4" sockets/ratchets. The 3" extension and u joint are not married to the tractor, but as quickly removable as the drive, cool. The weather cooperated nicely during this test phase, several days in a row of high winds and lots of snow every day, nothing like real world, out ofr my genuine original equipment 100% plastic kubota tool box just fine.that is this pic the shop, testing.
I'm calling this project complete, BETA testing is over. Zero out of pocket expense, as i won't replace my tool kit with another 1/2" drive x 3/8" socket (which I used to weld onto the shaft) as if I am messing with something that small I use my 3/8 or 1/4" sockets/ratchets. The 3" extension and u joint are not married to the tractor, but as quickly removable as the drive, cool. The weather cooperated nicely during this test phase, several days in a row of high winds and lots of snow every day, nothing like real world, out ofr my genuine original equipment 100% plastic kubota tool box just fine.that is this pic the shop, testing.
Attachments
-
98.5 KB Views: 332
Last edited:


