MID PTO Replacement B2650

NEPA Guy

Member
Lifetime Member

Equipment
B2650HSDC, Spacers, FEL, BH, Snowblower, Snowplow, PBar, Forks
Nov 28, 2015
424
4
18
Pennsyltucky
This is a continuation of my previous thread. http://www.orangetractortalks.com/forums/showthread.php?t=26068&page=2

2 weeks out and I have nothing accomplished from the company I was dealing with. Poor service. Maybe that's the norm in this area. I'm starting to wonder if there's something in the water. :p

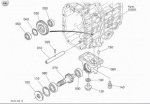
Nonetheless, I think it's time to put on my big boy pants, and see if I can perform this mid pto pan replacement myself. I can see on the messicks website the diagram and various parts.

http://www.messicks.com/ku/90285?sectionId=229525&diagramId=457430

Four bolts to drop and replace the pan. Do I need to replace anything else? I can see a seal, clip, spindle bearing, brg ball radial, bolts, pin. 100, 110, 80, 90, 140, 150

I also don't see a gasket in the diagram. I assume a sealant of sorts.

Is it important to torque it at recommended specs?

I've never replaced "linkage" before. Any special tools I need or procedures I should follow?

Is it going to fall to pieces when I drop the pan or can I be gentle enough with it to just put it right back in as is?

Any advice or comments would be appreciated. Thanks!
 

Attachments

Last edited:

North Idaho Wolfman

Moderator
Staff member
Lifetime Member

Equipment
L3450DT-GST, Woods FEL, B7100 HSD, FEL, 60" SB, 743 Bobcat with V2203, and more
Jun 9, 2013
30,552
6,599
113
Sandpoint, ID
That is about a 5 min operation.

Get a new seal as you'll most likely destroy the old seal getting it apart.
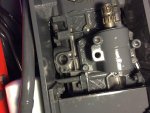
All the parts are attached via the one snap ring, unbolt the 4 bolts, drop the gear case (it's not a pan), pull the seal, pull the snap ring, pull shaft and front bearing, pull rear bearing, pull alignment pin and install it and all other parts in new case, clean the bottom of the transmission gasket surface, put some RTV or better yet anaerobic sealer on the gear case and reinstall it, tighten normally, fill with fluid and get back to work.
 
Last edited:

NEPA Guy

Member
Lifetime Member

Equipment
B2650HSDC, Spacers, FEL, BH, Snowblower, Snowplow, PBar, Forks
Nov 28, 2015
424
4
18
Pennsyltucky
That about a 5 min operation.

Get a new seal as you'll most likely destroy the old seal getting it apart.
All the parts are attached via the one snap ring, unbolt the 4 bolts, drop the gear case (it's not a pan), pull the seal, pull the snap ring, pull shaft and front bearing, pull rear bearing, pull alignment pin and install it and all other parts in new case, clean the bottom of the transmission gasket surface, put some RTV or better yet anaerobic sealer on the gear case and reinstall it, tighten normally, fill with fluid and get back to work.
Thanks for the quick reply!

What tool if any is used to pull the items out? Just use my hands?

When I put it all back together in the new gear case, I'll assume the gears will have to mesh nicely with the others on top (labeled No. 30) Anything I have to do to make sure it fits properly?

That simple? Just put it back?

This for my sealant? Comes up as anerobic.

http://www.messicks.com/part/zpx51550/adhesive
 
Last edited:

1970cs

New member
Apr 26, 2016
1,124
3
0
Grand Ledge
The obvious, drain oil, drop the box down. It looks like a couple of flat screw drivers will work for popping that seal out. Now you have to match a piece of pipe or PVC pipe long enough to clear the end of the shaft. Try to match the out side diameter or slightly inside. And maybe to protect the new seal when going over the shaft like and old peal off protector like from a screen saver from a cell phone or an old microfische card.

The gasket eliminator is the perfect stuff for what you are doing! Just make sure both box and the transmission are clean and oil free. Gear should line up and fall into place.

Pat
 

NEPA Guy

Member
Lifetime Member

Equipment
B2650HSDC, Spacers, FEL, BH, Snowblower, Snowplow, PBar, Forks
Nov 28, 2015
424
4
18
Pennsyltucky
You guys make it sound so easy.

I've searched the internet high and low for some reference materials on the subject. Nothing specific enough.

I see guys will use seal pullers and seal drivers for the oil seal. I did find a reference where one guy used a piece of pvc pipe to tap in the seal.

Some guys use grease on the seal prior to putting it back in, one guy used a small bit of red loctite.

Some people use "contact cleaner" for the surfaces before reinsertion and say nothing but!

Some guys had problems because the seal wasn't set right and it leaked and they had to redo the job.

Also a few references where they said it was so easy but no pictures, no videos.

Is it possible to set the seal off just a bit and have it cause a problem? How can I know if the seal placement is correct?

What if the gears don't line up?

Thanks for the advice.
 

CountryBumkin

New member
Lifetime Member

Equipment
BX2370 w/LA243, Bucket, Grapple, QA Pallet Forks, 60" MMM, rear blade & rake
Sep 27, 2015
568
4
0
Central FL
You guys make it sound so easy.

I've searched the internet high and low for some reference materials on the subject. Nothing specific enough.

I see guys will use seal pullers and seal drivers for the oil seal. I did find a reference where one guy used a piece of pvc pipe to tap in the seal.

Some guys use grease on the seal prior to putting it back in, one guy used a small bit of red loctite.

Some people use "contact cleaner" for the surfaces before reinsertion and say nothing but!

Some guys had problems because the seal wasn't set right and it leaked and they had to redo the job.

Also a few references where they said it was so easy but no pictures, no videos.

Is it possible to set the seal off just a bit and have it cause a problem? How can I know if the seal placement is correct?

What if the gears don't line up?

Thanks for the advice.
Knowing these things is the difference between being a professional mechanic and a DIYer. After you do it yourself, you will learn a little more and be a step closer to becoming a pro. :cool:
 

NEPA Guy

Member
Lifetime Member

Equipment
B2650HSDC, Spacers, FEL, BH, Snowblower, Snowplow, PBar, Forks
Nov 28, 2015
424
4
18
Pennsyltucky
True. I'll have a go at it, and be the wiser.

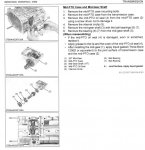
I got my hands on the WSM. I've attached the page in question for reference.

The only extra piece of info I've found is where it says to grease the seal and lip.

It however does not go into the details which are a given for the pros. Like "remove the bearing from the mid gear shaft." I read online that some people use bearing pullers. Maybe that's a given in this situation? I don't know.

It would be helpful to have explanations of that assumed knowledge for someone like myself.

I'm understandably apprehensive. I say well, what If I screw up the transmission? They'll have to remove the cab and split the tractor! Risky going in with one eye closed.

Any advice or comments are always appreciated.

Thanks again for your time
 

Attachments

CountryBumkin

New member
Lifetime Member

Equipment
BX2370 w/LA243, Bucket, Grapple, QA Pallet Forks, 60" MMM, rear blade & rake
Sep 27, 2015
568
4
0
Central FL
I haven't taken one of these apart, but since it is using ball bearings (not tapered bearings) and there is a C-clip holding the front bearing in, I would expect that the bearings are just a slip fit on the shaft (not pressed on).

A lot of times a big old socket will make a nice seal installer.

One thing not mentioned (so maybe it's not an issue) is to be sure there is some clearance between the two gear's teeth when it is assembled. You would expect that there would be some backlash needed (easy to check by rotating shaft back and forth to feel for that clearance). This job looks similar to installing a PTO on a truck transmission - but there you would use shims between case and PTO housing to set the gear's backlash.
 

D2Cat

Well-known member
Lifetime Member

Equipment
L305DT, B7100HST, TG1860, TG1860D, L4240
Mar 27, 2014
13,884
5,687
113
40 miles south of Kansas City
That apprehension is good! It keeps you focused and cautious.

Kinda like installing Thunderbird. Thanks, by the way.

The directions, "remove the bearing from the mid gear shaft." seem overly simplistic, but just take it one step at a time. Go through the steps they list in you picture and as you do, it will become clearer. I have not done what you are going to do, but that item #5 (circlip) comes out and it's probably holding the bearing and the shaft in place.

Here's a long winded video that show a few things you might find interesting about installing the new seal. You can find all kinds of videos for any part of the process you have wonderments about! https://www.youtube.com/watch?v=h6IX3ocOpDk

Don't be concerned about saving the seal, just replace it.

You may find the work easier with a couple of special tools, like a seal remover, and a set of snap ring pliers.

https://www.amazon.com/s/?ie=UTF8&k...qmt=e&hvbmt=bp&hvdev=c&ref=pd_sl_2efbnzuelg_p

https://www.amazon.com/Lisle-56750-...=1471019758&sr=8-2&keywords=seal+removal+tool

You can buy cheapos at Harbor Freight and they'll do all you need for probably years to come. But as you collect a few of these weird tools you be more comfortable doing other jobs in the future.

Take picture before and during disassembly so you have a reference if you question something.

If you get stumped with a process, take a picture or two, and post them. You'll get an answer much faster then that dealer is getting there!!!!

The real benefit of all this is how you feel afterwards....kinda like that Rocky movie.
 

NEPA Guy

Member
Lifetime Member

Equipment
B2650HSDC, Spacers, FEL, BH, Snowblower, Snowplow, PBar, Forks
Nov 28, 2015
424
4
18
Pennsyltucky
Anything I can do to help. It comes easy for me. :D

I actually found the video you shared last night as I was doing my youtube search on mid pto shafts and oil seals. Its very insightful.

Ill order the tools you recommend, and maybe even a seal driver kit while I'm at it. I'm sure they will come in handy down the line and make the current job easier. Especially the snap ring pliers, I've never had to use one before.

As soon as I get everything settled at my new home, I'm debating finding a school to take a course on diesel engines to help me along.

Thanks for the advice!!!
 

Daren Todd

Well-known member
Lifetime Member

Equipment
Massey Ferguson 1825E, Kubota Z121S, Box blade, Rotary Cutter
May 18, 2014
10,200
6,712
113
Vilonia, Arkansas
Just a couple FYI :D I've seen several videos online where the "pro" doing the video shows the incorrect way to install a lip seal. :rolleyes: If there is an oil cavity, make sure the spring goes towards the oil ;) or if there is a cavity it sleeves into, pay attention to the depth to the lip compared to your seal. There was a post on here recently where another member paid the dealer to fix there tractor, and the dealer put the seal in upside down and it caused an issue with the pieces not seating together correctly.

A seal driver set is handy, but there is a but....:p They only work on a flat surface. If you have to install a seal with a shaft inplace, then you need something such as pvc pipe, metal pipe, ect that will fit the diameter of the shaft and the outsides of the pipe press against the outside edges of the seal. If dent in the middle of the seal, it will change the inner diameter, and it won't seal correctly. Then you have to start over with a new seal ;) Make sure and grease the inner rubber lip of the seal. You can't use too much grease :D Some folks use oil, but what I've found is with friction, the oil causes the seal to break down faster due to heat build up. With the grease, the rubber stays way cooler and lasts longer ;)
 

North Idaho Wolfman

Moderator
Staff member
Lifetime Member

Equipment
L3450DT-GST, Woods FEL, B7100 HSD, FEL, 60" SB, 743 Bobcat with V2203, and more
Jun 9, 2013
30,552
6,599
113
Sandpoint, ID
WOW, DRAMA DRAMA DRAMA!!!! :eek: :p :rolleyes:
Your are taking a simple job of a component replacement and making it into the "I've got to rebuild my transmission" problem, it not that complected or involved!

There is no special tools required, yea a snap ring pliers and that's it, there is no parts falling out, no alignment issues, no tolerance issues, no timing issues, no seal install issues, nothing, nadda, zilch.

In the time you have put into research and formulating the problem, you could have done the repair a thousand times and not even broken a sweat.

So put on your big boy pants, get off the bench, and just go do it! ;)

In the time it took me to write this and you to read this, you could have already had it done! :D
 
Last edited:

NEPA Guy

Member
Lifetime Member

Equipment
B2650HSDC, Spacers, FEL, BH, Snowblower, Snowplow, PBar, Forks
Nov 28, 2015
424
4
18
Pennsyltucky
WOW, DRAMA DRAMA DRAMA!!!!
Your are taking a simple job of a component replacement and making it into the "I've got to rebuild my transmission" problem, it not that complected or involved!

There is no special tools required, yea a snap ring pliers and that's it, there is no parts falling out, no alignment issues, no tolerance issues, no timing issues, no seal install issues, nothing, nadda, zilch.

In the time you have put into research and formulating the problem, you could have done the repair a thousand times and not even broken a sweat.

So put on your BIG BOY PANTS and just go do it! ;)
LOL! I'll do it! I'll do it!

Ya know I'm gonna have to use this as my theme music in the garage lmao!...:p

https://www.youtube.com/watch?v=TnqZl_blT7E
 

whitetiger

Moderator
Staff member

Equipment
Kubota tech..BX2370, RCK60, B7100HST, RTV900 w plow, Ford 1100 FWA
Nov 20, 2011
2,942
1,399
113
Kansas City, KS
Just a couple FYI :D I've seen several videos online where the "pro" doing the video shows the incorrect way to install a lip seal. :rolleyes: If there is an oil cavity, make sure the spring goes towards the oil ;) or if there is a cavity it sleeves into, pay attention to the depth to the lip compared to your seal. There was a post on here recently where another member paid the dealer to fix there tractor, and the dealer put the seal in upside down and it caused an issue with the pieces not seating together correctly.

A seal driver set is handy, but there is a but....:p They only work on a flat surface. If you have to install a seal with a shaft inplace, then you need something such as pvc pipe, metal pipe, ect that will fit the diameter of the shaft and the outsides of the pipe press against the outside edges of the seal. If dent in the middle of the seal, it will change the inner diameter, and it won't seal correctly. Then you have to start over with a new seal ;) Make sure and grease the inner rubber lip of the seal. You can't use too much grease :D Some folks use oil, but what I've found is with friction, the oil causes the seal to break down faster due to heat build up. With the grease, the rubber stays way cooler and lasts longer ;)
In a lot of the Kubota L & M series tractors the rear axle seal is installed with the spring away from the oil. Over my 35 years as a Tech on tractors-farm implements, I have ran into many oil seals that the correct installation is with the spring away from the oil. Never assume, always check.
 

Daren Todd

Well-known member
Lifetime Member

Equipment
Massey Ferguson 1825E, Kubota Z121S, Box blade, Rotary Cutter
May 18, 2014
10,200
6,712
113
Vilonia, Arkansas
In a lot of the Kubota L & M series tractors the rear axle seal is installed with the spring away from the oil. Over my 35 years as a Tech on tractors-farm implements, I have ran into many oil seals that the correct installation is with the spring away from the oil. Never assume, always check.


I agree with you ;) always double check.
But...... What happens if the manual is wrong????? :p

The reason I bring that up. My employer brought in a factory service rep to run s class for our techs on a certain brand of pump.

Created more issues and aggravated a problem. See some genius at the factory decided they needed to switch from grease to oil in a cavity. So the equipment comes from the factory with a $150 glorified grease seal instead of putting a $10 lip seal on each end of the bearing cavity.

In the class, the service rep created more issues by teaching the techs how to install the seals backwards. So every bloody cavity that has oil in it, leaks!!!!!!

I'm on my six location, going in and retraining our techs ;)


Sent from my iPhone using Tapatalk
 

NEPA Guy

Member
Lifetime Member

Equipment
B2650HSDC, Spacers, FEL, BH, Snowblower, Snowplow, PBar, Forks
Nov 28, 2015
424
4
18
Pennsyltucky
And I beheld when he had opened the sixth seal,
and, lo, there was a great earthquake;
and the sun became black as sackcloth of hair,
and the moon became as blood;
Revelation 6:12


Well, as we learn from Revelations, an open seal is a real problem. :D
 

North Idaho Wolfman

Moderator
Staff member
Lifetime Member

Equipment
L3450DT-GST, Woods FEL, B7100 HSD, FEL, 60" SB, 743 Bobcat with V2203, and more
Jun 9, 2013
30,552
6,599
113
Sandpoint, ID
If you can install that seal in backwards, I want to come meet you, either to learn your Houdini tricks or to have you committed to the loony bin!

It's a flat face lip seal, only can go one way!
 

Attachments

NEPA Guy

Member
Lifetime Member

Equipment
B2650HSDC, Spacers, FEL, BH, Snowblower, Snowplow, PBar, Forks
Nov 28, 2015
424
4
18
Pennsyltucky
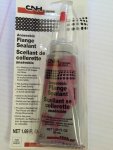
I received my parts in the mail today. I thought had ordered the loctite 515 anaerobic sealant . I received CNH Anaerobic Flange Sealant. I'll assume it doesn't matter. Same part number. See attached photo.

The sealant itself is mixed red and grey where on the case and new holland site its all grey? Seems odd no? http://partstore.agriculture.newholland.com/us/adhesive-p745114.html

When I look up the CNH name all I can find for the material is reference to a pdf where it lists the products.http://servicemotor.com/catalogs/PM-8560.pdf

I do see a "high temperature anaerobic flange sealant rated at 400 degrees vs 300 degrees with the stuff I have now. Is one better than the other?

What would be recommended for cleaning the surface where I'll be replacing? I saw where one guy just used contact cleaner or does the activator act as a cleaner as well?

How long should I wait to refill the SUDT? It doesn't mention total cure time.

I'll jump on the repair Sunday or Monday and post photos. Thanks!
 

Attachments

1970cs

New member
Apr 26, 2016
1,124
3
0
Grand Ledge
I received my parts in the mail today. I thought had ordered the loctite 515 anaerobic sealant . I received CNH Anaerobic Flange Sealant. I'll assume it doesn't matter. Same part number. See attached photo.

The sealant itself is mixed red and grey where on the case and new holland site its all grey? Seems odd no? http://partstore.agriculture.newholland.com/us/adhesive-p745114.html

When I look up the CNH name all I can find for the material is reference to a pdf where it lists the products.http://servicemotor.com/catalogs/PM-8560.pdf

I do see a "high temperature anaerobic flange sealant rated at 400 degrees vs 300 degrees with the stuff I have now. Is one better than the other?

What would be recommended for cleaning the surface where I'll be replacing? I saw where one guy just used contact cleaner or does the activator act as a cleaner as well?

How long should I wait to refill the SUDT? It doesn't mention total cure time.

I'll jump on the repair Sunday or Monday and post photos. Thanks!
Gasket eliminator can be red or purple color and what you have. I have used both in many applications, coolant, engine oil and hydraulic.

Clean and cure is the recommended product for cleaning the oil off the flange area. We have used ether, carb and brake clean. Just make sure the surface has been scraped to bare metal and where you are at the residual oil can continue to bled onto that surface.

As far set up time as soon as you take away the air, you should be able within minutes, you can ad your fluid. You could torque up the hardware and maybe take a break for a beverage of your choice and then dump the SUDT back in.

Pat