Fixing hole in side of block

joesmith123

Active member

Equipment
L295DT, BX1500
Mar 18, 2023
351
31
28
earth
The valves in the head are super easy, push the spring down with the valve held up and remove the two keepers, then the valve will come out.
yes, I watched a video last night, the guy had a huge clamp going around the block, pushed onto the spring, took out the keepers with needle nose

I dont have a clamp big enough to wrap around the head


Screen Shot 2024-06-02 at 10.22.04 AM.png


I want to do exactly what this guy does in this video, what is called "valve job"

Polish the valves, especially where they sit, and polish the head to make sure they sit tight in their seat

2 main tasks this week:

1. refurbish the head

2. Remove all pistons, polish everything

Rig it back up enough to do compression test
 

North Idaho Wolfman

Moderator
Staff member
Lifetime Member

Equipment
L3450DT-GST, Woods FEL, B7100 HSD, FEL, 60" SB, 743 Bobcat with V2203, and more
Jun 9, 2013
29,211
5,494
113
Sandpoint, ID
You don't need a spring compression tool for Kubota heads, the springs are super light!
Just push down on the sides of the spring.
If your feeling you can't push then down you can normally rent a spring compressor at a auto parts store.
There is a much smaller version available.

 
  • Like
Reactions: 1 user

joesmith123

Active member

Equipment
L295DT, BX1500
Mar 18, 2023
351
31
28
earth
IMG_1134.jpeg


Brushed everything with diesel

IMG_1138.jpeg


Removed shaft that goes to front axle

IMG_1142.jpeg


Removed entire front axle in one piece

IMG_1145.jpeg


Picked up axle assembly using 3 point hitch on bx1500

IMG_1149.jpeg


Moved axle assembly away from work area

IMG_1151.jpeg


Hit the block with brush on drill, dipping in diesel often


Hit the top of the block with 6 inch soft wire wheel on variable polisher, 800 rpm, rotated crankshaft using oil filter tool to get the piston to the top point, hit it softly with 800 rpm wire wheel, did each piston twice


IMG_1157.jpeg


Hit the block with parts cleaner

IMG_1158.jpeg


Removed tons of sludge

IMG_1159.jpeg


Other side

Summary of all tasks: scrubbed with brush entire engine, hit the entire thing with air, removed steering, had to cut the bolt because rusted/welded, removed bottom propeller, moved support blocks from axle to transmission areas, removed water pump, fan, removed front axle, moved axle using chains and 3 point hitch, hit the block with nylon brush on drill, hit the top of the block with low speed 6 inch soft wire wheel applying diesel often with brush, hit all nooks and crannies with compressed air, hit the entire block with parts cleaner using airless sprayer

Need: 3 inch abrasive ball to strip interior of cylinders (600 grit), 3 inch foam ball to polish inside of cylinders, a way to put these attachments on the variable speed polisher, I ordered a chuck kit that might make that possible, dremel for when cleaning all the crannies on the head and the short block

Next steps: drain and remove oil pan, carefully remove each piston, paying attention to which way they are pointed, keep track of the bolts and exactly how it is fastened, label it using cardboard and sharpies

IMG_1156.jpeg
 
Last edited:

joesmith123

Active member

Equipment
L295DT, BX1500
Mar 18, 2023
351
31
28
earth
Rebuilding the head

IMG_1166.jpeg


Built a table out of a pallet to work on the head, raked all the rocks off of the shop floor

IMG_1169.jpeg


Hit the flat surface of the head with: stripping disc 4.5 inch on variable speed polisher, 800 rpm

IMG_1172.jpeg


Best trick to take out valve springs: put the head on a table vice, get a ball joint separator, leverage it to push the spring back, then go in there with pic and get the holder out

IMG_1173.jpeg


zoomed out picture

IMG_1176.jpeg


Thick sludge dried on valve stems, none of them bent

IMG_1174.jpeg


Took out valves, hit the sludge with combination of: brass wire wheel on drill, dremel with rock attachment for the areas where the valve sits, apply diesel with the brush, hit it with the abrasives, then hit it with compressed air, did that 6-7 times, also with smaller drill: hit all the holes with pipe cleaner attachment

IMG_1181.jpeg


Picture after I spent 2 hours with 3 or different tools with different attachments

IMG_1177.jpeg


Another picture inside where the valves sit, I still have to hit with buffing wheel and 3m foam polisher

IMG_1178.jpeg


Valves before cleaning

IMG_1184.jpeg


Valves after cleaning: spend 2 hours going one by one, polisher on table rotating with 4.5 inch stripping disc running on 1500 rpm, then I go through each one, hitting all angles, stripping the dried sludge, finish much smoother than before
 
Last edited:
  • Like
Reactions: 1 user

dragfan66

New member

Equipment
B7500 Z231KW G1800 L3350DT
Apr 12, 2020
17
7
3
Alabama
Those valves and seats need professional attention.
I would load all the valve components and head and take it to a machine shop.

They can check the flatness of the head for you too.
 
  • Like
Reactions: 2 users

joesmith123

Active member

Equipment
L295DT, BX1500
Mar 18, 2023
351
31
28
earth
IMG_1185.jpeg


Hit all the head parts with high speed keystone buffer, 7 inch

IMG_1186.jpeg


Hitting the top of the block with 4.5 inch nylon stripping disc, 2000 rpm, high force

IMG_1187.jpeg


Getting ready to hit top of block and top of pistons with 7 inch keystone buffing pad, 2800 rpm

IMG_1188.jpeg


Up close after I hit cylinder liner with wire wheel on drill

IMG_1190.jpeg


Top of piston very smooth

IMG_1191.jpeg


Hit the inside of the piston liner with 3 inch foam ball on drill

IMG_1193.jpeg


Picture after hitting it hard with wire wheel, stripping disc, keystone buffing pad, and 3 inch ball on drill for the piston liners, also hit all the smaller holes with wire wheel pipe cleaner on small drill

IMG_1195.jpeg

IMG_1198.jpeg


took out the oil pan, oil pan filled with sludge, oil pan suction also filled with sludge

IMG_1199.jpeg


This is the progress so far, next step:

setup an area for where you are marking all the bolts and pistons using cardboard, when removing each bolt (or anything), instantly put it in the cardboard and label it using sharpie

My understanding: how that piston assembly connects to the rod journal on the crankshaft, keep that same orientation


Video of the engine spinning, connected it to battery, spun the engine without the head attached. Critique the sound. Does it maybe sound like there is a knock? That top piston, notice the pitting. I hit it as hard as you can imagine with everything possible, I could not get the pitting to to get better than that

That is the piston where I showed pitting in the head, and that there was head damage
 
Last edited:
  • Like
Reactions: 1 user

joesmith123

Active member

Equipment
L295DT, BX1500
Mar 18, 2023
351
31
28
earth
Took out pistons

IMG_1205.jpeg


Two of the pistons had damage to the top part, in between the rings, there is damage to the piston head

IMG_1207.jpeg
IMG_1208.jpeg


Those are the parts of the pistons that come out with them once piston popped out of the block


After removing pistons, I rotated crank by hand, listen to the sound, do you hear that grinding/rattling? Something is loose in there

IMG_1211.jpeg


Decided to keep taking parts off, got area ready to remove front block cover

IMG_1213.jpeg


Removed the springs, removed all the bolts, hit the edges with air chisel, very light, separated it

IMG_1212.jpeg


Piston lined up with broken pieces next to them, only front piston did not have damage

IMG_1214.jpeg


Sprayed diesel on the gears, then hit them with wire wheel on drill

IMG_1215.jpeg


Hit it with diesel and then compressed air

Stopped here, need to go watch videos closely of how to proceed
 
Last edited:

TECH101

Member

Equipment
Kubota - Bobcat - Caterpillar - Case - John Deere - FARM - CONSTRUCTION -
Mar 8, 2022
48
9
8
Canada
Time for new engine 😁
 
  • Like
Reactions: 2 users

joesmith123

Active member

Equipment
L295DT, BX1500
Mar 18, 2023
351
31
28
earth
Ok yes, I am fixing to go start taking gears out, but let me know if this statement is true:

With the pistons removed and the the transmission in neutral, spinning the main crank should produce ZERO sound

Any sound produced when spinning the crank, is bad news

Are these statements correct?

Another convincing detail it needs new crank bearings:

When spinning it, it does not spin smoothly, some parts spin freely with less resistance, the parts where there is grinding sound, it is harder to spin
 
Last edited:

MountainMeadows

Well-known member

Equipment
L2501, JD 655, Ford 841, JD 6x4 Gator, Gravely 432.
Jun 6, 2022
207
274
63
Poconos, PA
I commend your efforts! Where there's a Will there's a Way!

You could get some valve lapping compound and a lapping stick to lap the valves yourself. That will show you how much of the area on the valve is sealing and also the sealing area on the valve seat in the head. By the looks of things, and as mentioned above, you're most likely looking at a trip to the machine shop.

Any grinding sounds while spinning is not good. There's a problem.
 
  • Like
Reactions: 1 user

joesmith123

Active member

Equipment
L295DT, BX1500
Mar 18, 2023
351
31
28
earth
I cannot get the timing gears to line up

IMG_1217.jpeg


none of the gears match

IMG_1219.jpeg


how do I take out that collar in the picture?

What I have already tried: hit the entire area with torch, then then the top of the collar with air chisel, I tried slightly tapping on it with hammer

The video I watched, they do not have this collar


I just watched this video, it looks like I need to start with top right gear, I'll keep trying to figure it out
 

Attachments

Last edited:

fried1765

Well-known member

Equipment
Kubota L48 TLB, Ford 1920 FEL, Ford 8N, SCAG Liberty Z, Gravely Pro.
Nov 14, 2019
7,006
4,425
113
Eastham, Ma
I cannot get the timing gears to line up

View attachment 130323

none of the gears match

View attachment 130325

how do I take out that collar in the picture?

What I have already tried: hit the entire area with torch, then then the top of the collar with air chisel, I tried slightly tapping on it with hammer

The video I watched, they do not have this collar


I just watched this video, it looks like I need to start with top right gear, I'll keep trying to figure it out
See post #68!
 
  • Like
Reactions: 1 user

North Idaho Wolfman

Moderator
Staff member
Lifetime Member

Equipment
L3450DT-GST, Woods FEL, B7100 HSD, FEL, 60" SB, 743 Bobcat with V2203, and more
Jun 9, 2013
29,211
5,494
113
Sandpoint, ID
The gears only match up every 268 revolutions, and it doesn't matter what position they are in when you remove them, they will just need to be set when you reassemble it, which is very easy.

You're too the point where you need to remove the motor from the rest of the tractor.
You're got gaining anything with it in there.

You need to pull the key way to remove the seal race, it will just be snug to the crank.

You need to remove the rods from the pistons and see if they are all exactly the same length.

You are going to need a complete rebuild kit with pistons, but you will not know which pistons to get till you mic the cylinder bores.
 
  • Like
Reactions: 2 users

joesmith123

Active member

Equipment
L295DT, BX1500
Mar 18, 2023
351
31
28
earth
ok yes I'll get ready to separate tractor from engine

IMG_1222.jpeg


took off injection pump/hydraulic gears, separated hydraulics

I need to: build support structure under block, move other support structure (its blocking some bolts of the bell housing)

Later on I'll figure out how to remove the front collar that is being blocked

Now I'll focus on separating engine from tractor
 

joesmith123

Active member

Equipment
L295DT, BX1500
Mar 18, 2023
351
31
28
earth
IMG_1228.jpeg

Separated block from tractor


IMG_1229.jpeg


This is where I am stuck

You need to pull the key way to remove the seal race, it will just be snug to the crank.
I need to understand this statement, I'm looking for a video to help visualize


Image 6-8-24 at 4.55 PM.jpeg


Then once that collar and what is blocking it is removed, in this picture, he is using a gear puller

I do not have a gear puller, do I need a gear puller?

Ok i'll go watch videos and try to figure it out, and organize the garage


In this clip, he is hammering on the crankshaft, and the gear pops out without gear puller, but he doesnt have that object blocking the collar from exiting

IMG_1229.jpg
 

Attachments

Last edited:

Russell King

Well-known member

Equipment
L185F, Modern Ag Competitor 4’ shredder, Rhino tiller, rear dirt scoop
Jun 17, 2012
4,843
1,084
113
Austin, Texas
To answer some of the questions you have posed.

Turning a crankshaft in the block should be a fairly quiet process. Yours sounds bad. Not sure but probably the bearings are failing or failed already.

The thing you have labeled as “OBJECT” is a key that is half in the shaft and the other half is sticking out to drive the pulley that you previously removed.

I believe that @North Idaho Wolfman meant to state something like this: The key must be removed from the shaft keyway and then the collar and gear will slide off (in the direction of your yellow arrow).

That key might be difficult to get out but I am sure it will come out of the shaft. I also assume you have removed some sorts of keys from shafts before. This one appears to be a reactangular key with the ends rounded and sits into a flat bottom slot in the shaft. Do not try to hammer on one end to get it out like you can with the Woodruff style keys that are kind of half circles.

If you don’t mind having to replace it then try grabbing it with pliers and pull up (outwards) on one end and see if it moves. Then progress up in pliers and damage until it is out. I guess you could spray penetrating oil around it and let it sit overnight, then clean the half you need to grab so it is less slippery.
 
  • Like
Reactions: 1 user

joesmith123

Active member

Equipment
L295DT, BX1500
Mar 18, 2023
351
31
28
earth
To answer some of the questions you have posed.

Turning a crankshaft in the block should be a fairly quiet process. Yours sounds bad. Not sure but probably the bearings are failing or failed already.

The thing you have labeled as “OBJECT” is a key that is half in the shaft and the other half is sticking out to drive the pulley that you previously removed.

I believe that @North Idaho Wolfman meant to state something like this: The key must be removed from the shaft keyway and then the collar and gear will slide off (in the direction of your yellow arrow).

That key might be difficult to get out but I am sure it will come out of the shaft. I also assume you have removed some sorts of keys from shafts before. This one appears to be a reactangular key with the ends rounded and sits into a flat bottom slot in the shaft. Do not try to hammer on one end to get it out like you can with the Woodruff style keys that are kind of half circles.

If you don’t mind having to replace it then try grabbing it with pliers and pull up (outwards) on one end and see if it moves. Then progress up in pliers and damage until it is out. I guess you could spray penetrating oil around it and let it sit overnight, then clean the half you need to grab so it is less slippery.
ok yes I think I understand

I will try: place the chisel facing it parallel to crankshaft, then strike trying to uplift it from the crankshaft

I’ll draw visualization next time I’m around computer
 

North Idaho Wolfman

Moderator
Staff member
Lifetime Member

Equipment
L3450DT-GST, Woods FEL, B7100 HSD, FEL, 60" SB, 743 Bobcat with V2203, and more
Jun 9, 2013
29,211
5,494
113
Sandpoint, ID
ok yes I think I understand

I will try: place the chisel facing it parallel to crankshaft, then strike trying to uplift it from the crankshaft

I’ll draw visualization next time I’m around computer
Much easier way, clamp a pair of voice grips to the key then 2 pry bars on either side under the vice grips and it will pop right out.
 
  • Like
Reactions: 1 user

joesmith123

Active member

Equipment
L295DT, BX1500
Mar 18, 2023
351
31
28
earth
IMG_1231.jpeg


took out the key

IMG_1232.jpeg


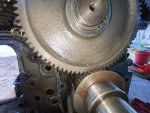
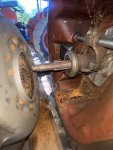
Setup for how I hammered out the crankshaft. I put the towel to not let gear dig into the block, bad idea, next time, I will put metal in between block and gear before hammering down on crankshaft

IMG_1234.jpeg


Hammer on the crankshaft let it fall until the collar and the gear were touching. Then I go in with air chisel pushing collar up, notice I destroyed the washer in between them. This was the best way I found without gear puller.
IMG_1235.jpeg


removed crankshaft assembly

IMG_1237.jpeg


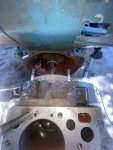
Indentation of gear into block

IMG_1239.jpeg


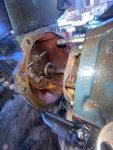
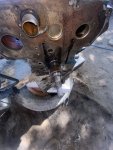
I'm pointing to center piston liner, it is a bit shifted down

IMG_1240.jpeg


12 mm wrench for reference, few mm gap in piston liner and engine block


Got crankshaft on the table, hit wire wheel on drill to reveal the markings so I can understand how to reassemble

IMG_1242.jpeg


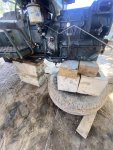
Pretty much all the parts that came out to get the crank out. The gear that runs the injection/hydraulic, I noticed loose spinning on the front gear, making some noise. I'll go through and rebuild that one.

IMG_1243.jpeg


Crankshaft with main bearings removed. I noticed the front two bearings did not have the extra shims, the third bearing, had the shims, in the picture, they are next to the gloves

Front two bearings had back and forth movement, 3rd bearing: no back and forth movement

I dont know if it is supposed to be that way, I will study diagram and see if there are parts missing, here is a video demonstrating, first two bearings are more loose, last one, still a bit of a rattle, but less loose


I'll go study diagrams and see if there are parts missing

Ok yes, the diagram shows those parts are correct, bearings on all 3, but rear bearing has additional parts labeled as "metal side"

Image 6-9-24 at 6.30 PM.jpeg
 
Last edited:

joesmith123

Active member

Equipment
L295DT, BX1500
Mar 18, 2023
351
31
28
earth
Image 6-11-24 at 9.21 AM.jpeg


Here's a list so far of what parts to get:

All new japanese main bearings, connecting rod bearings, new piston rings for all 3 cylinders, and also 2 new japanese pistons for $150 a piece

I did ask messick specifically about engine balancing if I put in the new pistons, they said:

"Kubota makes the piston heads exactly the same size/spec. Putting in new pistons and keeping the same connecting rods will NOT cause the engine to be unbalanced"

Just this little list alone is $1000 plus shipping

Then, I'm fixing to get a gasket kit from amazon/china/low cost


Please critique my plan, I have not ordered anything yet

I do see entire kits for $500 with new pistons etc, but they are Chinese replicas, I trust them less than Japanese parts

My list will be $1200 so far...

Ok yes I go back and keep wire wheeling/cleaning/scrubbing
 
Last edited: