L275 clutch adjustment question - dual disk

whitetiger

Moderator
Staff member

Equipment
Kubota tech..BX2370, RCK60, B7100HST, RTV900 w plow, Ford 1100 FWA
Nov 20, 2011
3,752
2,164
113
Kansas City, KS
The adjustment bolts that affect your PTO engagement are #11 in the PDF. The measurement is between the bolt head and the ear of #4.
In the picture you posted it appears to be just above the window.
 

Attachments

timsch

Active member
Lifetime Member

Equipment
'49 8N, L275DT
Jun 11, 2018
172
33
28
Houston, TX
So, it's taken a while, but I finally think I understand what needs to be done. 1st thing will be to remove the FEL, because if there's an access to adjust bolt #11 referred above, it'll be behind my FEL mounting bracket. The access plate I've been taking pictures of looks to mainly adjust engagement from pedal stroke and isn't my problem here. All of these things were mentioned in this thread by you already, so thanks for that. It's just taken awhile to get through my thick skull.
 
Last edited:

timsch

Active member
Lifetime Member

Equipment
'49 8N, L275DT
Jun 11, 2018
172
33
28
Houston, TX
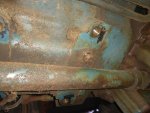
Finally got the access port uncovered and opened. The rust was pretty bad. I soaked the adjustment screws with Kroil a few times and left it to sit overnight. I'll see if they'll move later today.

I've seen posts where people recommend filling the bell housing as much as possible with Coke to eat the rust, then draining and rinsing. I looked last night for a drain, and thought I might have found one right below where the clutch is, but the hole bottomed out just below the threads and doesn't go through.

It is a fine threaded 12mm head bolt, so not big enough to mount anything from. It's right where the FEL bottom part of the frame mounts, but has nothing to do with the FEL. It's halfway backed out in the picture below. It's almost as if it's there to be drilled through if someone wanted to have a drain.

Anyone know what this is for?


IMG_20240511_192026751.jpg

As bad as the surface rust is, there's no issue with disengaging the clutch to change gears. Just the PTO disengagement that's the problem now.

Shame on me for not blocking the pedal down, but double shame on me for not checking that the side access port cover plate (thumbnail shown in post #1) was tight after I pulled it off to check things this past summer. Sitting outside allowed rain to seep behind it and here i am now....

 

Attachments

Last edited:

timsch

Active member
Lifetime Member

Equipment
'49 8N, L275DT
Jun 11, 2018
172
33
28
Houston, TX
Got the adjustment done. That was a real relief even being able to get the screws to move after seeing all of that rust. Now I just have to finish wrestling with the FEL mounting pieces. I'm close, but no cigar yet.

Any ideas on that bolt hole I mentioned in the previous post?
 

North Idaho Wolfman

Moderator
Staff member
Lifetime Member

Equipment
L3450DT-GST, Woods FEL, B7100 HSD, FEL, 60" SB, 743 Bobcat with V2203, and more
Jun 9, 2013
36,369
11,175
113
Sandpoint, ID
I don't find any mention of that bolt / plug in any of the prints I look at.
Could be that that housing was for a different model.
 

007kubotaguy

Well-known member
Lifetime Member

Equipment
B7100DT L245DT JD 2355
Dec 23, 2012
707
328
63
Herald Calif.
The 12 mm head bolt you refer to is a drain. I think if you remove it you will probably find it goes through to the clutch housing but is probably full of garbage. When these tractors were new we took the plugs out so that housing would drain.
 
  • Like
Reactions: 1 user

timsch

Active member
Lifetime Member

Equipment
'49 8N, L275DT
Jun 11, 2018
172
33
28
Houston, TX
The 12 mm head bolt you refer to is a drain. I think if you remove it you will probably find it goes through to the clutch housing but is probably full of garbage. When these tractors were new we took the plugs out so that housing would drain.
I was hoping it was a drain. When I pulled the plug, it looked to be a threaded but not a thru hole. Clean metal is all I thought I saw.

I'll pull it again tonight and probe with a pick.

EDIT:

Yep, it was a drain. The clutch assembly itself must be very close to the bottom of the bell housing. I didn't see a gap but did feel it with a pick.

Thanks everyone for the help.
 
Last edited:
  • Like
Reactions: 1 user

timsch

Active member
Lifetime Member

Equipment
'49 8N, L275DT
Jun 11, 2018
172
33
28
Houston, TX
Ran the tractor with the shredder yesterday. The PTO engaged & disengaged several times without issue. Like butter.

I didn't make it clear earlier, but the access cover was indeed behind the support bracket for my FEL. It was designed to use the same 4 bolts as the cover and completely covered it up.

Much appreciation to everyone who helped me out here. Much gratitude. All the best to y'all.
 

Mike Luker

New member

Equipment
L275, L3400
Sep 16, 2026
2
0
1
Wisconsin
This got back-burnered, but now I'm back on it. I am having issues getting access to the lock nut (circled in post #14, and shown here) that holds the bolt in place. No problem getting a wrench on the head of the bolt, but the bend in the arm is preventing me from getting the wrench on the nut. There's also not enough clearance between the nut and the component just above & to the left of the nut as seen below.

Any suggestions as to how to loosen and retighten the nut? I hope someone's got a good one, because i'm looking at my 1st split if not. View attachment 127144
All new to the forum. and have a question on how to adjust the clutch on my L275 4x4 dual clutch. How do I get the clutch to rotate so I can better position the clutch bolt to get my wrenches in there? I jacked up one rear tire and tried to spin it in 4th gear high. tire spins but clutch is not spinning
 
Last edited: