Fixing hole in side of block

joesmith123

Active member

Equipment
L295DT, BX1500
Mar 18, 2023
351
31
28
earth
hole.jpeg


hole in the side of block of D1301 on L295

headremoved.jpeg


took off the head

removingoilpan.jpeg


this is a picture facing up, I removed many 14 mm bolts including the two hard to reach above the differential

removingoilpan2.jpeg


Under the oil pan from the other side of tractor, you can see I took out all the 14 mm bolts

frontpanbolts.jpeg


There are total 4 17 mm bolts facing the oil pan from the front axle, I removed those as well on both sides

frontdifferential.jpeg


In this picture, you can see the differential shaft is blocking the oil pan from dropping

What is the next proper step to getting the oil pan removed? I took out that one bolt that attaches the differential to the oil pan

frontdifferential2.jpeg


I removed the two bolts that hold the rear of the differential to the rear axle, but still the shaft would not drop
 

North Idaho Wolfman

Moderator
Staff member
Lifetime Member

Equipment
L3450DT-GST, Woods FEL, B7100 HSD, FEL, 60" SB, 743 Bobcat with V2203, and more
Jun 9, 2013
29,211
5,494
113
Sandpoint, ID
You need to slide the front half (RED) of the propeller shaft cover backward over the rear section (BLUE) and then slide the coupling rearward to disengage it from the front end (Yellow).

1716185038527.png
 
  • Like
Reactions: 2 users

joesmith123

Active member

Equipment
L295DT, BX1500
Mar 18, 2023
351
31
28
earth
You need to slide the front half (RED) of the propeller shaft cover backward over the rear section (BLUE) and then slide the coupling rearward to disengage it from the front end (Yellow).

View attachment 128791
Yes I am comprehending

frontdifferentialedited.jpg


I watched these videos twice, that tractor is pretty much the same, I will copy what he does to get the tractor fixed
 
Last edited:

joesmith123

Active member

Equipment
L295DT, BX1500
Mar 18, 2023
351
31
28
earth
Ok I figured it out

IMG_1036.jpeg

IMG_1037.jpeg

I hit with hammer, uncovered the spindle

now I go spray diesel, and remove lock spring

IMG_1038.jpeg


wasp nest
 

joesmith123

Active member

Equipment
L295DT, BX1500
Mar 18, 2023
351
31
28
earth
rearspindlestuckedited.jpg


I have the chisel striking the direction of the big arrow, attempting to move it toward the rear axle (small arrow), it is not budging

I hit with torch and diesel, not moving

Should I be striking the opposite direction, attempting to move that union forward toward front of tractor?

I back now and hit it harder with torch, hammers, chisels, etc

IMG_1042.jpeg


yes I removed it, hit it hard with torch, then spray ton of diesel, then sledge hammer without chisel, worked perfectly

IMG_1043.jpeg


Removed shaft
 
Last edited:
  • Like
Reactions: 1 users

jaxs

Well-known member

Equipment
B1750HST
Jun 22, 2023
536
285
63
Texas
I don't envy your shop floor for doing teardown like this.
 
  • Like
Reactions: 1 users

joesmith123

Active member

Equipment
L295DT, BX1500
Mar 18, 2023
351
31
28
earth
image.jpg


top end: cannot remove pulley because frame blocking it

What do I have to do to move forward?
image.jpg

Oil pan: all bolts removed and shaft out the way, pan won’t budge, hit it with diesel and 5 minutes of torch, chiseled edges, did not move

please let me know the proper next steps, appreciated
 

North Idaho Wolfman

Moderator
Staff member
Lifetime Member

Equipment
L3450DT-GST, Woods FEL, B7100 HSD, FEL, 60" SB, 743 Bobcat with V2203, and more
Jun 9, 2013
29,211
5,494
113
Sandpoint, ID
You need to remove the front axle and support.
It wedges the oil pan, and the oil pan will not come off without removing it.

1716242947229.png
 
  • Like
Reactions: 2 users

GreensvilleJay

Well-known member

Equipment
BX23-S,57 A-C D-14,58 A-C D-14, 57 A-C D-14,tiller,cults,Millcreek 25G spreader,
Apr 2, 2019
10,346
4,300
113
Greensville,Ontario,Canada
WOW, gotta give him 'A+' for effort and doing it right....
...me, I'd have done the backyard 'drywall' bodge and back in the field in 24hrs.
 
  • Like
Reactions: 1 users

joesmith123

Active member

Equipment
L295DT, BX1500
Mar 18, 2023
351
31
28
earth
WOW, gotta give him 'A+' for effort and doing it right....
...me, I'd have done the backyard 'drywall' bodge and back in the field in 24hrs.
there is no other way to get to the damaged area

from what I am understanding

How else am I to service the bottom end without removing the oil pan?

I did not want to remove all of those components but I cannot get the oil pan out of the way

I took off wheels, steering link, both knuckles, now I am stuck, hard to reach bolts

IMG_1047.jpeg


In the video, where he removes the front axle, it appears that he strikes here in order to get a shaft out of the front of the tractor

IMG_1050.jpeg


here is the front of the tractor where that shaft comes out, then he removes front axle assembly


I cannot tell how he removed it, and I dont think the one he is working on is 4wd, this one is 4wd


IMG_1045.jpeg


Also i did see in the diagram it shows these long bolts could be holding that front assembly to the block

IMG_1044.jpeg


In the video, he removes that front axle assembly, then he takes off the huge front bracket/structure

I will go try now

image.jpg

Removed front axle

ok now I figure out front bracket
 

Attachments

Last edited:
  • Like
Reactions: 1 user

D2Cat

Well-known member
Lifetime Member

Equipment
L305DT, B7100HST, TG1860, TG1860D, L4240
Mar 27, 2014
13,217
4,634
113
40 miles south of Kansas City
I haven't followed your entire process. Is your goal to remove the engine to replace it?

If so, be careful when unbolting the engine from the transmission. The engine can and will flop to one side or the other. Usually you can put wood wedges on both lower sides if the block to keep in in place, but you may have it so stripped down there is nothing to hold the wedges. Then you'd need something above the engine to stabilize it for safety.
 

North Idaho Wolfman

Moderator
Staff member
Lifetime Member

Equipment
L3450DT-GST, Woods FEL, B7100 HSD, FEL, 60" SB, 743 Bobcat with V2203, and more
Jun 9, 2013
29,211
5,494
113
Sandpoint, ID
I haven't followed your entire process. Is your goal to remove the engine to replace it?

If so, be careful when unbolting the engine from the transmission. The engine can and will flop to one side or the other. Usually you can put wood wedges on both lower sides if the block to keep in in place, but you may have it so stripped down there is nothing to hold the wedges. Then you'd need something above the engine to stabilize it for safety.
D2Cat, not on that model, you have to remove the front axle as that model had a cast section and no front frame at all.
 

joesmith123

Active member

Equipment
L295DT, BX1500
Mar 18, 2023
351
31
28
earth
I got to the damaged area

IMG_1052.jpeg


Oil pan filled with finger piercing metal shards

IMG_1053.jpeg


IMG_1054.jpeg


broken bearing and the clamp that goes around it, came out of the oil pan
IMG_1055.jpeg

These also came out of the oil pan when oil pan fell, piece of the block, and the bolt that holds the piston

IMG_1057.jpeg


looking up into the engine

IMG_1056.jpeg


Ok here is a video, facing up, while I rotated crank shaft

Can we tell if the crankshaft is damaged and will need to be removed from looking at the damaged area?

Meaning, if I spin the engine, and the spin feels smooth, does that tell us that the crankshaft is fine, and will not need to come out?

Let me know the exact procedure to fix this issue and make sure the other pistons do not have the same problem

What are the exact parts I need to make sure the entire bottom end is proper and will last for a long time?
 
Last edited:
  • Like
Reactions: 1 user

jiggseob

Member

Equipment
B6200 HST with Allied loader, Muratori 48" hyd side shift tiller
Nov 12, 2023
49
37
18
Round Hill, Alberta, Canada
Wow... I thought my shop space was low-tec h, yours looks like fun.

I just did main / rod bearings, crankshaft, etc on my L3130 HST. What I see there is a "thrown" rod. That will very probably have scored a crankpin journal on the crankshaft. That crankshaft must be removed to have that damaged crankpin and probably all other main and crankpin journals ground and poilished.

If you find that the crankshaft is not damaged (you have horseshoes up your @$$ but thats another story), and you can replace the connecting rod and piston, and leave the crankshaft in place, then you do not have to split the tractor. JB-weld will plug that hole in the block and hold the oil in.

To get the crank out, you have to separate the engine from the back of the tractor at the back of the bellhousing. That means support the rear half under the transmission, probably with blocks and a hydraulic jack. Support the front half, with two vertical pieces of sturdy steel such as 2" angle iron or square tubing that hold the front half up when its pulled away from the rear.

Rather than "splitting", you can remove the front half of the tractor piece by piece, first radiator, then front diff, then frame, at which point you are left with engine hanging on the rear. Un-bolt rear of bellhousing from transmission to separate engine.

Once you have access to rear of engine, either by splitting or disassembling, remove the clutch, flywheel, and bellhousing, then when you have access to the back of the block, you can take the crank out after removing pistons and connecting rods.
 
  • Like
Reactions: 1 users

joesmith123

Active member

Equipment
L295DT, BX1500
Mar 18, 2023
351
31
28
earth
If you find that the crankshaft is not damaged (you have horseshoes up your @$$ but thats another story), and you can replace the connecting rod and piston, and leave the crankshaft in place, then you do not have to split the tractor.
I will look into the damage on the crankshaft, I would prefer not to split the tractor

Rather than "splitting", you can remove the front half of the tractor piece by piece, first radiator, then front diff, then frame, at which point you are left with engine hanging on the rear. Un-bolt rear of bellhousing from transmission to separate engine.
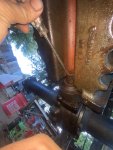
This pretty much describes what happened today. My main goal was to remove oil pan, had to take off propeller shaft, entire front differential, steering, frame piece, just to get to the last two bolts holding the oil pan. It took 10 hours to do these tasks

I am thinking now about which direction to take

then when you have access to the back of the block, you can take the crank out after removing pistons and connecting rods.
Yes, it would be another whole day of labor to separate the block from the bell housing

Plan in my head at this point, yall feel free to critique:

Replace all the moving parts on the bottom end but keep the main parts that would require machine shop

My understanding: the parts that deteriorate and break down are replaceable, but the parts that are honed and machined for that specific block, do not need to be replaced and should not be replaced because:

if you replace the piston head, then you also need the block to be modified

Same goes for the connecting rod: that rod is specific to that block, and should not be replaced

I want to replace: all the bottom area, new bolts, connecting rod bearing for all the pistons, and whatever else yall instruct me to

Do yall recommend to put in new piston rings? I think yes

Plan with the block: the plan is to learn how to use acetylene torch to braze a patch that is rigid, permanent, better than JB weld

I might salvage the pieces of the broken block, or

Use torches/hammers to shape a piece of metal the same as the hole in the block, then braze that onto the block

I will not braze on the block until I am comfortable brazing, I will practice on scrap until I figure it out

Summary: figure out the bottom area to secure all the pistons perfectly, then seal up the block after I learn acetylene torch
 
Last edited:

PaulL

Well-known member

Equipment
B2601
Jul 17, 2017
2,250
1,209
113
NZ
This job is way beyond my skills. All I have to offer is - wow. Well done. I look forward to seeing it progress.
 
  • Like
Reactions: 1 users

joesmith123

Active member

Equipment
L295DT, BX1500
Mar 18, 2023
351
31
28
earth
This job is way beyond my skills. All I have to offer is - wow. Well done. I look forward to seeing it progress.
Its not as complicated as people make it out to be,

watch the video, the guys rips the entire engine apart

Many of the bolts are repetitive,

I dont know about newer ones, but the older ones are made to be fixed

If you find that the crankshaft is not damaged (you have horseshoes up your @$$ but thats another story), and you can replace the connecting rod and piston, and leave the crankshaft in place, then you do not have to split the tractor. JB-weld will plug that hole in the block and hold the oil in.
soon I will get under the engine, and start to loosen up those connecting rods and try understand the area

According to jiggseob, one can change the piston, the piston rings, the connecting rods, WITHOUT removing the huge crankshaft

Someone did say that the failure happened due to failed "connecting rod bearings"

I will take it apart, and see if one can change the connecting rod bearings without taking out the crankshaft, I am guessing no
 
Last edited:

North Idaho Wolfman

Moderator
Staff member
Lifetime Member

Equipment
L3450DT-GST, Woods FEL, B7100 HSD, FEL, 60" SB, 743 Bobcat with V2203, and more
Jun 9, 2013
29,211
5,494
113
Sandpoint, ID
if you replace the piston head, then you also need the block to be modified

Same goes for the connecting rod: that rod is specific to that block, and should not be replaced
No not true, the head can be swapped without changing the block.
The rods are not specific to the block, the only requirement is that the rod and rod cap need to stay matched and in the right orientation and installed in the block in the proper direction.

I want to replace: all the bottom area, new bolts, connecting rod bearing for all the pistons, and whatever else yall instruct me to

Do yall recommend to put in new piston rings? I think yes
You're not going to be able to easily or cheaply get new bolts.
used bolts are still tough to get.
You are going to need at minimum a new (used) connecting rod and cap, and 2 connecting rod bolts.
and rod bearings.
You can't do any of the mains with the engine in the tractor.
You can do rings, but if there is too much wear you will either need to have the sleeves replaced or hone the block and use oversized pistons and rings.
HUGE gamble that the mains are not damaged or that the rod journal (that threw the rod) will be in good enough shape to even accept a bearing, let alone run it without failure.

Plan with the block: the plan is to learn how to use acetylene torch to braze a patch that is rigid, permanent, better than JB weld

I might salvage the pieces of the broken block, or

Use torches/hammers to shape a piece of metal the same as the hole in the block, then braze that onto the block

I will not braze on the block until I am comfortable brazing, I will practice on scrap until I figure it out

Summary: figure out the bottom area to secure all the pistons perfectly, then seal up the block after I learn acetylene torch
Forget Acetylene, use a mig welder with nickel wire.
 
  • Like
Reactions: 1 users