

Runs With Scissors
Well-known member
Equipment
L2501 TLB , Grappel, Brush Hog, Box Blade, Ballast box, Forks, Tiller, PH digger
Ok fellas,
I have been chipping away at the "Hydraulic Thumb" project.....slowly....
As per normal, each project I do, creates 4 more projects, and so on....and so on.....
I had a post written, but apparantly the "drafts" folder has a short time limit on it.
ASIDE: So in my "lost post" I eloquently pointed out that @Chanceywd had a perfectly good way of dealing with the length problem, by boring out and plugging the tail end of the cylinder....and I was going to use it.........But sometimes, I do things differently....Just because.
So I was testing out the Hyd. Thumb recently and it took forever to retract. (like 40 seconds long)
So I immedialty figured that my hose crimps were to to blame.
Therefore I decide to troubleshoot it by using the "Squirt Test"
So what is the "Squirt test" you ask?
Well its a scientifically engineered test that is universally accepted by the ASE, NASA, and all of the governing hydraulic agencies, and all 3 letter .gov agencies.
You take the temp of you hydraulic fluid, then plug that into a complicated quaratic equation, then divide by the logrythim of the .......
hahahah....JK
I just actuated my levers in both directions and shot that sh1t across the shop.

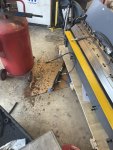
Well both of them made an equal mess, so I conclude that the hoses are not the problem.
The next thing that pops into my head is my "spacer" that I made to limit the retraction distance.
I figure that it is probably blocking the oil port, thus limiting the amount of fluid that can pass.

Well, I am fairly sure that this "spacer" is the problem. So now I gotta figure out how to stop the pistons from traveling too far, but I need to not limit the flow of oil.
Hmmmmm??????
About 10 ideas hit me simultaneously........All of them are some sort of a "drilled/machined matrix" of channels and holes.
Now the big problem is how do I keep the plug/slug/spacer indexed properly as to not "turn in the bore" and block fluid flow?
This keeps me awake for a night or two.........
Then it hits me like a "sack of hammers" in my sleep............
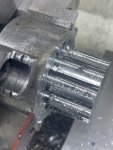
Why not make a "star" shaped spacer?
This way the spacer will allow for fluid flow in any orientation......(In theory)
Too bad it woke me at 0200 though........
ASIDE: kind of funny how 25 years ago I would be getting kicked out of a bar at this time....but now I am making a pot of covvffe, firing up the computer, and warming up the lathe.......
At 0" Dark hundred I fire up the computer and "draw" this up.

So at 0'Dark Thirty, there I am, in the Fortress of Solitude, smoke poring off the lathe (Not really), and me making chips. (my wife loves it when the compressor goes off then too )
Now at this point, I am also at a "cross roads" of sorts.
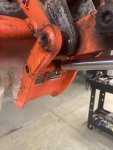
I learned that the cylinder was also a "wee bit" too long, so it was just barely hitting the cross member of the BH. HOWEVER, I would have to take off the piston of my "new cylinder" to make a spacer ....Hmmmmmmmmmmmmm??????????????

Well, "in for a penny, in for a pound" I suppose, so after my 4th coveffe I decide thats exactly what I am going to do.
But first things first........The "Star"
So the first thing I have to decide is how to make the "valleys".....Well that damned "Machinist Phenomena" hits me square in the face......I think of about 3 ways to do it.....DAMN IT MAN!!!!!!!!
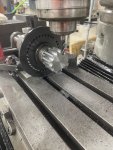
Being a "NOOB" I decide that the "best way" to do this is to turn a "nub" that will fit into a collet and use my "indexer' to mill the valleys on the Bridgeport.....
So I very carefully measure it, and take my time.....Double and............ triple checking things
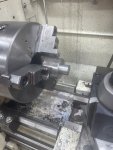
So thats exactly what I do, then flip it around and face the backside.

Looking good so far.......
Now its off to the mill.......then chuck it up.

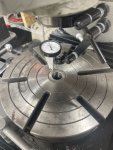
It takes me a little while, and I figure that the best place to check for X axis alignment is on the "shaft part" of the indexer.

So after a few "love taps", to get it aligned, I am ready to take the first cut.

I have been chipping away at the "Hydraulic Thumb" project.....slowly....
As per normal, each project I do, creates 4 more projects, and so on....and so on.....
I had a post written, but apparantly the "drafts" folder has a short time limit on it.
ASIDE: So in my "lost post" I eloquently pointed out that @Chanceywd had a perfectly good way of dealing with the length problem, by boring out and plugging the tail end of the cylinder....and I was going to use it.........But sometimes, I do things differently....Just because.
So I was testing out the Hyd. Thumb recently and it took forever to retract. (like 40 seconds long)
So I immedialty figured that my hose crimps were to to blame.
Therefore I decide to troubleshoot it by using the "Squirt Test"
So what is the "Squirt test" you ask?
Well its a scientifically engineered test that is universally accepted by the ASE, NASA, and all of the governing hydraulic agencies, and all 3 letter .gov agencies.
You take the temp of you hydraulic fluid, then plug that into a complicated quaratic equation, then divide by the logrythim of the .......
hahahah....JK
I just actuated my levers in both directions and shot that sh1t across the shop.
Well both of them made an equal mess, so I conclude that the hoses are not the problem.
The next thing that pops into my head is my "spacer" that I made to limit the retraction distance.
I figure that it is probably blocking the oil port, thus limiting the amount of fluid that can pass.
Well, I am fairly sure that this "spacer" is the problem. So now I gotta figure out how to stop the pistons from traveling too far, but I need to not limit the flow of oil.
Hmmmmm??????
About 10 ideas hit me simultaneously........All of them are some sort of a "drilled/machined matrix" of channels and holes.
Now the big problem is how do I keep the plug/slug/spacer indexed properly as to not "turn in the bore" and block fluid flow?
This keeps me awake for a night or two.........
Then it hits me like a "sack of hammers" in my sleep............
Why not make a "star" shaped spacer?
This way the spacer will allow for fluid flow in any orientation......(In theory
)Too bad it woke me at 0200 though........
ASIDE: kind of funny how 25 years ago I would be getting kicked out of a bar at this time....but now I am making a pot of covvffe, firing up the computer, and warming up the lathe.......
At 0" Dark hundred I fire up the computer and "draw" this up.
So at 0'Dark Thirty, there I am, in the Fortress of Solitude, smoke poring off the lathe (Not really), and me making chips. (my wife loves it when the compressor goes off then too
)Now at this point, I am also at a "cross roads" of sorts.
I learned that the cylinder was also a "wee bit" too long, so it was just barely hitting the cross member of the BH. HOWEVER, I would have to take off the piston of my "new cylinder" to make a spacer ....Hmmmmmmmmmmmmm??????????????
Well, "in for a penny, in for a pound" I suppose, so after my 4th coveffe I decide thats exactly what I am going to do.
But first things first........The "Star"
So the first thing I have to decide is how to make the "valleys".....Well that damned "Machinist Phenomena" hits me square in the face......I think of about 3 ways to do it.....DAMN IT MAN!!!!!!!!
Being a "NOOB" I decide that the "best way"
to do this is to turn a "nub" that will fit into a collet and use my "indexer' to mill the valleys on the Bridgeport.....So I very carefully measure it, and take my time.....Double and............ triple checking things
So thats exactly what I do, then flip it around and face the backside.
Looking good so far.......
Now its off to the mill.......then chuck it up.
It takes me a little while, and I figure that the best place to check for X axis alignment is on the "shaft part" of the indexer.
So after a few "love taps", to get it aligned, I am ready to take the first cut.