Pin Hole Too Big

MikeinDewey

New member

Equipment
L39 TLB
Mar 19, 2016
10
0
1
Dewey, AZ
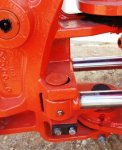
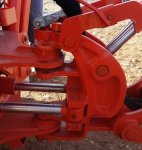
I just bought my first tractor (Kubota L39 TLB) at a Lyon & Son auction and made a mistake. I thought I’d looked over everything pretty well but missed the right-side (top and bottom) pin-hole elongation on the swing frame that the alleged A-hole mechanic at Ahern Rental covered up by welding a large fender washer to the top of the pin and then painting it all Kubota-orange. The manufactured 1-1/4” bored holes (top and bottom) now have nearly a 1-3/4” outside diameter. So now the questions.

Should I cut my losses early and simply purchase a new swing frame and pin – roughly a $1000 investment in parts, or do I take the assembly to a machinist to attempt a fix? And, if the latter, should the pin holes first be filled with metal weld and then rebored, probably sized for a press fit sleeve bushing, or do I attempt to cold-weld (JB Weld or metal epoxy) a top and bottom sleeve bushing (1-1/2” OD) or flanged sleeve bushing (again 1-1-2” OD with the flange (1-3/4” OD) being closer in diameter to the elongated holes), or do I have the holes resized for a high load, sealed ball bearing (the one I found has an OD of 2-9/16”), or something else all together?

My concern with filling the holes first with metal weld before having them rebored is that the resulting heat may make that area of the frame too brittle and the inherent voids in the weld may compromise the needed strength. My concern with the cold weld options securing sleeve bushings is that the fill won’t be strong enough for the imparted forces. My concern with making the holes bigger for a ball bearing (or even leaving them the size they are) is losing the meat of the frame and possibly making the whole assembly too weak.

And as a side, what would have caused this in the first place? The other (left) side frame hole and pin look good as new. Why would one side get so buggered up and not the other? Was this likely caused by the original swing frame being defective or is this type of wear to be expected?

Any knowing experience or intelligence would be greatly appreciated.
 

North Idaho Wolfman

Moderator
Staff member
Lifetime Member

Equipment
L3450DT-GST, Woods FEL, B7100 HSD, FEL, 60" SB, 743 Bobcat with V2203, and more
Jun 9, 2013
29,038
5,356
113
Sandpoint, ID
If you can locate a welder that can line bore it, then that's a pretty standard repair, and it should last for many a year.
AZ is really hard on equipment, between the constant heat, fine dry dust,and rock hard ground everywhere. ;)
 

D2Cat

Well-known member
Lifetime Member

Equipment
L305DT, B7100HST, TG1860, TG1860D, L4240
Mar 27, 2014
13,119
4,489
113
40 miles south of Kansas City
Yep, buying a new frame and pin would be my last step. If you have a trusted machine shop nearby, load it up and let them SEE what you have and let them come up with their method of solution.

They'll probably repeat what North Idaho Wolfman said, and my guess is the cost will be much less then those new parts.
 

Daren Todd

Well-known member
Lifetime Member

Equipment
Massey Ferguson 1825E, Kubota Z121S, Box blade, Rotary Cutter
May 18, 2014
9,200
4,793
113
Vilonia, Arkansas
I agree with Wolfman and d2cat :D. If one side is correct. Then take them to the local welding shop. They can either press a sleeve in to the correct thickness hole. Or weld it up and drill a new hole. Probably cost 100$ or so depending on the time they have in it. If you have a friend in a welding shop. It may only cost a case of beer :D:D
 

MikeinDewey

New member

Equipment
L39 TLB
Mar 19, 2016
10
0
1
Dewey, AZ
Thanks, all. I'll take the related parts drawing to a few shops and see if they sound intelligent with their recommended course of action, and then have some fun disassembling the unit. Wish I could figure out what caused this, and then stick an unlubricated wrench in the nose or some other orifice of the mechanic that decided to hide the problem. I was looking forward to using that backhoe before the AZ sun got too impressive.
 

aeronutt

Member

Equipment
Z725 Mower, MX5200 w/FEL, Stihl 660, assorted others...
Jan 7, 2016
120
2
16
Omaha NE
If I'm imagining correctly, you are describing an opportunity to overbore the hole and press in a sleeve. This is easy stuff for a good machine shop. Without a good picture, I'm kinda stabbing in the dark so the best thing I can say is to take it to a machine shop and let them tell you what the right fix is. Taking them a drawing isn't really helpful. Take the actual problem to them.
 

BadDog

New member

Equipment
B7100D TL and B2150D TLB
Jun 5, 2013
579
2
0
Phoenix, AZ
Biggest problem for an "easy" fix is getting it broken down to a size to easily transport and get on a common sized machine. I know a machine shop down town with a horizontal boring machine easily big enough to put a full size tractor on the table and bore the hole. But you don't want to think about what that machine's time costs. Reality is, to keep cost reasonable, you have to break it down to suit available machines.

But there is another alternative to the in-situ repair. I've seen it used on some really large machines, and some smaller machines like the CUT and SCUT size. These setups employ a bearing fixture that mounts to the machine (clamps, bolts, sometimes welded). There is then a drive head attached, and a bar run through the bearings and the damaged hole. The bar carries a cutter that passes through the hole much like a boring head, making it nice and round to an appropriate size. The bushing is then pressed (or driven) in. If necessary, the same machine bores the bushing to final size.

Bushing is probably the most likely economical fix, but depending on material, welding up and re-boring is also an option.

And I recall once seeing a magnetic drill with annular cutter being used to clean up a really messed up hole for a bushing that was then placed into the slightly loose hole. And then a pin was placed to align the bushing while it was brazed into place.

Lots of people have fixed this problem lots of ways over the years without buying new parts.
 
Last edited:

MikeinDewey

New member

Equipment
L39 TLB
Mar 19, 2016
10
0
1
Dewey, AZ
I've attached pictures of the bad and the good. My reasoning for taking drawings (from the Kubota parts website) is to give the shop a better clue as to the scope of the problem without having to lug a 150 LB chunk of steel around. Concur that some businesses won't have the tooling available to work on something so large and cumbersome while others might not be economically able to deal with something so small. I had no good clue as to how it might be repaired, but now thanks to all of your responses it seems that I won't need to write the check to Kubota. Removing it is likely to be a thrill, but life without at least a little excitement isn't really worth living.
 

Attachments

D2Cat

Well-known member
Lifetime Member

Equipment
L305DT, B7100HST, TG1860, TG1860D, L4240
Mar 27, 2014
13,119
4,489
113
40 miles south of Kansas City
My wife's grandfather had a machine shop. He had three son who were all first class machinist. One of those guys eventually became my father-in-law.

The first time I went into that machine shop I need a hinge on a TR3 welded. or fixed somehow.

I remember saying, "You probably can't fix this, but...."

Those became magical words to remember. There are very few people who have a creative streak in them who can resist a statement like that. It fires them up, and they begin to figure how to prove to you that's not a challenge.

Might use it when you approach whomever you go to for repairs!
 

aeronutt

Member

Equipment
Z725 Mower, MX5200 w/FEL, Stihl 660, assorted others...
Jan 7, 2016
120
2
16
Omaha NE
Thank you for the pic. That helps me understand the problem much better. The area in question is not supposed to have any movement at all. The only part that is supposed to move is the hydraulic ram end where the grease zerk is. There should be a replaceable press-in sleeve in that ram that makes returning to factory tolerance a 30 minute job for one man once every 2000 hrs or so. Once movement started up there, it was already too late. The other side (the good side) didn't get any wear because it didn't have any movement. I wonder if the original source of problem was somebody failing to grease that joint and the pivot point siezed up so the bolt at the bottom of the pin slipped/broke?

I agree with your original assesment of the person who welded that washer over the problem. I also think you underestimate the weight of that block of cast iron. That's going to be a big job taking it apart. Take this picture with you to the machine shop before you start dismantling. They might be able to fix it in place by just swinging the hydraulic ram out of the way. Be sure to post back too. I'm curious about what they say.
 

BadDog

New member

Equipment
B7100D TL and B2150D TLB
Jun 5, 2013
579
2
0
Phoenix, AZ
He lives up in Dewey somewhat near Prescott Valley. They get a little more relief than we get down here in the Valley... where it's been bumping at and over 90 most days for over a month now. It was hot enough in February that I was already scheduling some tasks for when the sun got low or down! In February!
 

MikeinDewey

New member

Equipment
L39 TLB
Mar 19, 2016
10
0
1
Dewey, AZ
Finally got the holes fixed. It got a little more fun when the upper pin that secures the swing frame assembly to the boom decided to stay put. Bigger hammers, penetrating fluid and a hydraulic bottle jack chained to the side all failed to make the pin budge. Finally ordered a new pin and sawed through the stuck one on either side of the cylinder rod, then let a local machinist install hardened bushings in the initial problem holes and use his much more powerful hydraulic press to convince the now two ends of the stuck bushing to release. Everything is cleaned up and all that is needed is the replacement pin that escaped its box somewhere between shipping and my front door.

A follow-on question - a lot of hydraulic fluid flowed out of the hydraulic lines and cylinders during this fun time. Does the air that has replaced the fluid need to be purged or will everything simply take care of itself once reconnected to the tractor?