This is part 2 of a maintenance project where I opened and cleaned the rooftop A/C unit on my L5240HSTC. In Part 1, we removed the cab cap and opened the A/C box for cleaning.
13. Locate the drain ports and hoses (there are 4!). The location of the ports is circled (I couldn't find the exact location of #2). And the drain hose routes are marked as well. 1 & 2 go down the right side of the cab (#1 in the rear channel and #2 in the front channel). Similarly, 3 & 4 go down the left side of the cab, #3 in the rear channel and #4 in the front.

Close-up of port for drain #1

Drain 2 hose route to bottom of box

Drain 3 port and hose (I have removed the hose already in this pic)

Drain 4 port

Drain 4 hose route to bottom of box

All 4 drain hoses exit just below the cab. Drain hose 4 shown here. Others are in the other corners as described above

14. Clean each of the 4 drains. For #2, #3, and #4 I removed the hose from the box nipple for cleaning. For drain #1, I didn't remove the hose but just accessed the port in bottom of the drain pan (location shown above)

For each drain, I did the following steps:
a) Put catch pan on ground below drain hose
b) Use compressed air (from the top end) to blow out any debris out the bottom of the hose
c) Flush line with water & chlorox mixture to kill any mold that might be present
d) Flush line with distilled water
15. Reverse disassembly steps to reassemble. Make sure motor cams and actuator rods are oriented as before (consult the picture you took on disassembly) and the lid should easily snap back into place
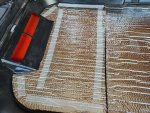
16. For extra credit, I added some Reflectix (or iFoil) brand bubble insulation in my roof to try to repel some of the heat so the unit doesn't have to work quite so hard. Attached with strips of double-sided tape.

So far, A/C is working great in 100 degree heat and no longer raining on me.
13. Locate the drain ports and hoses (there are 4!). The location of the ports is circled (I couldn't find the exact location of #2). And the drain hose routes are marked as well. 1 & 2 go down the right side of the cab (#1 in the rear channel and #2 in the front channel). Similarly, 3 & 4 go down the left side of the cab, #3 in the rear channel and #4 in the front.
Close-up of port for drain #1
Drain 2 hose route to bottom of box
Drain 3 port and hose (I have removed the hose already in this pic)
Drain 4 port
Drain 4 hose route to bottom of box
All 4 drain hoses exit just below the cab. Drain hose 4 shown here. Others are in the other corners as described above
14. Clean each of the 4 drains. For #2, #3, and #4 I removed the hose from the box nipple for cleaning. For drain #1, I didn't remove the hose but just accessed the port in bottom of the drain pan (location shown above)
For each drain, I did the following steps:
a) Put catch pan on ground below drain hose
b) Use compressed air (from the top end) to blow out any debris out the bottom of the hose
c) Flush line with water & chlorox mixture to kill any mold that might be present
d) Flush line with distilled water
15. Reverse disassembly steps to reassemble. Make sure motor cams and actuator rods are oriented as before (consult the picture you took on disassembly) and the lid should easily snap back into place
16. For extra credit, I added some Reflectix (or iFoil) brand bubble insulation in my roof to try to repel some of the heat so the unit doesn't have to work quite so hard. Attached with strips of double-sided tape.
So far, A/C is working great in 100 degree heat and no longer raining on me.
Attachments
-
 1.2 MB Views: 31
Last edited:
