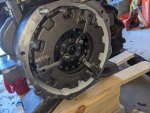
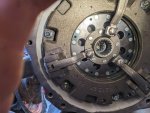
Clutch replacement, was not expecting this

Spikes

New member

Equipment
L3450DT-W
Oct 15, 2012
21
15
3
N.W. Arkansas
Reading through this thread as I'm having clutch trouble also but here's something to ponder - I worked in a machine / welding shop for around 12 years that had a flywheel machine. People brought me flywheels from all sorts of stuff, as I was known as the guy who would fix the things that others turned away and was very accurate with grinding them. On stepped flywheels like the one you have, the outer surface needs to be ground as much as the friction surface. A diamond wheel is needed as the Silicon Carbide particulate wheels don't keep a sharp enough edge to get the lower step level all the way in.
That's it - There's no voodoo to it, as long as the exact same amount is removed, you can take all you want off the friction surface (within reason). Those are the two dimensions that matter. I don't know much, but I know I had a lot of happy customers doing just that.
 
  • Like
Reactions: 1 users

jaxs

Well-known member

Equipment
B1750HST
Jun 22, 2023
765
581
93
Texas
I don't have any chapter and verse to quote on the subject but I don't understand how taking a few thousandths of a wheel could render it useless. Far more clearance is created as clutch disk wears down in normal use.
 

North Idaho Wolfman

Moderator
Staff member
Lifetime Member

Equipment
L3450DT-GST, Woods FEL, B7100 HSD, FEL, 60" SB, 743 Bobcat with V2203, and more
Jun 9, 2013
31,098
7,063
113
Sandpoint, ID
I don't have any chapter and verse to quote on the subject but I don't understand how taking a few thousandths of a wheel could render it useless. Far more clearance is created as clutch disk wears down in normal use.
Just trust the people that have worked on them for years, It matters! 😉
 

North Idaho Wolfman

Moderator
Staff member
Lifetime Member

Equipment
L3450DT-GST, Woods FEL, B7100 HSD, FEL, 60" SB, 743 Bobcat with V2203, and more
Jun 9, 2013
31,098
7,063
113
Sandpoint, ID
Reading through this thread as I'm having clutch trouble also but here's something to ponder - I worked in a machine / welding shop for around 12 years that had a flywheel machine. People brought me flywheels from all sorts of stuff, as I was known as the guy who would fix the things that others turned away and was very accurate with grinding them. On stepped flywheels like the one you have, the outer surface needs to be ground as much as the friction surface. A diamond wheel is needed as the Silicon Carbide particulate wheels don't keep a sharp enough edge to get the lower step level all the way in.
That's it - There's no voodoo to it, as long as the exact same amount is removed, you can take all you want off the friction surface (within reason). Those are the two dimensions that matter. I don't know much, but I know I had a lot of happy customers doing just that.
Yes you are exactly right, just very few ever do it the right way!
 
  • Like
Reactions: 1 user

BastropMetal

Member
Lifetime Member

Equipment
L3400
Dec 20, 2022
31
19
8
Texas
I think the seal looks fine, you should be able to see where the old seal rubbed on the crank sleeve, compare to that mark.

It always bugs me when a kit parts don't match.
Did you compare the the old clutch pack and clutch disks to make sure they matched?

As far as I can tell they match. I have looked over the clutch discs closely and I'm very confident they are the same shape, and size, at least to the degree I can tell by eye. I havent put calipers on every dimension. In post #43 I mentioned that the adjustment bolts dont seem to be the same, but all the other dimensions on the clutch assembly seem right to me.
 
  • Like
Reactions: 1 user

North Idaho Wolfman

Moderator
Staff member
Lifetime Member

Equipment
L3450DT-GST, Woods FEL, B7100 HSD, FEL, 60" SB, 743 Bobcat with V2203, and more
Jun 9, 2013
31,098
7,063
113
Sandpoint, ID
As far as I can tell they match. I have looked over the clutch discs closely and I'm very confident they are the same shape, and size, at least to the degree I can tell by eye. I havent put calipers on every dimension. In post #43 I mentioned that the adjustment bolts dont seem to be the same, but all the other dimensions on the clutch assembly seem right to me.
Ok, Carry on!
 

BastropMetal

Member
Lifetime Member

Equipment
L3400
Dec 20, 2022
31
19
8
Texas
I think today is the day for putting it back together, finally. I am going to wire wheel the real half to clean it up, apply RTV and then put it back together. If you see anything wrong here, let me know.

The manual says put molybdenum disulphide on the clutch splines. I did that, you can see it in one of the pictures. It also says put grease on the splines of the shaft. I did that. I'm not sure if the amount I put on is too much or too little. Thats fine, but it does seem strange that this grease and molybdenum disulphide are immediately going to mix together, right?

PXL_20250118_175601788.jpg PXL_20250118_175533983.jpg PXL_20250118_175544536.jpg
 
  • Like
Reactions: 1 user

Runs With Scissors

Well-known member

Equipment
L2501 TLB , Grappel, Brush Hog, Box Blade, Ballast box, Forks, Tiller, PH digger
Jan 25, 2023
2,605
3,052
113
Michigan
I think today is the day for putting it back together, finally. I am going to wire wheel the real half to clean it up, apply RTV and then put it back together. If you see anything wrong here, let me know.

The manual says put molybdenum disulphide on the clutch splines. I did that, you can see it in one of the pictures. It also says put grease on the splines of the shaft. I did that. I'm not sure if the amount I put on is too much or too little. Thats fine, but it does seem strange that this grease and molybdenum disulphide are immediately going to mix together, right?

View attachment 146511 View attachment 146512 View attachment 146513
It has alway been my experience with automotive clutchs that grease needs to be used sparingly.

You certainly don't want it to get "slung" onto the clutch surfaces.

EDIT: to me that looks about right. I might wipe off the small stings/globs that are hanging down. (y)
 
  • Like
Reactions: 1 user

BastropMetal

Member
Lifetime Member

Equipment
L3400
Dec 20, 2022
31
19
8
Texas
Thanks for feedback everyone.

I'm sliding it together and it has basically stopped. The two studs on the top of the engine side have just slid into the matching holes on the rear side, so I'm pretty well lined up. I measured the gap at the top and the gap at the bottom and I'm within a mm, so it seems as lined up as I could reasonbly be. But it just will not got further together.

I thought maybe the spines of the clutch assembly arent aligned with the spines of the shaft so I tried rotating it slightly, but didnt detect any give or resistance there.

Based on the gap I think I should be at the point where the shift is just starting to slide into the pilot bearings, so maybe thats not perfectly lined up.

Any best practices at this point that i should know? Should I just get some ratchet straps and crank on it?
 

D2Cat

Well-known member
Lifetime Member

Equipment
L305DT, B7100HST, TG1860, TG1860D, L4240
Mar 27, 2014
13,982
5,864
113
40 miles south of Kansas City
Here's where I'd be focused.

"Based on the gap I think I should be at the point where the shift is just starting to slide into the pilot bearings, so maybe thats not perfectly lined up."

Usually some jiggling, slight rotation, and prayer gets it all lined up. Patience is a virtue!!!!
 
  • Like
Reactions: 2 users

bhaack

New member

Equipment
L305DT
Jan 17, 2025
13
5
3
Kansas
Are you in the dowels?
If so, put the bolts in it and snug it, wiggle it, snug it, wiggle it, spin the flywheel with a screw driver or something between each snug n wiggle.
As soon as the dowels are engaged in their holes you really can't mess anything up anymore.
 

BastropMetal

Member
Lifetime Member

Equipment
L3400
Dec 20, 2022
31
19
8
Texas
I'm to the threaded studs on the top, but not to the two dowels. I'm right at 25mm gap, within a mm all the way around, so I'm squared up.

I had to step away for a bit due to frustration. But I'll keep wiggling and jiggling and I'm sure it will go eventually. The responses are helpful because I kept having a thought in my the back of my mind of "you are doing something wrong and are going to screw something up." So everyone saying I need to just keep trying makes me more comfortable continuing.
 
  • Like
Reactions: 1 user

bhaack

New member

Equipment
L305DT
Jan 17, 2025
13
5
3
Kansas
I'm to the threaded studs on the top, but not to the two dowels. I'm right at 25mm gap, within a mm all the way around, so I'm squared up.

I had to step away for a bit due to frustration. But I'll keep wiggling and jiggling and I'm sure it will go eventually. The responses are helpful because I kept having a thought in my the back of my mind of "you are doing something wrong and are going to screw something up." So everyone saying I need to just keep trying makes me more comfortable continuing.
Amen, be glad you're doing this on a Compact tractor and not a bend in the middle 4 wheel drive. This stress is manageable lol!!

You'll get this, no worries.
Being in line is where the trick is. gap the same on all sides, and top and bottom.
Spin the flywheel and those splines will slide together.
Don't pull it together with the bolts, but you can start one on each side to help hold it. If you do put a couple bolts in it, bring them up to where they touch the block but don't pull on it. You'll want some slack in there to wiggle with.
A little up here, a little down there, and don't forget the front axle tilts, that can cause issues with alignment also.

Oh, just remembered.

Want to cheat?
You sure?

Ok

go find a bolt that is twice as long but the same size / thread pitch. Get 2 of them, cut the heads off, round that end you just cut off and screw it into the clutch/transmission housing. You just made and installed some guide pins, that will make life a lot better, just make sure you can get them out again after it's married.
 
  • Like
Reactions: 1 users

North Idaho Wolfman

Moderator
Staff member
Lifetime Member

Equipment
L3450DT-GST, Woods FEL, B7100 HSD, FEL, 60" SB, 743 Bobcat with V2203, and more
Jun 9, 2013
31,098
7,063
113
Sandpoint, ID
Check your alignment.
I will throw it a small amount out of alinement and it will slide into the pilot bushing.
 

BastropMetal

Member
Lifetime Member

Equipment
L3400
Dec 20, 2022
31
19
8
Texas
I have thus far been unsuccessful.

Any suggestions on how to check my alignment? I have measured the gap on the top, bottom, left and right and its all within a mm or so. It seems like that should be good.

I'm going to ask my brother in law to come out tomorrow and help me out. I think if I had one person pulling it together while another person was jiggling it around it might pop into place.
 
Last edited:
  • Like
Reactions: 1 user

D2Cat

Well-known member
Lifetime Member

Equipment
L305DT, B7100HST, TG1860, TG1860D, L4240
Mar 27, 2014
13,982
5,864
113
40 miles south of Kansas City
When you remember how much trouble you have when taking something with just a little bit of rust apart, like a brake drum, you can realize it does not take much to cause something to not slide together.

You might adjust your 25mm gap up or down a tad also. when you project any amount off it is amplified by the time it's to the pilot bushing.
 

jaxs

Well-known member

Equipment
B1750HST
Jun 22, 2023
765
581
93
Texas
If it is still being stubborn after you have 2 heads and 4 hands, hold a recep saw , air chisel or other vibratory against housing while guiding things together.
 

Runs With Scissors

Well-known member

Equipment
L2501 TLB , Grappel, Brush Hog, Box Blade, Ballast box, Forks, Tiller, PH digger
Jan 25, 2023
2,605
3,052
113
Michigan
I'm with the "wiggle, jiggle and pray" crowd.

Double checking that your clutch alignment is good (y)

Unless tractors are way different than cars, it is my advice that, under no circumstances, should you use the "bell housing bolts" to pull it together.

In the automotive world, only bad things happened when I have done that.

It can be frustrating for sure.

And be ready with a bolt to secure it quickly; cause when everything is aligned properly, it will "suddenly pop into place" (It will almost bring a tear to your eye when it happens ;))


I don't want to derail this thread, so here is a comical story for ya
 
Last edited:
  • Like
Reactions: 1 users

BastropMetal

Member
Lifetime Member

Equipment
L3400
Dec 20, 2022
31
19
8
Texas
together.jpg
I didnt update yesterday because I had a friend over and we got it together! Anyone capable of getting this together by themselves has my utmost respect and also must have vastly more tolerance for frustration than I do. Even with a buddy it took 30-40 minutes of pushing together, jacking up the back, lifting the front, lowering the back, lowering the front, wiggling the middle, etc. We got it done though.

The whole tractor is mostly together at this point. I should have planned better, I have to refill my hydraulic fluid so I might as well replace all my fluids and filters, so I am going to order those today.

Thank you so much to all of you for the help and support. I tried to document this repair thoroughly in this thread as resource for anyone in the future.

If you are reading this in the future and have any questions dont hesitate to ask here or message me directly.