Here is a brief walk through of HST fan on BX2350. During my searches I did not find any write ups for this model. Pauls video on youtube was close, but not exact for this one. It was the most helpful video though.
I got this done yesterday, sort of, I ended up bending my drive shaft after finishing it, so as long as you're not a bone head like me, it should be a one time affair, install a skid plate and you'll never have to do it again.
After viewing every youtube video, and reading every thread until my eyes bled, I opted to do it from the top. I wanted the extra room to work and didnt want to drill a hole through the deck. I don't think on the older bx, doing it from the bottom is even possible. Time to remove all the upper panels is only around 45 minutes for a first timer.
- Open hood, remove engine side shroud, unplug headlights and detach loom from support brace.
- Remove the bolts that hold the entire hood bracket on, they are attached at the front frame, should be 6x 15mm bolts. remove the entire thing set aside.
- Seat comes out with one pin. Remove floor mat, remove foot deck by unbolting its bolts, and orienting deck up and away from pedals. - I had to remove plastic hydraulic covers under the battery box, just a few bolts.
- Remove rear fender body by unplugging wires going to rops, and tail lights. -Remove ROPs, remove knobs (yank them off), remove bolt under fenders that go to rear grab handles. Use care these 'nuts' are cast into the plastic. Mine were stuck, I used a cutting wheel and cut handle (ordered new handle set, not expensive). - Fender will come off.
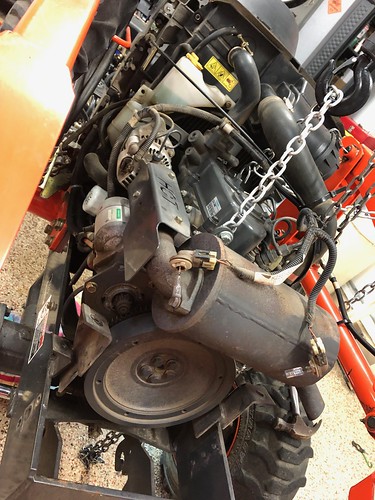
I was glad I did it this way because the amount of nastiness was real. I got to cleaning.
- You can remove the 3 bolts that attach the front drive shaft CV to the crank. On older models without the removable coupler between the shaft and crank, you are out of room, and need to move the engine forward...
- Undo the 4x 10mm bolts that hold the radiator shroud around the fan. Two on each side, on the right side one of them just above the lower hose. The two top ones have heads that are secured by the under dash frame. If you got the right ones the whole radiator and baffle will be loose, make sure it can lift up out of the rubber feet on bottom.
- Remove front engine mounts bolts, top and bottom, very easy to access. - Remove rear left upper engine mount bolt, remove rear right upper engine mount bolt, note it has two grounding straps, and remove the grounding strap on the right side frame that is below the starter, it has two wires going to it. - Raise engine slightly, so it can move forward a few inches.
- Spin shaft to access the bolt allowing shaft to be freed from rear, it will slide froward about 3 inches off the splined HST shaft.
That's really about it, you can change the fan. Dont over tighten fan bolts or the vertical one. The vertical bolt that goes back onto the shaft, there should be a flat spot on the HST splines where the bolt will align, my machine did not have this flat spot.
- Put engine back, and shroud, dont forget the ground straps, make sure radiator is seated back into its rubber feet.
I wrapped rubber pad around the shaft and put a vice grip on it so it wouldnt spin when I reattached the front coupling. Remove vice grips, put stuff back.
I liked doing it from the top, you have lots of room to work, and there was so much crap caked in there it gave me a chance to clean, and replace other miscellaneous items (fan belt ect).
I then started the tractor with the clamps on the middle of the drive shaft, and
bent it, so I will be doing this a second time when the new shaft arrives.
older machines do not have the second 3 bolt coupler


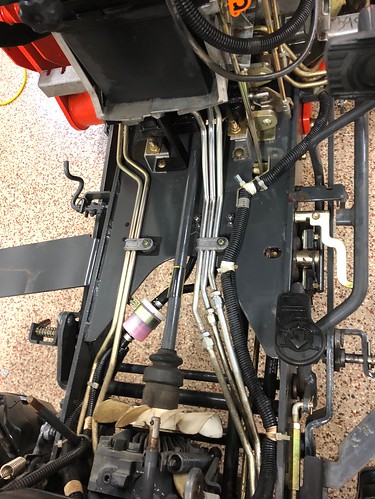
Deck off

Cleaner
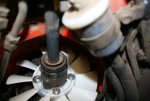
hooking up motor

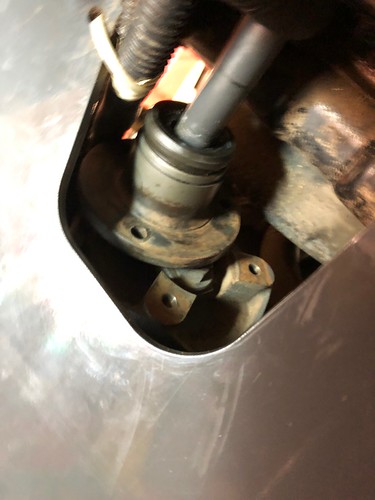
Hood bracket removed, engine moved forward and up a few inches, this is all you need. Now there is room to work in the back
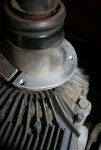
old fan


together