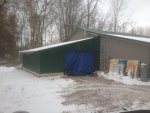
We'll I'm finally getting around to posting some pictures of the shed I designed and built for my B2620. The shed is only 10'x14', but I already had a concrete pad that was there so it saved a lot of money. I can get the tractor and rear blade in there, but when I get the FEL, I'll either have to leave the loader off or the rear blade off. But in the next couple years I'd like to build a pole barn/shop so that will help out.
Back in June when I first got the tractor I used it to pull down an old nasty shed/chicken coup, with the plans of building a new shed on the concrete pad for the tractor eventually. See that post at: http://www.orangetractortalks.com/forums/showthread.php?t=15129
Well my garage was getting more and more stuffed so my wife said why not go ahead and get the shed built before winter. A few weeks ago I had the week off to work around the house so I took a couple days to put up this shed.
I started out using a 3d modeling program called Rhino 3d, that I used to use to design our hovercrafts, to draw up the shed I wanted to build on the existing concrete pad, which was about 10'x14'. I strayed from this drawing a little bit and made the door 6.5' wide instead of 6' and also continued the header all the way across the front. I also designed it so I could build the shed completely by myself.

First thing I had to do is get spot ready for the shed, I remembered there being a sapling growing behind the pad, but it turned out to be more of a full sized mulberry, about 10" dia and 25' tall or so, and it was leaning over the neighbors fence. So I figured the B2620 needed to work for its new home anyways") so I hooked it up to the tree, pull it away from the fence and started cutting until I was able to pull it over with the tractor.
so I hooked it up to the tree, pull it away from the fence and started cutting until I was able to pull it over with the tractor.

I built the side walls down in the garage where I had power and air and then loaded them up on the trailer.

Then I put the tractor to work again to pull the trailer out back and I put the side walls up and anchored them. I also put some steel straps on to anchor the studs to the concrete in case we get a high winds. I also used a couple C-clamps to hold the walls the correct distance apart.

I also printed off some templates for some gusset plates for the trusses. And my wife got me a new cordless circular and jig saw for our anniversary so I was able to test those out too.

I also built my trusses ahead of time down in the garage, and made up spacers with my gusset plates.

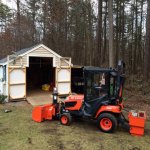
And I put the tractor to work again hauling the bits and pieces around back.

Then I built the back wall of the shed, followed by putting up the first truss, that way I could C-clamp the truss to the wall, and then go down and get the bottoms sides lined up on the wall.

Back in June when I first got the tractor I used it to pull down an old nasty shed/chicken coup, with the plans of building a new shed on the concrete pad for the tractor eventually. See that post at: http://www.orangetractortalks.com/forums/showthread.php?t=15129
Well my garage was getting more and more stuffed so my wife said why not go ahead and get the shed built before winter. A few weeks ago I had the week off to work around the house so I took a couple days to put up this shed.
I started out using a 3d modeling program called Rhino 3d, that I used to use to design our hovercrafts, to draw up the shed I wanted to build on the existing concrete pad, which was about 10'x14'. I strayed from this drawing a little bit and made the door 6.5' wide instead of 6' and also continued the header all the way across the front. I also designed it so I could build the shed completely by myself.
First thing I had to do is get spot ready for the shed, I remembered there being a sapling growing behind the pad, but it turned out to be more of a full sized mulberry, about 10" dia and 25' tall or so, and it was leaning over the neighbors fence. So I figured the B2620 needed to work for its new home anyways
so I hooked it up to the tree, pull it away from the fence and started cutting until I was able to pull it over with the tractor.
I built the side walls down in the garage where I had power and air and then loaded them up on the trailer.
Then I put the tractor to work again to pull the trailer out back and I put the side walls up and anchored them. I also put some steel straps on to anchor the studs to the concrete in case we get a high winds. I also used a couple C-clamps to hold the walls the correct distance apart.
I also printed off some templates for some gusset plates for the trusses. And my wife got me a new cordless circular and jig saw for our anniversary so I was able to test those out too.
I also built my trusses ahead of time down in the garage, and made up spacers with my gusset plates.
And I put the tractor to work again hauling the bits and pieces around back.
Then I built the back wall of the shed, followed by putting up the first truss, that way I could C-clamp the truss to the wall, and then go down and get the bottoms sides lined up on the wall.