B2400 HST 4wd - Partially stripped bolt housing

NickAdams

Member

Equipment
B-2400 HSD
Jan 11, 2021
40
10
8
22642
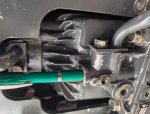
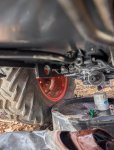
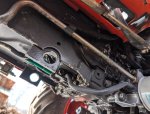
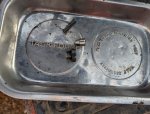
Working on the tractor today and started randomly tightening bolts to reduce sources of hydraulic leaks. When I came to the bolt shown in the pictures below, the bolt did not tighten at all but could not be pulled out by hand. I did turn it counter-clockwise to remove the bolt. The bolt was not damaged but had some metal shavings on it indicating that it partially stripped the bolt housing. In addition, I found a spring and another part shown in the pictures below. The bolt housing appears to be an integral part of the tractor that would be extremely difficult/costly to replace. I have two questions:

1. Is there a product or method to allow the bolt to firmly seat in the bolt housing? I have used helicoil when working on cars but it does not seem practical in this application. Locktite might help but not as firm as I would like. Ideas would be appreciated.

2. I have been unable to locate the bolt and bolt housing with certainty in the parts diagrams. In the pictures the bolt housing has a green pen in it to help locate it. This is important to me because: i) I am not 100% certain that I recovered all the parts behind the bolt and ii) I am not certain how the parts go into the bolt housing before the bolt. I've gotten better at reading the part diagrams but have a way to go.

Thanks for your help
 

Attachments

torch

Well-known member

Equipment
B7100HSD, B2789, B2550, B4672, 48" cultivator, homemade FEL and Cab
Jun 10, 2016
2,642
883
113
Muskoka, Ont.
I would try a heli-coil there. The other alternative is Loctite's "Form a Thread" repair kit. It's an epoxy that you apply to the hole. Also supplied is a release agent for the bolt. You apply the epoxy and insert the bolt, allowing the epoxy to cure around the bolt threads.

The problem in this application is getting the hole clean and free of all oil so the epoxy can bond. I'd also be concerned about extra epoxy oozing in to whatever that spring is for.
 

North Idaho Wolfman

Moderator
Staff member
Lifetime Member

Equipment
L3450DT-GST, Woods FEL, B7100 HSD, FEL, 60" SB, 743 Bobcat with V2203, and more
Jun 9, 2013
32,019
7,757
113
Sandpoint, ID
@PoTreeBoy got it right.


Let me post a little less blurry pic.
That's the charge relief port.
Get a epoxy thread repair kit or a heli coil kit.
Loctite PC3967
I would use a Qtip or a small hook tool and pull the seat out, #450
Then put a cotton ball (dry if doing epoxy or oil soaked if helicoil) in the port.
If helicoil:
Drill 1/8" deeper than the helicoil.
Vacuum port
Tap hole
Vacuum again
Install coil

If epoxy:
Follow kit instructions

Once rethreaded:
Pull out cotton ball reinsert seat cone, spring shim and bolt with new O-ring.


1741664977197.png
 

NickAdams

Member

Equipment
B-2400 HSD
Jan 11, 2021
40
10
8
22642
Thank you for your help. I was unable to Loctite PC3967 so I ordered Loctite 236382 4.8-ML. Form-A-Thread Stripped Thread Repair Kit from Amazon. I am missing parts 460 and 450 - am in the process of getting these parts. I do not think that I had the necessary clearances to do the helicoil well in this area. Oddly, it maybe that the treads were previously helicoiled (more than 20 years ago) and have failed. I will look into removing the old helicoil and replacing it with new helicoil- would be the simplest and best solution, if possible.

Once again I want to thank the members of this forum. Amazingly helpful.
 

North Idaho Wolfman

Moderator
Staff member
Lifetime Member

Equipment
L3450DT-GST, Woods FEL, B7100 HSD, FEL, 60" SB, 743 Bobcat with V2203, and more
Jun 9, 2013
32,019
7,757
113
Sandpoint, ID
I am missing parts 460 and 450 - am in the process of getting these parts.
If it ran before those parts can not be missing.

460 would only been needed if the pressures were wrong, that shim is an adjustment for a short or weaker spring.
450 is in the case, it does not easily come out.
 

NickAdams

Member

Equipment
B-2400 HSD
Jan 11, 2021
40
10
8
22642
When I removed the bolt, the spring and charge relief fell out but I was unable to locate the shim. You are probably right about 450 still being in the case. I am hoping to get the parts used so I'll probably get the whole assembly because I don't think there would be a significant price difference. And, I am known to lose and break parts.

Hypothetically, if I just welded the bolt on so it didn't leak, without parts 430-450, would the tractor still work well? I imagine that Kubota is not in the business of adding parts to the tractor that serve no purpose. Weld it shut with the parts inside and hope to never have to access this assembly again - plan D.
 

PoTreeBoy

Well-known member
Lifetime Member

Equipment
L35 Ford 3930
Mar 24, 2020
2,963
1,624
113
WestTn/NoMs
When I removed the bolt, the spring and charge relief fell out but I was unable to locate the shim. You are probably right about 450 still being in the case. I am hoping to get the parts used so I'll probably get the whole assembly because I don't think there would be a significant price difference. And, I am known to lose and break parts.

Hypothetically, if I just welded the bolt on so it didn't leak, without parts 430-450, would the tractor still work well? I imagine that Kubota is not in the business of adding parts to the tractor that serve no purpose. Weld it shut with the parts inside and hope to never have to access this assembly again - plan D.
You have all the parts, only the 420 seal washer looks a little sketchy and could have been leaking.

I think that housing is aluminum which is probably the source of the shavings you discovered. Will a magnet attract them?

Kill plan C and D. First, those little parts are responsible for supplying the hydrostat with a supply of fluid. Why would you want to kill your tranny? Second, if that housing is aluminum, you'd have to be a h€ll of a welder to weld that steel plug to it.
 

North Idaho Wolfman

Moderator
Staff member
Lifetime Member

Equipment
L3450DT-GST, Woods FEL, B7100 HSD, FEL, 60" SB, 743 Bobcat with V2203, and more
Jun 9, 2013
32,019
7,757
113
Sandpoint, ID
You need to use the epoxy kit with the plug and the case, leaving out the internal parts and the O-ring when you do it.
Then pull the plug back out after the epoxy has set, then install all the parts including the O-ring and use a light duty threadlocker on the plug and use LIGHT force to tighten the plug.

I will repeat this one more time, If it didn't have a shim in it, don't put any in it.
When a shim is installed it sits inside the plug and does not easily fall out.

The shims come in a kit of 4 different thicknesses and are added as needed.
you would need the proper test equipment to figure out what size shim it would need, it's not random and it's not a set size.
There was no shim in it and it ran perfectly, adding a shim it doesn't need will not make it run better.

Get a new O-ring:
 

NickAdams

Member

Equipment
B-2400 HSD
Jan 11, 2021
40
10
8
22642
Sticking with Plan A.

1. I have ordered the o-ring.

2. A magnet did not attract the shavings. And, looking at other bolt holes on the tractor, I don't think its helicoil.

3. I will not use a shim in the assembly.

PoTreeBoy and Wolfman - thank you both for your time and advise.
 

torch

Well-known member

Equipment
B7100HSD, B2789, B2550, B4672, 48" cultivator, homemade FEL and Cab
Jun 10, 2016
2,642
883
113
Muskoka, Ont.
Thank you for your help. I was unable to Loctite PC3967 so I ordered Loctite 236382 4.8-ML. Form-A-Thread Stripped Thread Repair Kit from Amazon.
It seems to be discontinued by Loctite. Just what's left in the supply chain now.

Make sure you have the hole absolutely clean. Use brake cleaner and a cotton swab repeatedly. I would smear the thinnest of layers inside the hole and apply a layer to the bolt itself (after applying the release agent, of course) to minimize the chance of pushing excess into the hole. If possible, use a sacrificial bolt of the same diameter and thread to avoid contaminating the original's sealing surface. Cut the sacrificial bolt to 1 thread longer than the original to ensure adequate but not excessive depth .
 

NickAdams

Member

Equipment
B-2400 HSD
Jan 11, 2021
40
10
8
22642
Torch - I like the ideas and will use them. Looking into the hole there appears to be a small hole on the top (and maybe the bottom) of the bolt hole, just after where the bolt would stop when screwing it into the hole. Certainly is best not to cover this hole(s) with locktite. I will also jack up the tractor to stop the fluid from flowing toward the threads. We shall see. Thanks.
 

PoTreeBoy

Well-known member
Lifetime Member

Equipment
L35 Ford 3930
Mar 24, 2020
2,963
1,624
113
WestTn/NoMs
Torch - I like the ideas and will use them. Looking into the hole there appears to be a small hole on the top (and maybe the bottom) of the bolt hole, just after where the bolt would stop when screwing it into the hole. Certainly is best not to cover this hole(s) with locktite. I will also jack up the tractor to stop the fluid from flowing toward the threads. We shall see. Thanks.
That's probably a relief hole to prevent trapping fluid behind the poppet, or it could be a pressure equalizing port. Yes, better not to plug it.
 

NickAdams

Member

Equipment
B-2400 HSD
Jan 11, 2021
40
10
8
22642
I understand that the part I am working on is a pressure relief valve. I am interested in testing the relief valve pressure after reassembling this valve. I believe the pressure relief valve is addressed in WSM Manual, page 8-M6 (except I don't see a spring) and the testing procedure is on page 8-S8. In the unlikely event that I'm right, is there an inexpensive hydraulic pressure test kit that I can use to test this system? Usually, I buy really good tools, but I am 66 yrs old and never needed a tool like this before - I suspect I will never need it again. Thoughts?