D1105 idle, governer, injection pump questions

Island Runner

New member

Equipment
Kubota RTV X1140
Jan 11, 2024
7
1
3
OHIO
Hello all, first post on this site and I have asked this question on other sites but no answers in over a week so I found this site and read thorugh hundreds of pages over the last few days and still have not found my answer so I will ask and hopefully get some answers.

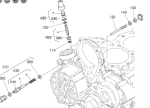
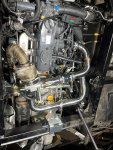
Can anyone tell me what the 3 screws that are capped off near the injection pump are on my D1105? I have attached a pic for reference. I know they are screws for adjusting the governor/fuel delivery, but what does each one specifically control? How does adjusting one affect the other, or is there no correlation between them. I ask because I have ordered a turbo kit for my RTV X1140 and reading the different install instruction from different designs from different companies to get a handle what I am going to be doing, some say adjust this one and that one and another says adjust this one etc., but none of the instructions tell you why or what to expect. They just say move it 1-2 turns and tighten or make the bolt 0.625" from the nut. I want to know what each specifically does so I know what to expect while tuning this thing. Detailed info and explanations would be appreciated!

I should clarify that I am looking specifically at parts #20, #65, and #120. Each different turbo kit says something different in thier install manuals. I'm sure not all turbo kits are exactly the same but I would expect the tuning process to be similar and from what I read, they are not similar in tuning. I can't see why one would say to do this screw and not the next one, and another says to adjust this one and not the 2 the other mentioned by the other manufacturer. Just trying to understand the cause/effect of adjusting each one. Same goes for the tamper proof torx screws on the injector pump delivery plates. In one set of instruction they say to loosen the injector plates and rotate the plates counterclockwise as far as they will go. What does this do? I assume it will increase fuel in some way but other instructions do not mention this at all. Just trying to piece this all together in my head and use some instructions from all the different options together if needed. I just can't imagine why the tuning instructions are so much different.

I have already installed EGT, Boost, Air Intake Temp gauges, etc. to aid in tuning but don't feel comfortable doing my install yet until I figure out what I am really adjusting while I am tuning it. Yea, I can adjust and test and figure out what these screws do, but I would rather not waste the time and know ahead of time what they do. Hope someone can explain this. Thanks!
 

Attachments

  • Like
Reactions: 1 user

lugbolt

Well-known member

Equipment
ZG127S-54
Oct 15, 2015
5,191
1,877
113
Mid, South, USA
going off of memory...

the fuel adjustment is on the pump itself

you have a stop, usually at the back. That one you don't play with (usually). The one on the opposite side is generally your governor/overspeed adjustment. Probably don't need to mess with that one either.

Your kit comes with instructions doesn't it? Use them. Forget everyone else's destructions.
 

Island Runner

New member

Equipment
Kubota RTV X1140
Jan 11, 2024
7
1
3
OHIO
Yea, my kit came with instructions but I thought I would gain more insight by reading all the different kits instructions. In reality reading all the different tuning methods just made me more confused. I was able to find another set of instructions and the screws in question were given names. This is what the screws were called in that set of instructions.

#20 = Fuel Rack Adjusting Screw --> turn out 1/4 to 1/2 turn at a time and test.
#65 = Full Load Adjusting Screw --> make it .650" from bottom of screw to copper washer. .650" good starting point but needs tested and adjusted to get right.
#120 = Intermediate Governor Screw --> says to back it out 2.5 turns

Can anyone shed anymore light on this?
 

Island Runner

New member

Equipment
Kubota RTV X1140
Jan 11, 2024
7
1
3
OHIO
OK, here's the update. Just finished up the turbo installation and fueling adjustments. Also did the HST optimization procedure and adjusted the charge pressure and the high pressure relief.

As for the fueling adjustments I made, and as a reference to my other thread asking what the 3 adjustment screws are and what they do, I will try to explain it here.

Screw #20 = Fuel Rack Limit adjustment - Limits how far the fuel rack can be pushed by the governor under load when the RPM drops. Right now I am at 1 turn out from the factory setting and there is slight smoke under load. May adjust further out as I get more hours on it and get a better feel for it.

Screw #65 = Max Fuel adjustment - This screw limits the max amount of fuel the injection pump will deliver. I have no idea as to where the factory setting was. When I finally got the tamper proff sleeve off, the screw and jam nut were loose. I set the screw to 0.650" from end of screw to copper washer as one set of the instructions states. These instructions say that adjustments are case-by-case and even though the machine is running great right now, I'm sure I will adjust it further out as I go.

Screw #120 = Intermediate Governor Screw. I'm really not sure what this does yet. In one set of instructions it said to back it out 2 1/2 turns so thats what I did.

I also advance the injection timing about 2 degrees by taking out the thinnist shim. I feel I could advance it another 2+ degrees but I was left with only 1 shim, which is the thickest one with no holes so I left it in place.

I adjusted the charge pressure in 1 turn as set of instructions said to turn it in 1 to 2 turns. I went one turn but as of now, I do not have s set of Test Guages so in the future I will turn it in some more when I get guages. I really didn't notice any change in HST performance but for whatever reason, shifting from high to low to reverse is much, much smoother. No more stomping brake and tapping the throttle to get it to shift. It is smooth. Not really sure what made it smoother but I like it.

I also adjusted the high pressure relief and turned it in about 3/4 of a turn. Again, no real noticable difference. Again, when I get some test guages, I will revisit the HST adjustments.

As for the turbo installation, I can say this was a really nice and well thought out kit. It was from turbokits.com and actually went together smoothly. The engine bay does get pretty tight and the hardest part was figuring out how to get the nuts and bolts tightend up on the exhaust manifold, turbine housing to exhuast manifold, and a few other places. It trial and error, tighten down this and loosen it up again to tighten something else. It was a bit frustrating at times but get creative and you can figure out how to get it all tightened down.

As for the fueling and HST adjustments, I took instruction from 3 different kits and did all the adjustments they all stated to do. I believe adjusting everything made a huge difference. The machine runs amazingly well and the difference it quite noticable. Like I said, I will continue to make adjustments as I go and get a better feel for it in a working environment but in the brief testing I did last night, all was perfect and well within the parameters I was expecting. Here are my findings.

EGT's never got above 900 degrees. I was not loading the engine to its full ptotential by any means, but I feel with EGT's that low, I can up the max fueling quite a bit yet.

Water and oil temps never got above 180 degrees. Again, it was 20 degrees outside and I was not loading the machine to it's max and only ran 3 miles in the brief preliminary testing last night.

Boost was running about 5 PSI at full throttle in neutral. On the road, at full throttle I was seeing 9 PSI. Again, this is just the machine driving down the road and not putting a real load on the engine. I am guessing by loading the engine, I will see 12+ PSI but that is specualtion at this point and more tuning/testing will be done.

Here's the best part. THE SOUND! It took about 20 minutes for the turbine to "break in" if that is the correct term. For the first few starts and tests, the turbine would only spool up at about half throttle, at least the the point where you could hear it. At low idle, 1500 RPM, it was not producing any boost which I expected. After about 20 minutes of running the engine and keeping an eye temps and smoke levels etc. the turbo seemed to "loosen up" and was whistling at low idle. Right now, it is making 0.75 - 1.0 PSI of boost at 1500 RPM which is surprising to me. It does sound awesome though. The short open muffler connected to the short downpipe really lets the whistle come through in the exhaust note. It makes me smile just listening to it. At full throttle it sounds like a jet engine. I am no stranger to turbo diesels and even though my F350 is deleted, big turbo, tuned to the max, 5" straight exhaust with no muffler, and making about 700 HP, this little Kubota sounds better! Im chalking this project up as a BIG WIN!
 

Attachments

Island Runner

New member

Equipment
Kubota RTV X1140
Jan 11, 2024
7
1
3
OHIO
Forgot to mention that through this entire process the top speed has never changed. It was 24 - 25 MPH on the factory dash before any mods. After the lift and tires the dash would read 16 - 17 MPH and was 24.4 - 24.8 MPH on GPS. After turbo install it ran 24.8 MPH on GPS top speed last night. I knew I would not get more top end from the machine but it was suprising that speed never changed through the whole process. I was told by so many people that I would lose top speed with lift and big tires as the machine just doesn't have the power for it. DEAD WRONG.

Also, when I had everything apart for the turbo install, I went ahead and did my 50 hr service. Machine currently has 45.5 hours on it so I figured it was close enough to 50 hrs.
 

nicknack2

New member

Equipment
X1140
Oct 4, 2024
18
1
3
AZ
Forgot to mention that through this entire process the top speed has never changed. It was 24 - 25 MPH on the factory dash before any mods. After the lift and tires the dash would read 16 - 17 MPH and was 24.4 - 24.8 MPH on GPS. After turbo install it ran 24.8 MPH on GPS top speed last night. I knew I would not get more top end from the machine but it was suprising that speed never changed through the whole process. I was told by so many people that I would lose top speed with lift and big tires as the machine just doesn't have the power for it. DEAD WRONG.

Also, when I had everything apart for the turbo install, I went ahead and did my 50 hr service. Machine currently has 45.5 hours on it so I figured it was close enough to 50 hrs.
Interesting write up, so at the end what did you gained? I think you said speed did not change? so just more torque? how is it working now?
 

Island Runner

New member

Equipment
Kubota RTV X1140
Jan 11, 2024
7
1
3
OHIO
I gained HP and torque. I would assume HP increase was a good 50% and defintely has more torque. How much? DOn't really know but definitely noticable while pulling logs or other machinery. It does not go any faster top end but does get there faster. And I have noticed it is much faster when driving in muddy fields. I have several fields that are over 1 mile long and when they are wet and sloppy I can still run wide open without bogging the HST down. And I definitely gained a better exhaust sound!
 

Attachments

nicknack2

New member

Equipment
X1140
Oct 4, 2024
18
1
3
AZ
I gained HP and torque. I would assume HP increase was a good 50% and defintely has more torque. How much? DOn't really know but definitely noticable while pulling logs or other machinery. It does not go any faster top end but does get there faster. And I have noticed it is much faster when driving in muddy fields. I have several fields that are over 1 mile long and when they are wet and sloppy I can still run wide open without bogging the HST down. And I definitely gained a better exhaust sound!
That’s cool, so that much improvement in HP!!how much the turbo cost roughly if you don’t mind?
 

Island Runner

New member

Equipment
Kubota RTV X1140
Jan 11, 2024
7
1
3
OHIO
Here is the kit I went with. It was $2900 +/-. I probably had another $1000 in guages, sending units, and wiring I added to keep an eye on specific engine parameters to help me with tuning but I imagine you would be fine without all the guages etc.