BH77 Backhoe Dolly

bird dogger

Well-known member
Vendor Member

Equipment
Kubota B2650 and lots of other equipment
Feb 24, 2019
1,604
1,463
113
North Dakota
Still to be finished and painted, here’s my backhoe dolly for the BH77 used behind my B2650. It’s been in the unfinished “prototype” version waiting for any changes for a number of years. No changes needed so now I just need to finish some welds and finally get it painted…. one day.

But with some recent questions about backhoe dollies….thought I’d post these pics now…..maybe they’ll be of interest to someone.

It's made from 2”x2” sq. tubing for the long sides atop 2”x3” rectangular tubing for the end cross pieces and heavy duty wheel supports.
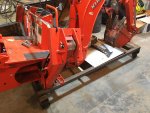
BH77 Dolly.JPG

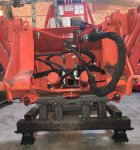
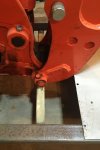
With the BH77 mounted on the tractor the dolly slides underneath until the vertical guide posts butt up against the hoe’s metal framework as shown in the pics. I had to notch out the top of the dolly's front support/rest for clearance when sliding it under the main framework of the backhoe. I think I’ll cut that center section out completely when finishing the welds for final painting. But for now it works great as is.
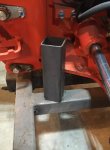
Dolly Alignment Guideposts.JPG Front Framework_Wheels_Rest_Guides.JPG Front Support and Notch.JPG

With the hoe unpinned, clear of the tractor, and ready to be lowered onto the dolly…..the guideposts help keep things centered and lined up for lowering the hoe down and onto the main support tubes.

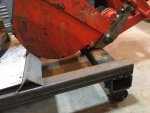
The dolly’s bucket end is made to support the main boom's framework with the bucket resting against the angle iron cross piece as shown.
End Framework_Bucket Rest.JPG

With the main support at the right height, the hoe sits at the right angle to be rolled up to the tractor and slip into the backhoe's lower mounting arms. Using the hoe's hydraulics, it’s rotated up into position to pin the top bracket locations in place. At rest on the dolly, there is no pressure or weight on any of the cylinders. A ratchet strap across the raised outriggers prevents them from sagging as well.
Front Framework_Wheels_Rest_Guides.JPG

I added a middle support cross piece (1” sq tubing) to prevent the hoe from sagging downward with any slow hydraulic fluid leakage. (You can see this white sq. tube in the first pic for a better overall view).
Middle Support Cross Brace.JPG

Once the backhoe is mounted with the outriggers down for support…..the boom/bucket is raised up off the dolly allowing it to be slid out from underneath.

Up next in a couple of years....maybe: "I finally finished and painted my backhoe dolly!!" :ROFLMAO:
 
  • Like
Reactions: 6 users

Chanceywd

Well-known member
Lifetime Member

Equipment
Kubota L2501DT BH77 VIRNIG URG60-CT 1950 8N
Mar 26, 2021
607
469
63
central ny
Still to be finished and painted, here’s my backhoe dolly for the BH77 used behind my B2650. It’s been in the unfinished “prototype” version waiting for any changes for a number of years. No changes needed so now I just need to finish some welds and finally get it painted…. one day.

But with some recent questions about backhoe dollies….thought I’d post these pics now…..maybe they’ll be of interest to someone.

It's made from 2”x2” sq. tubing for the long sides atop 2”x3” rectangular tubing for the end cross pieces and heavy duty wheel supports.
View attachment 104901

With the BH77 mounted on the tractor the dolly slides underneath until the vertical guide posts butt up against the hoe’s metal framework as shown in the pics. I had to notch out the top of the dolly's front support/rest for clearance when sliding it under the main framework of the backhoe. I think I’ll cut that center section out completely when finishing the welds for final painting. But for now it works great as is.
View attachment 104902 View attachment 104903 View attachment 104906

With the hoe unpinned, clear of the tractor, and ready to be lowered onto the dolly…..the guideposts help keep things centered and lined up for lowering the hoe down and onto the main support tubes.

The dolly’s bucket end is made to support the main boom's framework with the bucket resting against the angle iron cross piece as shown.
View attachment 104907

With the main support at the right height, the hoe sits at the right angle to be rolled up to the tractor and slip into the backhoe's lower mounting arms. Using the hoe's hydraulics, it’s rotated up into position to pin the top bracket locations in place. At rest on the dolly, there is no pressure or weight on any of the cylinders. A ratchet strap across the raised outriggers prevents them from sagging as well.
View attachment 104910

I added a middle support cross piece (1” sq tubing) to prevent the hoe from sagging downward with any slow hydraulic fluid leakage. (You can see this white sq. tube in the first pic for a better overall view).
View attachment 104908

Once the backhoe is mounted with the outriggers down for support…..the boom/bucket is raised up off the dolly allowing it to be slid out from underneath.

Up next in a couple of years....maybe: "I finally finished and painted my backhoe dolly!!" :ROFLMAO:
I like your stops to position it and your whole design. I have a dolly But I am using some wood blocking as I didn't get back to making the steel locating and rests yet. I had a large piece of channel iron I made mine out of which was my motorcycle turn table. I could drive my Kawasaki Vulcan 1500 in on it and then pull 1 pin and rotate it so I could drive out next time. I had used some 700# castors from Surplus center so the 4 of them are heavy enough for the backhoe. Sold the bike a couple years ago and wife sold hers and we bought a really nice low mileage 2006 Miata. It makes grocery shopping this time of year fun.

Bill
 

jkrubi12

Well-known member

Equipment
B2601/LA435/QA54"/BH70/B8160box/BB1254/PFL1242/SGC0554/WC-68 Chipper
Sep 24, 2012
397
289
63
right coast
Great engineering, nice build and awesome writeup! IMO that's the most thought-out & HD dolly setup I've seen! (y) Very well done!:)
 

bird dogger

Well-known member
Vendor Member

Equipment
Kubota B2650 and lots of other equipment
Feb 24, 2019
1,604
1,463
113
North Dakota
I like your stops to position it and your whole design. I have a dolly But I am using some wood blocking as I didn't get back to making the steel locating and rests yet. I had a large piece of channel iron I made mine out of which was my motorcycle turn table. I could drive my Kawasaki Vulcan 1500 in on it and then pull 1 pin and rotate it so I could drive out next time. I had used some 700# castors from Surplus center so the 4 of them are heavy enough for the backhoe. Sold the bike a couple years ago and wife sold hers and we bought a really nice low mileage 2006 Miata. It makes grocery shopping this time of year fun.

Bill
Great engineering, nice build and awesome writeup! IMO that's the most thought-out & HD dolly setup I've seen! (y) Very well done!:)
Thanks for the nice compliments, gentlemen!! It does work quite well. It definitely is a little overkill on the materials......but the square tubing was leftovers from a previous project I did for someone else.......so this seemed like a good use for it.

You can definitely push/pull on it anywhere to roll it around and it's rock solid on the framework. No worries of anything collapsing. All four wheels are full rotation castors.

One day, I'll surprise everyone with a pic of it finished and painted.

David
 

Runs With Scissors

Well-known member

Equipment
L2501 TLB , Grappel, Brush Hog, Box Blade, Ballast box, Forks, Tiller, PH digger
Jan 25, 2023
2,445
2,820
113
Michigan
Still to be finished and painted, here’s my backhoe dolly for the BH77 used behind my B2650. It’s been in the unfinished “prototype” version waiting for any changes for a number of years. No changes needed so now I just need to finish some welds and finally get it painted…. one day.

But with some recent questions about backhoe dollies….thought I’d post these pics now…..maybe they’ll be of interest to someone.

It's made from 2”x2” sq. tubing for the long sides atop 2”x3” rectangular tubing for the end cross pieces and heavy duty wheel supports.
View attachment 104901

With the BH77 mounted on the tractor the dolly slides underneath until the vertical guide posts butt up against the hoe’s metal framework as shown in the pics. I had to notch out the top of the dolly's front support/rest for clearance when sliding it under the main framework of the backhoe. I think I’ll cut that center section out completely when finishing the welds for final painting. But for now it works great as is.
View attachment 104902 View attachment 104903 View attachment 104906

With the hoe unpinned, clear of the tractor, and ready to be lowered onto the dolly…..the guideposts help keep things centered and lined up for lowering the hoe down and onto the main support tubes.

The dolly’s bucket end is made to support the main boom's framework with the bucket resting against the angle iron cross piece as shown.
View attachment 104907

With the main support at the right height, the hoe sits at the right angle to be rolled up to the tractor and slip into the backhoe's lower mounting arms. Using the hoe's hydraulics, it’s rotated up into position to pin the top bracket locations in place. At rest on the dolly, there is no pressure or weight on any of the cylinders. A ratchet strap across the raised outriggers prevents them from sagging as well.
View attachment 104910

I added a middle support cross piece (1” sq tubing) to prevent the hoe from sagging downward with any slow hydraulic fluid leakage. (You can see this white sq. tube in the first pic for a better overall view).
View attachment 104908

Once the backhoe is mounted with the outriggers down for support…..the boom/bucket is raised up off the dolly allowing it to be slid out from underneath.

Up next in a couple of years....maybe: "I finally finished and painted my backhoe dolly!!" :ROFLMAO:
Thats a very nice and well thought out design, cudos to you sir.

I also like those "stops" that you integrated in, that was a great idea.

It's interesting that it appears the 'main body ' (dunno what it's called) sits at an angle; Does that help with alignment or something?
 

rc51stierhoff

Well-known member

Equipment
B2650, MX6000, Ford 8N, (BX sold)
Sep 13, 2021
2,565
3,093
113
Ohio
Still to be finished and painted, here’s my backhoe dolly for the BH77 used behind my B2650. It’s been in the unfinished “prototype” version waiting for any changes for a number of years. No changes needed so now I just need to finish some welds and finally get it painted…. one day.

But with some recent questions about backhoe dollies….thought I’d post these pics now…..maybe they’ll be of interest to someone.

It's made from 2”x2” sq. tubing for the long sides atop 2”x3” rectangular tubing for the end cross pieces and heavy duty wheel supports.
View attachment 104901

With the BH77 mounted on the tractor the dolly slides underneath until the vertical guide posts butt up against the hoe’s metal framework as shown in the pics. I had to notch out the top of the dolly's front support/rest for clearance when sliding it under the main framework of the backhoe. I think I’ll cut that center section out completely when finishing the welds for final painting. But for now it works great as is.
View attachment 104902 View attachment 104903 View attachment 104906

With the hoe unpinned, clear of the tractor, and ready to be lowered onto the dolly…..the guideposts help keep things centered and lined up for lowering the hoe down and onto the main support tubes.

The dolly’s bucket end is made to support the main boom's framework with the bucket resting against the angle iron cross piece as shown.
View attachment 104907

With the main support at the right height, the hoe sits at the right angle to be rolled up to the tractor and slip into the backhoe's lower mounting arms. Using the hoe's hydraulics, it’s rotated up into position to pin the top bracket locations in place. At rest on the dolly, there is no pressure or weight on any of the cylinders. A ratchet strap across the raised outriggers prevents them from sagging as well.
View attachment 104910

I added a middle support cross piece (1” sq tubing) to prevent the hoe from sagging downward with any slow hydraulic fluid leakage. (You can see this white sq. tube in the first pic for a better overall view).
View attachment 104908

Once the backhoe is mounted with the outriggers down for support…..the boom/bucket is raised up off the dolly allowing it to be slid out from underneath.

Up next in a couple of years....maybe: "I finally finished and painted my backhoe dolly!!" :ROFLMAO:
Great job. It looks very functional. I’d like something like that for the BH92…it takes up a lot of real estate in the shop once disconnected and sagged. ☕
 

bird dogger

Well-known member
Vendor Member

Equipment
Kubota B2650 and lots of other equipment
Feb 24, 2019
1,604
1,463
113
North Dakota
Thats a very nice and well thought out design, cudos to you sir.

I also like those "stops" that you integrated in, that was a great idea.

It's interesting that it appears the 'main body ' (dunno what it's called) sits at an angle; Does that help with alignment or something?
Thanks for the compliments. The design came from just wanting to keep things simple once the base with the wheels was put together.

Bucket end: let's rest it on the boom framework and not on the bucket.

Main body: At rest on the dolly.....let's make it to be able to roll right up to the backhoe sub frame and be ready to pivot right into the mounting points with no messing around. I played with some wood blocks first to get it to sit at the right angle for that reason. Then made the steel tube support at that height.

Alignment posts: They were both a simple "stop" to let me know it's in position and a safety stop to then keep the backhoe from sliding rearward while on the dolly.

Bottom Middle Cross Brace: Kept the backhoe sitting at the right angle for easy mounting and prevented it from sagging on the dolly when parked. All the hydraulics are "at rest" while on the stand.

The design sort of evolved over a few days sitting in a chair beside the dolly's frame with the backhoe parked over it. With lots of....."would it work if I did this?"........"then how would I prevent that?" After a few beers the plan starts to come together. :ROFLMAO:

It probably could have been made a little shorter in length. But as is, I can use the hydraulics to push on the boom to pivot it up into place to insert the mounting pins.....without the use of the outriggers.

David
 

bird dogger

Well-known member
Vendor Member

Equipment
Kubota B2650 and lots of other equipment
Feb 24, 2019
1,604
1,463
113
North Dakota
Great job. It looks very functional. I’d like something like that for the BH92…it takes up a lot of real estate in the shop once disconnected and sagged. ☕
Thanks, rc51stierhoffs! It should work just as well for your BH92. It's certainly stout enough for the BH77.
Agreed, they do take up valuable floor space while off the tractor! At least this way they can be rolled in a corner or tucked in anywhere until needed. It does take a little "tug" to start it rolling.....but easy to keep it going and steer it right onto its tractor subframe. The concrete floor sure is nice for using attachment dollies.
David
 
  • Like
Reactions: 1 user

rc51stierhoff

Well-known member

Equipment
B2650, MX6000, Ford 8N, (BX sold)
Sep 13, 2021
2,565
3,093
113
Ohio
Thanks, rc51stierhoffs! It should work just as well for your BH92. It's certainly stout enough for the BH77.
Agreed, they do take up valuable floor space while off the tractor! At least this way they can be rolled in a corner or tucked in anywhere until needed. It does take a little "tug" to start it rolling.....but easy to keep it going and steer it right onto its tractor subframe. The concrete floor sure is nice for using attachment dollies.
David
I have not decided to use dollies or a pallet type construction and a pallet jack…at the rate I buy implements, I need to do something soon.
 
  • Like
Reactions: 1 user