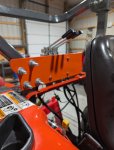
I installed 3 rear remotes on my 2017 L3301 with help from TheOldHokie. I ordered top and tilt cylinders from Fit-Rite, and bought a set of sectional valves from Dan. I decided to mount the valves behind the seat, using the ROPS to support the outside end. I used one of the blind nuts that was used for the original toolbox to support the inner end, and didn't have to drill anything on the tractor to mount the valves. As you'll see in the photos that follow, I still have to bend the valve levers to the right, so that they can be more easily reached from the seat.
The mounting plate was a piece of 1/2" plate steel roughly 15" by 6". A bit more substantial than would really be needed, but it was what I had available. I cut the right side to match the ROPS tubing. Drilled 4 holes for the square U bolts with a mag drill, and welded on a small piece of angle iron to line up with the leftmost blind nut on the crossbar. I did a trial fit of the sectional valve and then drilled 3 holes to mount it, again with the mag drill. 2 coats of primer followed by Kubota orange paint and it was done.
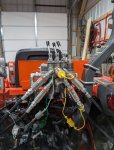
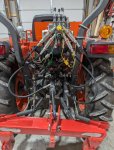
My plan from the beginning was to mount the couplers directly to the sectional valve, saving 4 sets of hoses and fittings and hopefully removing multiple places where leaks could occur. Since the sections were too close together to allow the couplers to mount with straight fittings, I used 90 degree fittings. The center section uses straight fittings. The outer 2 valves have float positions, the center one does not.
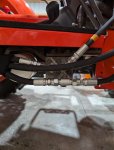
I made 4 hoses to connect to the tractor hydraulic system. One went from the loader valve PB output to the sectional valve input, another went from the sectional valve PB output back to the manifold. I used a tee on the manifold at the tank return line and made 2 hoses, one from the sectional valve and the second from the loader valve. That wrapped up the hydraulic plumbing.
The hoses that came with the Fit-Rite cylinders were a little longer than needed, but they don't pinch with 3pt hitch movement so there's no reason to shorten them.
The hoses are connected to the valve such that the right valve controls the tilt, when the lever is down the cylinder extends, when it is up the cylinder retracts. The left valve controls the top link, when it is down the cylinder extends, and when it is up the cylinder retracts. They work smoothly and no binding of the hoses.
I topped up the hydraulic fluid after operating the cylinders through their full travel about a dozen times to purge the air from the system. So far, no leaks.
Hopefully the photos will show you how it was done, except bending the valve levers which I haven't yet finished. I'll answer questions as best I can.
I knew literally nothing about hydraulics and did a lot of reading and asking questions before I leapt into this project. Including the cylinders, sectional valve, and hoses/fittings, I'm about $1700 into the project.
The mounting plate was a piece of 1/2" plate steel roughly 15" by 6". A bit more substantial than would really be needed, but it was what I had available. I cut the right side to match the ROPS tubing. Drilled 4 holes for the square U bolts with a mag drill, and welded on a small piece of angle iron to line up with the leftmost blind nut on the crossbar. I did a trial fit of the sectional valve and then drilled 3 holes to mount it, again with the mag drill. 2 coats of primer followed by Kubota orange paint and it was done.
My plan from the beginning was to mount the couplers directly to the sectional valve, saving 4 sets of hoses and fittings and hopefully removing multiple places where leaks could occur. Since the sections were too close together to allow the couplers to mount with straight fittings, I used 90 degree fittings. The center section uses straight fittings. The outer 2 valves have float positions, the center one does not.
I made 4 hoses to connect to the tractor hydraulic system. One went from the loader valve PB output to the sectional valve input, another went from the sectional valve PB output back to the manifold. I used a tee on the manifold at the tank return line and made 2 hoses, one from the sectional valve and the second from the loader valve. That wrapped up the hydraulic plumbing.
The hoses that came with the Fit-Rite cylinders were a little longer than needed, but they don't pinch with 3pt hitch movement so there's no reason to shorten them.
The hoses are connected to the valve such that the right valve controls the tilt, when the lever is down the cylinder extends, when it is up the cylinder retracts. The left valve controls the top link, when it is down the cylinder extends, and when it is up the cylinder retracts. They work smoothly and no binding of the hoses.
I topped up the hydraulic fluid after operating the cylinders through their full travel about a dozen times to purge the air from the system. So far, no leaks.
Hopefully the photos will show you how it was done, except bending the valve levers which I haven't yet finished. I'll answer questions as best I can.
I knew literally nothing about hydraulics and did a lot of reading and asking questions before I leapt into this project. Including the cylinders, sectional valve, and hoses/fittings, I'm about $1700 into the project.
Attachments
-
 284.3 KB Views: 20
 -
 419.3 KB Views: 20
 -
 333.2 KB Views: 22
 -
 646.6 KB Views: 19
Last edited:
