As an emergency vehicle upfitter by trade, it comes naturally that I wanted electrical power just because I can! I do plan to use it to run lights from the headlights (not OEM!) and flood lights on the ROPS. Warning lights will also be added as I'll use it to clear snow on the street as the county plow doesn't always come around often. I jumped into this project starting with this compact alternator, figuring out things as I progress.
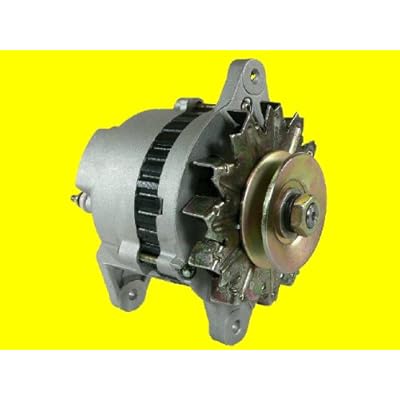
The alternator that I bought is a Hitachi model #14231. It's a 3-wire, 35 amp compact unit, cheap at $65 and sized appropriately. As shown:

Realizing later into the project that I'd need a double pulley, what I SHOULD have gotten is this (more shaft space):
Originally, I was going to mount it on the left side of the tractor to take advantage of a single belt setup but it was too tight and it pressed on the crankshaft vent hose. The right side offered ample room but can't use a single belt setup. With a little research and some thought, I decided to take the dual belt route.
The alternator required a double pulley with a 15mm bore, which I was only able to locate one from a machinist in Canada. It was made for RX7 Mazda aftermarket owners. A very nice fellow, he even machined it to keep the bore depth to a minimum as it was quite shallow. It just fits with no room to spare. If I had a shop press, I would have taken the alternator fan piece and flattened the dome that formed part of the pulley to give me some more shaft space. Sure, I could have gotten the other alternator but I already drilled out the lower mounting studs to 3/8" to fit the alternator snugly on the welded tube that I had lying around. (This is why I posted so you'll know what alternator to get!)
The alternator/fan required another pulley so I took it apart to explore my options and saw that it was a simple alternator/fan combination. No water pump as I thought it had. I carefully took out the alternator coils & wiring and saved it. The three wires at the other end were labeled & isolated on the tractor. The option of returning it to stock remains. Taking it out reduces the friction as the pulley now spins freely. I wanted to find a pulley that was the same width as the belt but couldn't find one that day (I'm impatient sometimes) so I went with one that was slightly wider because I was still in the experimental stage and this would do. I took it to a machinist to bore it out to 20mm so it would fit right behind the fan mount. The pulley had a set screw to secure it to the fan mount but it was already very secure once I had it all assembled. Went on beautifully.
Rest of the job required fabricating the two brackets. The slotted piece was from eBay when I was looking for a similar type of bracket to weld to the 1" angle. The best choice bracket was ironically, made for another Kubota tractor. http://www.ebay.com/itm/170949584872?ssPageName=STRK:MEWNX:IT&_trksid=p3984.m1497.l2649

The other bracket was bent from 1/4" thick stock I had and bent it to shape. It didn't take long.


Fitting process: Notice the clamp holding the slotted bracket to the 1" angle.

Pieces painted & assembled.


Close-up of the fan pulley:

Next step, I have a 3/4" round aluminum blank that will be drilled out & placed between the fan shaft and the fan itself to provide clearance. Longer bolts were already purchased. When that's done, I'll finish wiring it up using the 3-wire method by wiring the field to the ignition switch as opposed to the 1-wire method. This would enable the alternator to start charging & sensing the voltage level AWAY from the alternator and it will compensate with the voltage drop rather than the jumper method which is always a bad idea.
Until then, I'll update when the conversion is complete.
The alternator that I bought is a Hitachi model #14231. It's a 3-wire, 35 amp compact unit, cheap at $65 and sized appropriately. As shown:
Realizing later into the project that I'd need a double pulley, what I SHOULD have gotten is this (more shaft space):
Originally, I was going to mount it on the left side of the tractor to take advantage of a single belt setup but it was too tight and it pressed on the crankshaft vent hose. The right side offered ample room but can't use a single belt setup. With a little research and some thought, I decided to take the dual belt route.
The alternator required a double pulley with a 15mm bore, which I was only able to locate one from a machinist in Canada. It was made for RX7 Mazda aftermarket owners. A very nice fellow, he even machined it to keep the bore depth to a minimum as it was quite shallow. It just fits with no room to spare. If I had a shop press, I would have taken the alternator fan piece and flattened the dome that formed part of the pulley to give me some more shaft space. Sure, I could have gotten the other alternator but I already drilled out the lower mounting studs to 3/8" to fit the alternator snugly on the welded tube that I had lying around. (This is why I posted so you'll know what alternator to get!)
The alternator/fan required another pulley so I took it apart to explore my options and saw that it was a simple alternator/fan combination. No water pump as I thought it had. I carefully took out the alternator coils & wiring and saved it. The three wires at the other end were labeled & isolated on the tractor. The option of returning it to stock remains. Taking it out reduces the friction as the pulley now spins freely. I wanted to find a pulley that was the same width as the belt but couldn't find one that day (I'm impatient sometimes) so I went with one that was slightly wider because I was still in the experimental stage and this would do. I took it to a machinist to bore it out to 20mm so it would fit right behind the fan mount. The pulley had a set screw to secure it to the fan mount but it was already very secure once I had it all assembled. Went on beautifully.
Rest of the job required fabricating the two brackets. The slotted piece was from eBay when I was looking for a similar type of bracket to weld to the 1" angle. The best choice bracket was ironically, made for another Kubota tractor. http://www.ebay.com/itm/170949584872?ssPageName=STRK:MEWNX:IT&_trksid=p3984.m1497.l2649
The other bracket was bent from 1/4" thick stock I had and bent it to shape. It didn't take long.
Fitting process: Notice the clamp holding the slotted bracket to the 1" angle.
Pieces painted & assembled.
Close-up of the fan pulley:
Next step, I have a 3/4" round aluminum blank that will be drilled out & placed between the fan shaft and the fan itself to provide clearance. Longer bolts were already purchased. When that's done, I'll finish wiring it up using the 3-wire method by wiring the field to the ignition switch as opposed to the 1-wire method. This would enable the alternator to start charging & sensing the voltage level AWAY from the alternator and it will compensate with the voltage drop rather than the jumper method which is always a bad idea.
Until then, I'll update when the conversion is complete.
")