L3130 - suspected crankshaft damage - how to remove engine

jiggseob

Member

Equipment
B6200 HST with Allied loader, Muratori 48" hyd side shift tiller
Nov 12, 2023
33
24
8
Round Hill, Alberta, Canada
Weld-and-Grind, a shop in Edmonton ballparks $2500 to build-up one journal then grind down all the journals.

All-State Ag Parts shows what I need on their site, but a phone call and conversation with Jeff finds that my crank is not in-stock, no core on-hand to refurbish, so a strike-out there.

Dealer is $5k+ for crank and rod and this and that...

So still searching for replacement parts. May take my crank to grinder and tell/pay him to chuck it into his grinder and take that journal down the 0.4mm (16 thou) that is the max undersize journal for which oversize bearing shells are available. There is a CHANCE that grinding down the two increments of undersize on that journal will clean up. In the experience of the crank grinding shop, of the three previous Kubota cranks in his experience, two did not clean up. From my description of "deformations I can catch a fingernail on" he doubts mine will clean up. May pay him to try... what have I got to lose other than a few hundred bucks...

Seller on E-Bay (from china) is ~ $1000 canadian pesos to my door for crank, shells, thrust bearing, gasket set, con-rod, and seal bushings. Seems tempting.

Still checking hither and thither.

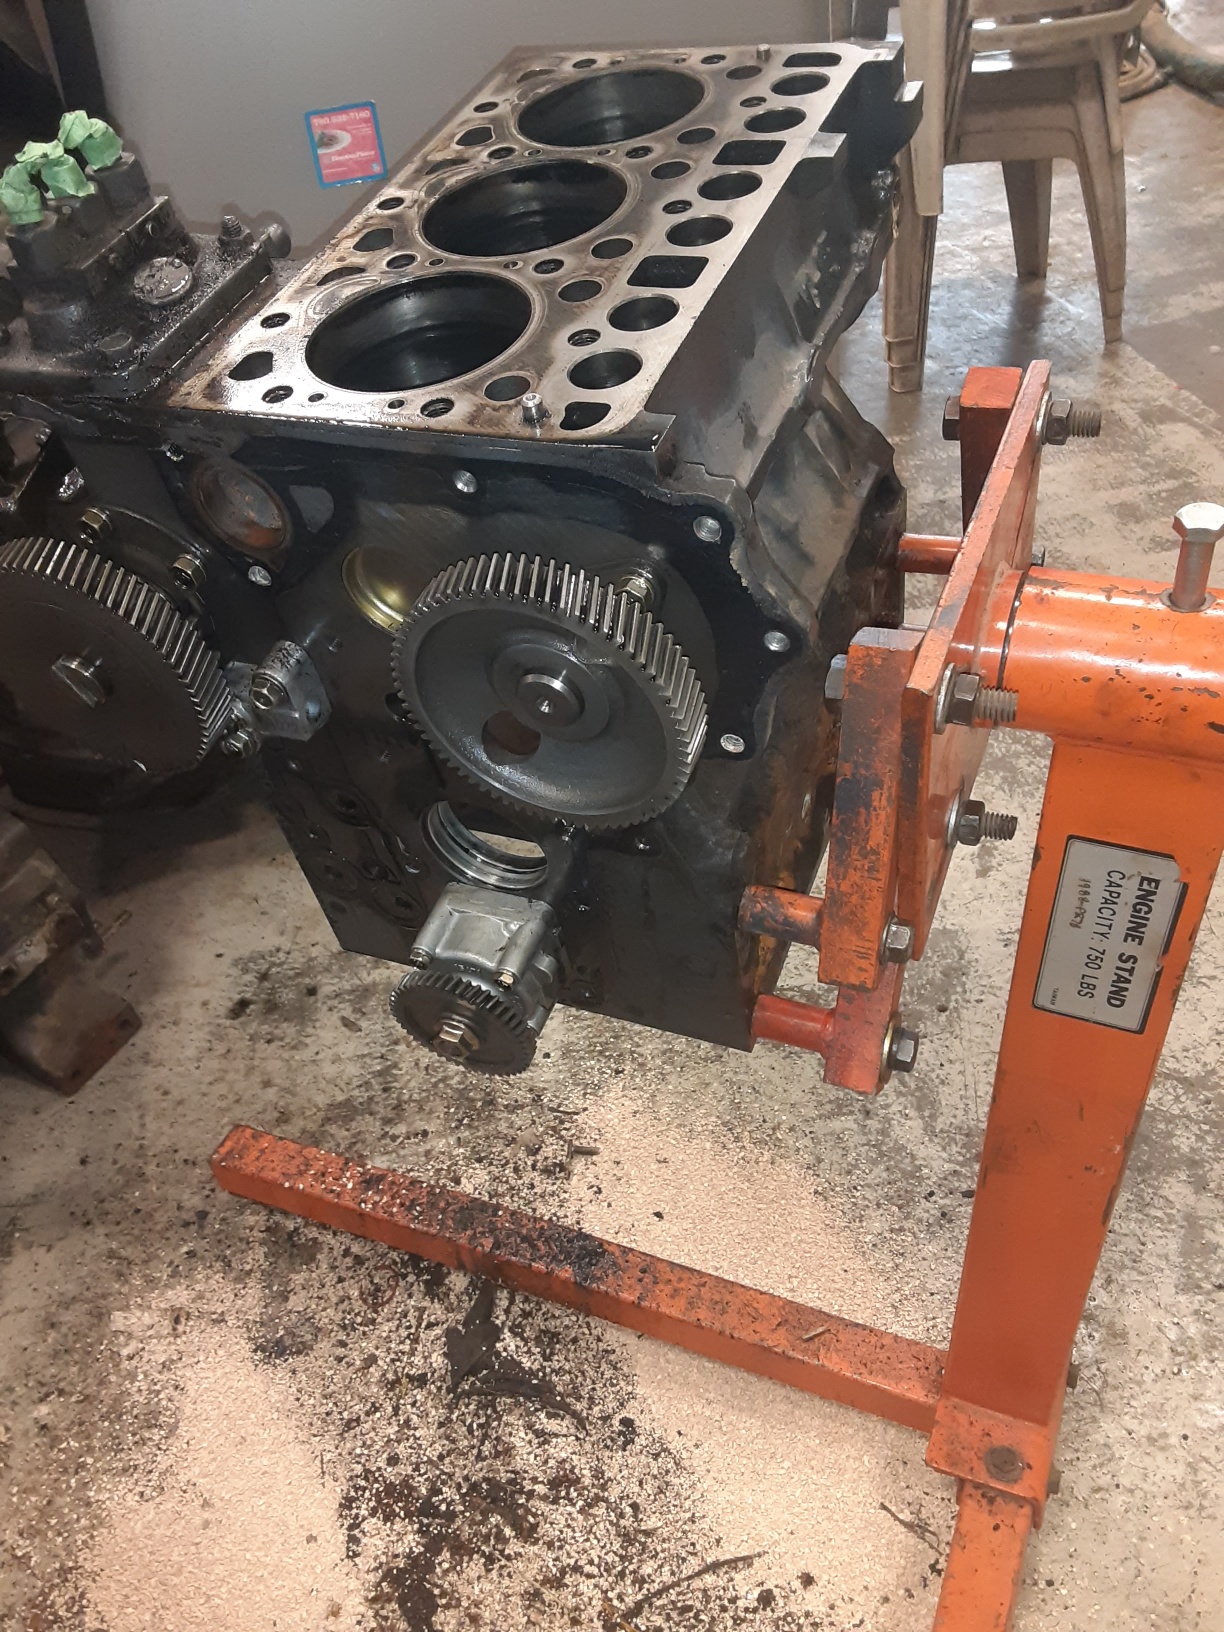
After I hoisted the engine out of frame I mounted the bellhousing end of the engine to an engine work stand. The same way I always do when working an engine. Doesn't work so well on this one. The crankshaft and main bearing carriers load from the flywheel end of the block, and the engine stand mount blocks that access. So I dismounted the engine from stand and manually tipped it over and over to disassemble head and oilpan and crank and stuff. Then I got the brain-wave to mount the engine stand bracket to the SIDE of the engine block, using the frame-mount bolt holes. Mucha betta.

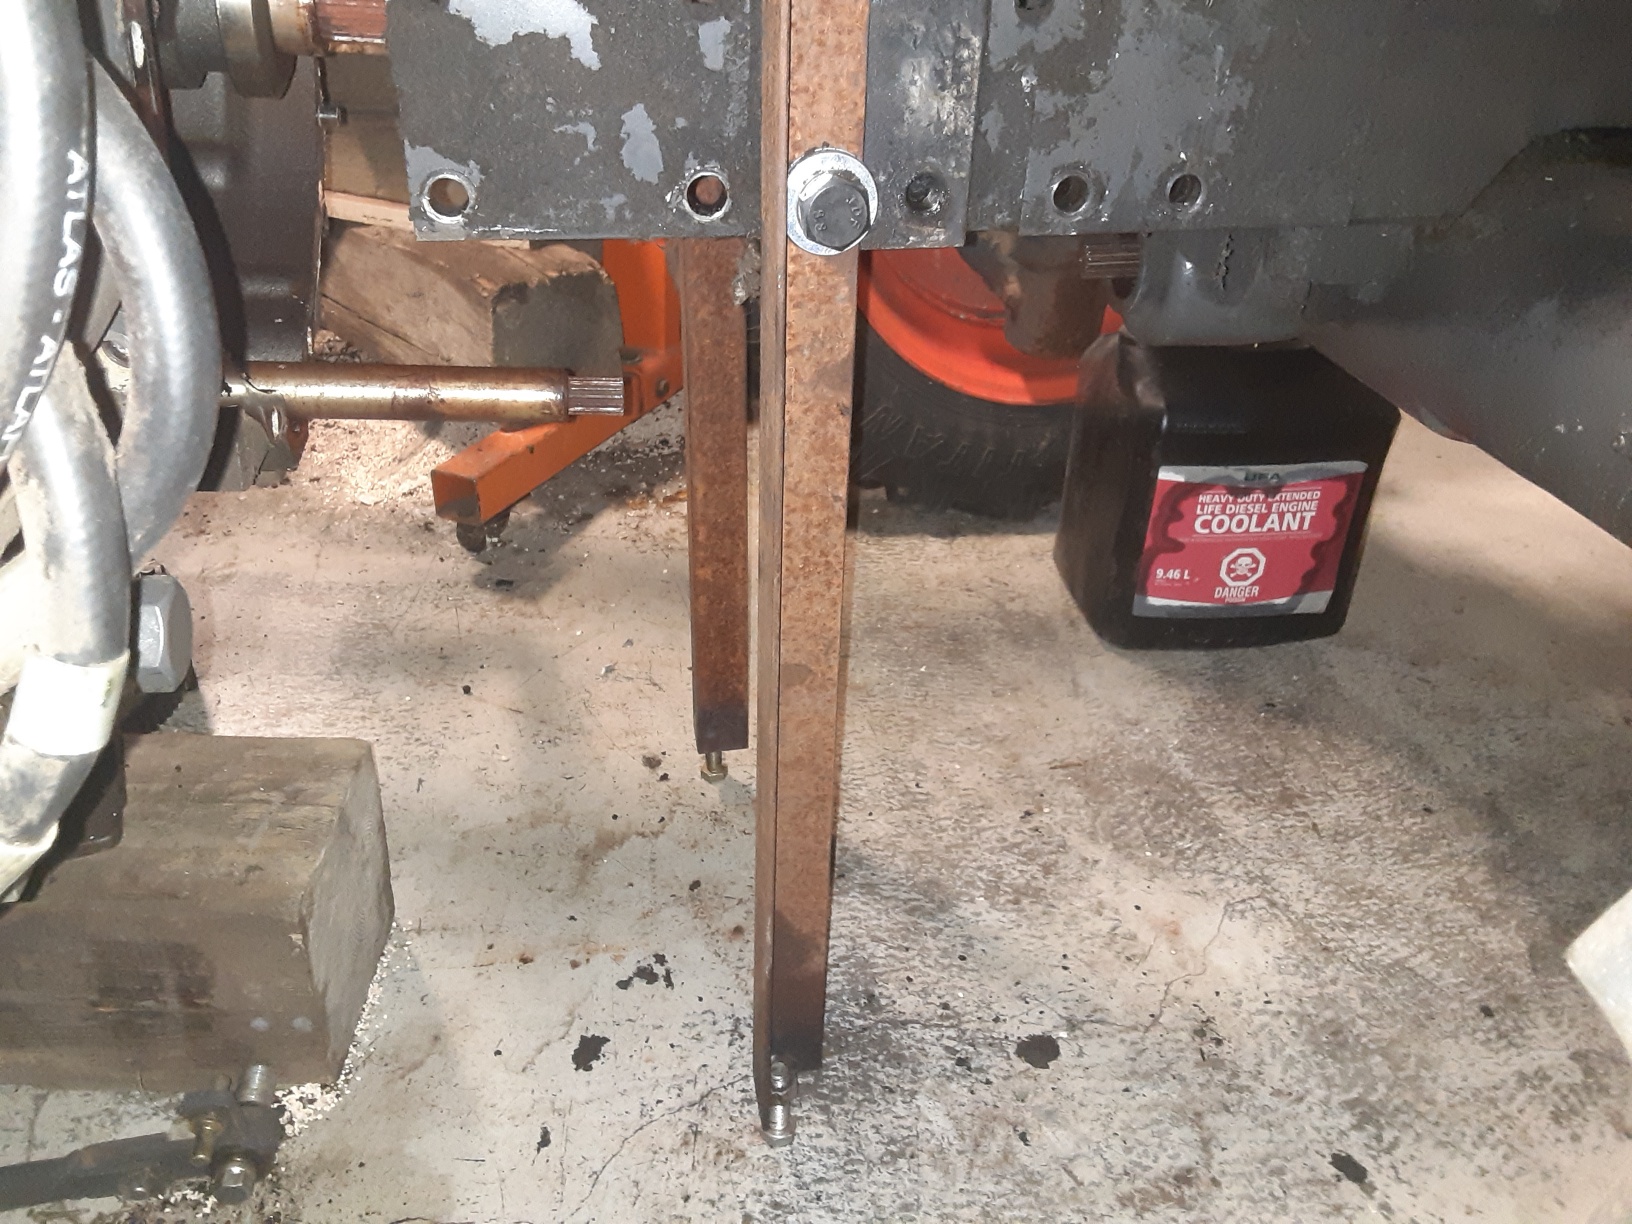
Also a pic of my home-made frame stands that hold the front-half up while splitting. Yes, just rusty scrappy angle iron from the "pile" behind the shop, nothing fancy. Note the "adjustment" bolts on the bottoms that will slide along on the floor. Now that the engine is out, the whole front assembly is unstable and wants to flip over, so theres a similar stand on the nose of the frame to keep whats left of the front half from flipping over.
engine on stand.jpg
Frame Stands.jpg
 

lugbolt

Well-known member

Equipment
ZG127S-54
Oct 15, 2015
4,890
1,622
113
Mid, South, USA
The dash assembly comes right off, easy. Then you can get to everything, easily. Going back together in the reverse of the manner you disassembled is going to be a pain in the neck.

In other words you did it the hard way. Been through it.
 

jiggseob

Member

Equipment
B6200 HST with Allied loader, Muratori 48" hyd side shift tiller
Nov 12, 2023
33
24
8
Round Hill, Alberta, Canada
Update...

Took the crank to Camrose Engine Rebuilders, the local shop that has been grinding cranks and building engines since the 1960's. Greg quick-looked at the crank, still concerned that the damage to the #1 crankpin journal is deeper than 16 thou. His crank grinding technician looked at it, suspects that the roughness is actually not gouges in the crankpin journal, but deposition of the babbit onto the journal as the bearing melted down and piled up. A few minutes with some crocus-cloth, and most of the roughness shined off. He thinks he could "polish" the journal and be really close to the minimum diameter for standard size.

Which he does not recommend. The main and rod bearings and journals will have experienced some wear as the engine ran dry before the #1 rod bearing piled up hard. So getting new standard size shells and then assembling it and finding the oil clearance at or beyond the wear limit is time and work and cost. He recommends grinding to first 0.2mm (8thou) under, and obtaining oversize shells, and putting it together at the lower end of the service limit.

So that is how we are proceeding, jobber main and rod shells 8 thou over, and grind the crank 8 thou under.

Dye-checked the head, no cracks found that way, paying close attention to between the valves.

Full gasket set and a replacement con-rod. Plus plus plus.

More later. For now, I have to go to Perth, WA for a month, fleeing glacier encrusted Alberta Canada does not break my heart...
 
  • Like
Reactions: 1 users

Nicksacco

Well-known member

Equipment
Kubota L35 TLB
Sep 15, 2021
587
330
63
Bahama, NC
This sounds logical since I believe the goal here is to make all journals effectively the same at .2mm under.
This would (I think) eliminate any differences between rotating parts of the piston rods and ends of the crank and thus eliminate any potential wobble.
Is that how y'all see it?
 

jiggseob

Member

Equipment
B6200 HST with Allied loader, Muratori 48" hyd side shift tiller
Nov 12, 2023
33
24
8
Round Hill, Alberta, Canada
Update.... back from Perth... 46C (114F) there for a couple days.

Crank - main journals and crank-pins all ground 0.4mm under. Crank installed, main bearings all plastigage 0.002" oil clearance. Main bearing 1 bushing and journal micrometer measured to also have that 0.002" oil clearance. After crank installed, dial indicator on nose of crank confirms 0.002" of play for oil clearance.

Pistons installed, rod-bearings 0.002" of oil clearance.

Rod bearing plastigage.jpg


I commend the quality accurate work of Camrose Engine Rebuilders in grinding and polishing that crank.

Head dye-checked and magna-fluxed for cracks, none found.

Proceeding with further assembly.
 
  • Like
  • Love
Reactions: 2 users

jiggseob

Member

Equipment
B6200 HST with Allied loader, Muratori 48" hyd side shift tiller
Nov 12, 2023
33
24
8
Round Hill, Alberta, Canada
Another update... injection pump stuck. The #3 plunger is not returning the same as the #1 and #2. And the rod that links the three barrels together should slide fore and aft with very little effort. The governor, linked through a quite small spring, pushes on that pin to move the rod - fuel delivery rack - and move the three barrels to vary fuel. That fuel delivery rack is pushed towards the front by a spring-pin that adjusts the rack position, and pushed to the rear by a spring inside the stop solenoid that pushes the rack to the rear to turn off the fuel. I can move that rack back and forth, but only with prying with a small bar, so much force that its close to bending or breaking that little pin. I think that fuel delivery rack should move fore and aft with a few ounces of push either way.

And the #3 plunger does not seem to be returning the same as the #1 and #2. I think some fossilized diesel fuel has turned from lubricant to adhesive.

I have dropped this pump unit off at the local injection shop, he thinks about 5 hrs labour to disassemble, clean and re-assemble. If replacement plunger(s) / barrel(s) is required, about $100 per plunger/barrel set.
Injection pump stuck.jpg
 

jiggseob

Member

Equipment
B6200 HST with Allied loader, Muratori 48" hyd side shift tiller
Nov 12, 2023
33
24
8
Round Hill, Alberta, Canada
It runs!!! Got injection pump back from injection pump shop, $605 to dissolve the fossilized diesel fuel from one plunger and three delivery valves. That little pin indicated above does indeed move left and right with very little effort.

Put it all back together, bled the fuel, and it started right up. Oil pressure light went out while cranking. Seems to idle nicely. Only ran for 15 seconds, looking frantically everywhere for oil-puking from anywhere it shouldn't. Did not see any oil leaks. Turned key off, and stop solenoid actually shut the thing down.

Reason I only ran 15 seconds is that I did not put coolant in. Tomorrow fill with coolant, hopefully the coolant stays where coolant belongs and oil stays where oil belongs. Then run it to temperature, and speed up / down a bit and see what happens.

I've drained and refilled transmission/hydraulic oil, and changed both filters.

See what needs fixing next.
 
  • Like
  • Love
Reactions: 7 users

jiggseob

Member

Equipment
B6200 HST with Allied loader, Muratori 48" hyd side shift tiller
Nov 12, 2023
33
24
8
Round Hill, Alberta, Canada
Filled with new ethylene glycol today. Ran it at various speeds today, for about ten minutes. No leaking, no puking of fluids, temp guage came up a couple notches from bottom, but not to middle of range.

Battery light is on, indicating what is probably an alternator fault. Checked connections. Checked the 50-amp alternator fuse, that passes multi-meter current. Any thoughts? New alternator?

Still have to change oil in front diff...
 

fried1765

Well-known member

Equipment
Kubota L48 TLB, Ford 1920 FEL, Ford 8N, SCAG Liberty Z, Gravely Pro.
Nov 14, 2019
6,908
4,340
113
Eastham, Ma
Filled with new ethylene glycol today. Ran it at various speeds today, for about ten minutes. No leaking, no puking of fluids, temp guage came up a couple notches from bottom, but not to middle of range.

Battery light is on, indicating what is probably an alternator fault. Checked connections. Checked the 50-amp alternator fuse, that passes multi-meter current. Any thoughts? New alternator?

Still have to change oil in front diff...
Get free alternator test first.
 

Jim L.

Active member
Jun 18, 2014
820
93
28
Texas
It's alive! Congratulations on your work.

Agree that free alternator test is the thing to do. Also, many times it is corrosion or loose connections that are the real problem. Battery cables (plus and minus) can be corroded from the inside if the crimp terminals have let moisture in.
 

JimDeL

Active member
Lifetime Member

Equipment
BX2380; R4 tires; 54" MMM; FEL w Pirahna bar; Ballast Box; BXpanded skid plate.
Aug 31, 2022
233
233
43
Austintown, Ohio
It's alive! Congratulations on your work.

Agree that free alternator test is the thing to do. Also, many times it is corrosion or loose connections that are the real problem. Battery cables (plus and minus) can be corroded from the inside if the crimp terminals have let moisture in.
Make sure to check BOTH ENDS of the cables. The negative connection to the frame/engine block is often the problem.
 
  • Like
Reactions: 1 users

jiggseob

Member

Equipment
B6200 HST with Allied loader, Muratori 48" hyd side shift tiller
Nov 12, 2023
33
24
8
Round Hill, Alberta, Canada
Still test-running a few minutes at a time in the shop, it moves back-and-forth, don't have the loader on yet but the 3pt hitch goes up and down and the steering works. So hydraulics and HST are functioning.

A bit of a re-cap. About $2000 canadian pesos all in making the engine run again. Crank grinding to 0.4mm under. 0.4mm oversize bearings; mains from Kubota and rod bearings from crank grinding shop. Gasket set and rods from Ebay - china - had rods checked for size, length, hardness by engine shop, perfectly to spec.

About $2000 in other stuff, a front tire, brake adjuster rods, loader cylinder repair, 2 pails and a gallon of HST oil, hydraulic filter, HST fllter, clean fossilized diesel from inside injection pump.

The clock shows some 6200 hours. This unit was purchased new by the old fellow previous owner. I found the hydraulic suction filter to be painted Kubota chassis dark-blue-grey. No one makes filters that color. The factory mostly assembles the tractor, then paints it all that dark-blue-grey. So this filter, which should be changed every 500 hours had some 6200 hours on it. Its now changed.

The front diff had a half quart of some watery rusty liquid that kind of resembled oil in it. I've flushed and refilled with 80-w90 EP synthetic. The right side lower king-pin plug leaks - drip drip drip... Looks like I will redo oil in the front diff, run it for a few hours, then drain the 80-w90 hoping that oil has picked up most of the rust and crud. Replace the king-pin plug with a new one. Then refill with 80-w90.

Run extra carefully and extra watchfully for the first hours, looking for whatever other surprises the previous owner left for me. The previous owner did not leave me a list of things needing tending-to. So its watch and fix...

The rear tires, 12.4 x 24 ag tread, have lots of sun and weather cracks. Should I replace soon, or run for a while and see what happens? Has anyone changed 12.4x24 at home? Only air in them - no fluid ballast, and at this point tubeless, I was thinking that I would find some cash-and-carry replacements and do the swap at home. Any thoughts?

Thanks, Mathew Banack
 
  • Like
Reactions: 1 user

jiggseob

Member

Equipment
B6200 HST with Allied loader, Muratori 48" hyd side shift tiller
Nov 12, 2023
33
24
8
Round Hill, Alberta, Canada
I find that the oil leak from the right front king-pin area is from the rotating seal of the "knuckle" that turns when turning left or right. Looks like that seal is leaking, running down the outside of the casting, and dripping off the bottom of the casting looking like its coming from the bottom plug. So I have some work to do in the right-side knuckle.

Yesterday when I was moving tractor back and forth, I was only pressing the HST toe-and-heel rocker a tiny amount, just creeping very very slowly. Things seem normal.

Today, I put together all the loader mount parts and pieces, put the hood on, and checked over a bunch of stuff.

Cleared all the miscellaneous crap from around the tractor to move it around the shop. Now I find that when I push the HST toe-and-heel rocker more than a tiny bit, then engine shuts off. Some safety thing shuts the engine off. Checked seat switch, seems to be down, checked pto, in off position. What causes the engine to shut off when I move the HST toe-and-heel rocker off neutral?

I just thunk of something... is it possible that the brake pedal lock switch thinks I have the brake locked on and kills the engine when I move the HST toe-and-heel rocker away from center? In replacing the seized rusted broken brake adjuster rods and adjusting the brakes, I did lock the brake on. Maybe there is a switch on the brake lock that shuts the engine down when I have the brakes locked on and try to drive the tractor. Looking that up now....
 
Last edited:

Nicksacco

Well-known member

Equipment
Kubota L35 TLB
Sep 15, 2021
587
330
63
Bahama, NC
I looked up the L3130 on Messicks website and found the electrical system and switches


I'm thinking it's a switch also. If you can isolate the switch (disconnect from harness) when testing you'll probably get better test results.

Your machine's wiring is very different from mine, however it could be a switch that is part of the brake lock. My tractor will let me drive with the brake lock on.

Switches like part ( T1060-43900 ) are omron leaf switches and although pretty good, can get damaged, leak and not work properly. Of course that can happen to any switch.

Let us know what you find - I hope I'm on the right track
 
Last edited:

jiggseob

Member

Equipment
B6200 HST with Allied loader, Muratori 48" hyd side shift tiller
Nov 12, 2023
33
24
8
Round Hill, Alberta, Canada
I find the Messick's parts-looker-upper is very useful. And their parts pricing is pretty darn good, but when I checked into their shipping to Canada, the price-advantage fell away. But that does not diminish how useful and informative their parts-lookup is. I use the "print PDF" icon on the upper right to print off the diagram and list to have in my greasey fingers out in the shop.

The tractor engine shutting off definitely behaves like a switch, when running and I move the HST toe-and-heel rocker more than that smidgen fore or aft, and the engine cuts out, I can hear the loud click of the fuel solenoid, and when I quickly move the rocker back to neutral the fuel solenoid clicks again and the engine resumes running. If it was some sort of hard hydraulic lock-down, I would not hear the clicks of the fuel solenoid.

I'm looking at the circuit diagram in the WSM. That is one area where my skills are not strong. For me, circuit diagrams seem to be written in Rihannsu, the written language of the Romulans on Star Trek. For me, there is better success to be had by printing off the diagram, and then identifying, locating and unplugging the switches one at a time.
 

Nicksacco

Well-known member

Equipment
Kubota L35 TLB
Sep 15, 2021
587
330
63
Bahama, NC
Hmmm, sure does.
I wouldn't worry too much about the drawing now. I think your plan of first finding the switches and testing is good enough.

One thing though to check is a loose or frayed wire around the hst pedal and/ or linkage. Might be something like that rather than a switch. Goodluck
 

North Idaho Wolfman

Moderator
Staff member
Lifetime Member

Equipment
L3450DT-GST, Woods FEL, B7100 HSD, FEL, 60" SB, 743 Bobcat with V2203, and more
Jun 9, 2013
29,038
5,356
113
Sandpoint, ID
Mid PTO switch, Main PTO switch, Seat switch, HST and OPC.
Check all of those switches, and check the 5 amp OPC fuse.
You can disconnect the stop solenoid to keep it running to move it around.